Shop Products
Houzz Logo Print
violet_z6

Transplanting? Here's How!

Violet_Z6
17 years ago

Tips to use for optimum results in transplanting - assuming your destination soil is prepared and ready to go:

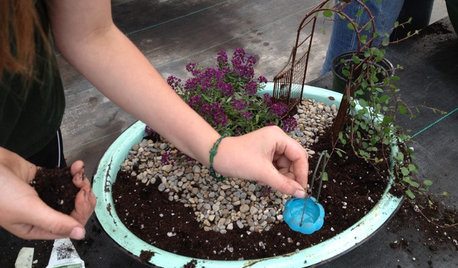
1) Prepare your destination location. Dig the destination holes. Make sure it is nutrient rich with up to 50% compost from multiple sources per square foot and ready to go.

2) Make sure the plant is hydrated. If in a container, submerge the container in a bucket or tub of water and hold it down until all air bubbles are out. Then leave it there for 20 minutes so it can take a good, long drink. Do not soak overnight. You'll smother your plant if you do that. Please do not keep roots underwater overnight. More plants die from too much water than from dehydration. Plants recover better from dehydration than from the roots being deprived of oxygen. Keep in mind that roots need equal parts water, oxygen, and nutrients.

If in the ground, water well a good 2-4 hours before moving.

Want to make it even better? Fill the bucket of water early in the day in a sunny area so it can warm up resulting in sun warmed water.

3) Move plants in the evening when the sun is less direct. Don't disturb plants until you are ready to transplant in the new location. Get them transplanted before dark and they will have one whole night to relax and adjust to their new home before dealing with light. Never let roots sit in sun or wind.

4) Move plants when it is not windy. Sun and wind are hard on roots, if even for a few minutes so avoid it if at all possible.

5) Transplant before a rain.This is the most recommended and has the highest success rate. Especially if it's going to rain the next day and you can plant the evening before. Try it... you'll see.

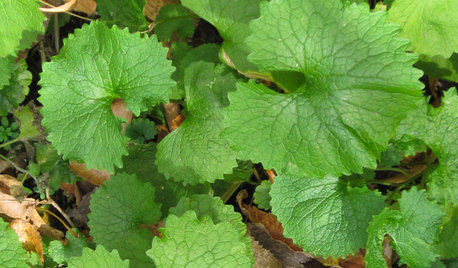
6) Dig around the plant at least as wide as the edges of the outer leaves and depending on the size of the plant, 6-8 inches down - less if the plant is smaller, more if the plant is larger. If the plant is a small shrub like rosemary, dig around the plant a few inches further then the outer edges of the leaves. You can quickly determine where the majority of the root system is and what is best to dig out.

7) Be Gentle. Never handle young plants only by the stem (you wouldn't want someone picking you up only by your neck), always support the base (for seedlings you may handle by the leaves). Keep as much of the soil around the root in tact as possible. In addition to the root system you can see with your eye, there is an entire system you can not see called mycorrhizas which are anatomically intimate associations between fine (feeder) roots of plants and some special soil borne fungi. If you disturb the soil around the roots, you disturb this delicate system.

If it is root-bound, then you'll have to gently loosen the roots so they don't continue to strangle themselves.

8) Once you get your plant where you want it, fill in with soil, and water it in (again, best with sun warmed water) so the surrounding area is moistened.

That's it! You're done and you can feel confident you gave your transplant the best chance of a stress free change you could possibly do.

Your plants will reward you because they've received the best TLC they could get from their caretaker.

Extra Details:


Do not soak overnight. You'll smother your plant if you do that. Please do not keep roots underwater overnight. More plants die from too much water than from dehydration. Plants recover better from dehydration than from the roots being deprived of oxygen. Keep in mind that roots need equal parts water, oxygen, and nutrients.

The above tips were given assuming your soil is "ready" meaning you've had your soil test and made any necessary amendments. I do not recommend fertilizing at the time of transplant (WHAT?!). "Many gardeners make the mistake of over-fertilizing. This practice can lead to nutrient deficiencies because of nutrients binding to the excess elements. Restoring nutrient balance after applying too much fertilizer is nearly impossible in the short run."

Many people think they have to add fertilizer and many learn the hard way that a little fertilizer goes a long way. If your soil is rich in nutrients with things like compost, you do not need to use additional fertilizer. Too much fertilizer on a regular basis can render your soil sterile of beneficial organisms, and as you discovered, burn your plants. Think of how much impact a tiny little pill for a human can make. No matter what fertilizer you use if you feel you must use any, always use half the dosage "recommended" on the package. Even less for seedlings. Consider that Mother Nature has been successfully planting plenty of things without humans coming along and fertilizing them.

1) Get your soil tested by a lab. This is the only way to be 100% sure. Don't guess. You actually save time, money, and work by only adding what you need. Check with your state's Extension Service.. They'll tell you what you need to do to get it tested. It's usually only $6.00 -$12.00 (mine was $9.00) which is what home kits cost but don't tell you nearly as much as a lab can tell you. Then you won't be guessing as to what state your soil is in or wasting money on amendments you don't need. They'll tell you exactly how much of what elements you need to add to your soil per square foot (if any). Stick with compost and natural sources of organic matter instead of fertilizers which can render your soil sterile in the long run. If you have more soil questions, browse the Soil Compost Mulch Forum Is there another way? Yes, raised beds or container gardening where you add the growing medium used in #5 below.

2) Incorporate real organic matter and shredded newspaper (not just compost) into your soil. Worms love it. If you don't have worms in your soil, the worms don't like your soil and the plants won't like it either.

3) Read about Building Fertile Soil.

4) Read about Fertilizing a vegetable garden, not so you can apply more, but so you're informed on the topic. A little goes a long way. Most experienced gardeners will dilute any fertilizer to half of the recommended strength if they use it at all.

5) Eliminate the use of anything but compost made from a variety of organic materials. Lay off the fertilizer - you don't need it if you have enough compost. If you don't believe me, look here.

Then look here: 1, 2, 3, 4, 5

So when I say "I do not recommend fertilizing at the time of transplant." This means get informed. Read the info provided at the links above and prep your soil well before you ever plant anything, then you won't need to fertilize. If you do - be *sure* you are not guessing or adding because it makes you feel better. If you had your soil tested, made the proper adjustments, and added plenty of compost made from multiple sources, then research the specific needs of the plant you are putting in to see if it prefers anything specific. And never add chemical fertilizers, stick to things like diluted solutions of fish emulsion, liquid kelp, compost tea, etc.

Comments (17)

  • blanesgarden
    17 years ago
    last modified: 9 years ago

    Violet, dear, just curious, and Im sure I speak for many here at the Vegy forum....but are you writing a book? Or shall I ask Have you written a book? Now dont take me the wrong way, Im just asking a simple polite question, And by no means you dont have to answer me, but I (we) were just wondering if Ya got a book out there somewhere on the Market. Well....Ya know? If Ya did...me, Myself I would like to go and read it. It could be in my local Mall or at Wally world? Well anyway let us know, and Good gardenin to Ya!

  • Violet_Z6
    Original Author
    17 years ago
    last modified: 9 years ago

    blanesgarden,

    Funny, I've been told that before. Lol... no, nothing planned. So far you can only check out any advice I might have to share here at the Vegetable Forums of GardenWeb. Hopefully the thoughts help a few people along the way...

    ;)

  • melanie-germany
    17 years ago
    last modified: 9 years ago

    Hi violet,
    I think I remember you putting this up last year too...I am glad that you put it up again though because it seems that everything that I learned last year either doesn't apply to this years "mood" (weather) or I've completely forgotten it...so to you...THANK YOU...you have saved my garden (from me).

    melanie

  • aka_peggy
    17 years ago
    last modified: 9 years ago

    Excellent information Violet!

    Blane, Violet IS a writer. She's been a long time contributor to gardenweb for many years. She's written or contributed to many of the FAQ's here. She's shared her knowledge and has proven herself to be an encyclopedia of info...or "yellow pages" for gardeners everywhere... Do a search on her name to see her contibutions.

    She makes no small talk...just states the facts as she knows them.

  • blanesgarden
    17 years ago
    last modified: 9 years ago

    yea ....I know....

  • clockwork
    17 years ago
    last modified: 9 years ago

    Man...if she's just making all that up, there are going to be 100's of miserable gardeners out there. Myself included.

    ;)

  • Violet_Z6
    Original Author
    16 years ago
    last modified: 9 years ago

    Me too clockwork. But I'm much less miserable now with these techniques.

    ;)

    More:

    As long as it's warm enough, you can transplant directly ASAP. The smaller they are the better because the sooner they'll get established in your garden, the longer they have to get settled in their permanent home. And the healthier and happier they will be so long as you have prepped the soil properly with lots of compost.

    As for hardening off transplants, the easiest way to do it is to leave them against the east side of the house before you leave for work and bring them out three feet every day until they are far enough away that they are in full sun all day. At the stage you explain you can probably leave them 9-12 feet out from the house.

    You can be creative, it doesn't have to be a house, can be a tree, bush, etc.

    The reason most seedlings need to be "hardened off" is because they have been grown indoors without exposure to temperature fluctuation, full sun, wind, rain, etc.

    Tiny seedlings (far smaller than 1-2 inch, more like 1/4 - 1/2 of an inch) do not need to be hardened off because they haven't learned to be weak in the first place. I'm talkin' teeeeeeny tiny! Best not to use inches though since there is such a wide variation. The best time is when the cotyledon leaves have developed - so even before the first true leaf stage.

    {{gwi:45257}}{{gwi:45258}}{{gwi:45259}}{{gwi:45260}}{{gwi:45261}}{{gwi:45262}}{{gwi:45263}}{{gwi:45264}}{{gwi:45265}}{{gwi:45267}}{{gwi:45269}}{{gwi:45270}}

    In less than a week they'll look like this:

    {{gwi:45271}}{{gwi:45272}}{{gwi:45273}}{{gwi:45274}}

    And in about two weeks like this:
    {{gwi:45275}}

    Keep in mind that I did say above that this is ok ***only if temperatures are within the accepted outdoor range for that variety of plant***. Protection from critters can be as simple as a toilet paper roll cut in half.

    If you want to try your own experiment, try planting a bunch of seeds of whatever you want to plant. Try planting some out as mentioned above, and then allow some to continue to grow indoors and then harden them off, see which do better. The key is to not plant them outside of their temperature range. If you can't help it, start some more seeds later and plant them out as soon as they emerge or even better, direct sow.

    The problem is that many people get spring fever and start seeds indoors too early for that variety in their area. They think they're getting a head start and in some cases they really are if they're caring for them properly. But in other cases, the seedlings are weak and leggy and stressed to begin with. Hardening off helps but the plant is stunted due to stress. If you plant the same seeds at the proper time, you'll likely find that they will grow faster, healthier, larger and produce a higher yield than the seedlings grown indoors weeks before.

    If you're going to determing planting out, it is more accurate to measure soil temperature instead of day and night temps.

    Soil 40 degrees F: Plant endive, lettuce and pea seed.

    Soil 45 degrees F: Plant carrot, radish and spinach seed. Set out cabbage transplants, potato starts and onion sets.

    Soil 50 degrees F: Plant beet, parsley, parsnip and Swiss chard seed.

    Soil 60 degrees F: Plant snap bean, sweet corn, cucumber and turnip seed. Set out tomato seedlings.

    Soil 65 degrees F: Plant lima bean seed.

    Soil 70 degrees F: Plant okra, southern peas, squash, pumpkin and watermelon seed. Set out eggplant and pepper transplants.

    Soil 75 degrees F: Plant cantalope seed. Set out sweet potatoes.

    If you want to make your plants happy, collect rain water and warm it in the sun for a day. Give it to them to drink and make sure you have provided plenty of compost. If you did not incorporate it into your soil before planting, then put down a couple of inches worth of compost around your plantings. Don't walk on your soil and compact it or the roots won't be able to breathe as easily. Watch for signs of pests or disease.

  • jasonp
    16 years ago
    last modified: 9 years ago

    Violet I was wondering if you could tell me or show me how to seperate seedlings? Being my first year gardining I think I planeted a lil to heavy in my seedling containers.....(Strawberry Packages...) and I was wondering if you could help a newbie. thanks

    Jason

  • pnbrown
    16 years ago
    last modified: 9 years ago

    Yes, I've often had direct-seeded stuff catch up to or even pass the transplants. I don't have a greenhouse, so the only thing I start inside is tomatoes. I have good success with cold-frames, where I find seeds will germinate four to six weeks earlier than otherwise. If they are appropriate crops they will grow moderately well in a cold-frame. That trick of warming up water in the sun is very useful in the early spring. I make the cold-frame on a well-prepared bed so that when the weather gets fully settled I remove the glass entirely and leave some of the plants to grow on, so they were effectively direct-seeded.

    Hotbeds from manure are very effective; I've had salad crops in march. These sorts of mini-greenhouses are easy and cheap, and they avoid most of the pest problems that plague permanent greenhouses.

  • moosemac
    16 years ago
    last modified: 9 years ago

    Violet,
    Question re: soil temperature. At what time of day and at what depth should the temperature be taken?

    I've never planted by soil temperature; I've always planted by date and weather so I'm interested in trying a new technique.

    Thanks for the help.

  • Violet_Z6
    Original Author
    16 years ago
    last modified: 9 years ago

    Hi jasonp,

    The key to separation is to not sow/plant closely to begin with. A little patience in the beginning means a lot less work the next. If your strawberry plants are fruiting, I'd consider leaving them alone. Do a little research on variety to see if you need to be planting the runners later this season.

    If you feel you can separate, do so in evening shade on a non-windy day having not watered for a day or two. Be gentle. If the roots are really intertwined, you'll have to take a bundle, shake off soil, hold the base of the crowns and gently try to pull apart. If they are not so intertwined, try to keep as much of the existing soil around the roots as intact as possible.

    Plant they way you intend and water in preferably with sun warmed rain water.

    Hi moosemac,

    Soil temperature is relatively stable and constant. You want to measure to a depth equivalent to the roots of what your planting - usually 6 inches. They'll get longer and deeper later but the temps will rise as well. What you're concerned about is now. Take a thermometer with a long probe and insert it at an angle so that the bottom tip and the top of the thermometer are within those six inches. Leave it in for a minute or two... go check your other plants in the meantime, then check the temp.

    Another way to determine when to plant is to start a garden journal to document when your native plants (flowers, trees, etc) and weeds start blooming or coming out of the ground. This would be the best way to figure out what to plant when because nature is giving you the signals.

  • jasonp
    16 years ago
    last modified: 9 years ago

    I think I messed up I ment I planted the seeds in the strawberry packages. I have lemon, lime, and cinnamon Basil. Collard Greens, Swiss Chard and Cilantro seedlings you would probly do the samething right?

  • Violet_Z6
    Original Author
    16 years ago
    last modified: 9 years ago

    Right jasonp. But do so asap. The smaller the better, and you may as well transplant them to their final destinations. If you feel you need protection from pests that like seedslings, you can put "collars" around them from toilet paper rolls, cans, etc.

  • gonefishin
    16 years ago
    last modified: 9 years ago

    Short answer, perhaps. Since Eggplant is in the same family as Tomatoes, they are similar. I easily and successfully separate many small tomato plants every year after they have the first one or two sets of true leaves.

    Just take your trowel and dig up that clump getting as much of the roots as possible. Have the cups and potting soil that they are going into ready. Grasp the root ball with both hands and gently wiggle and pull till it separates. The roots are usually intertwined and there will be some damage no doubt, but not as much as one may think. Over 95% of the time my plants do not even wilt. I put them immediately into the cups with the potting soil, firm it around the roots and water them well.

    I think that you will be pleased with the result.
    Bill P.

  • Violet_Z6
    Original Author
    16 years ago
    last modified: 9 years ago

    Hey, gonefishin.... Think you meant to post that here.

    *wink*

  • utdeedee
    16 years ago
    last modified: 9 years ago

    Violet, Thanks for posting this info. about transplanting. I didn't know about ' If in a container, submerge the container in a bucket or tub of water and hold it down until all air bubbles are out. Then leave it there for 20 minutes so it can take a good, long drink.'
    That's great. Wish I had known this sooner. You have been and are very helpful.
    D.

  • paulster2626
    16 years ago
    last modified: 9 years ago

    Interesting - I have a problem with a couple of my pepper plants too close together. Now that they have peppers growing on them, is it too late to dig up both plants and separate them? They are VERY close together...

    I'm wondering this as the hot weather is really here now, and would like to get these things bigger!