


Will I ever finish these walls?
schoolhouse_gw
13 years ago
Sort by:Oldest
Comments (38)
Related Stories

DECORATING GUIDESThe Dumbest Decorating Decisions I’ve Ever Made
Caution: Do not try these at home
Full Story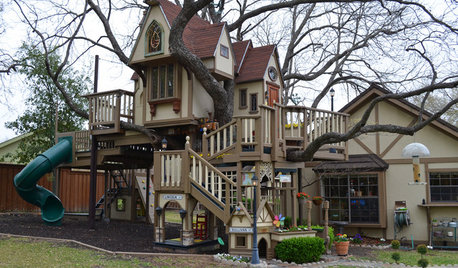
MOST POPULARThe Most Incredible Kids' Tree House You'll Ever See?
Duck your head to enter this unforgettable Dallas wonderwork, lovingly crafted with imaginative delights
Full Story
DECORATING GUIDES10 Design Tips Learned From the Worst Advice Ever
If these Houzzers’ tales don’t bolster the courage of your design convictions, nothing will
Full Story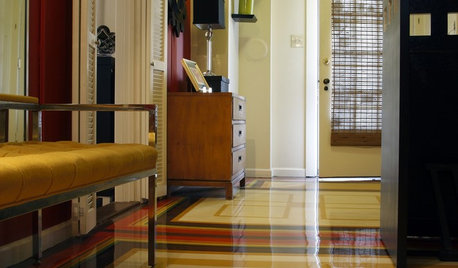
ENTRYWAYSRoom of the Day: The Most Flexible Foyer Ever
With zones for a bicycle, meditation and storage, and a hand-painted concrete floor, this entry mixes practicality and cool good looks
Full Story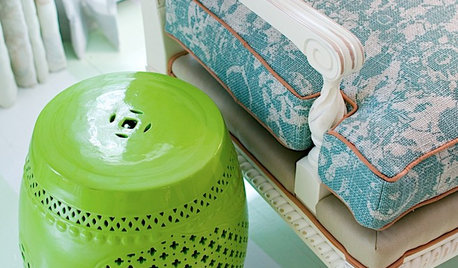
DECORATING GUIDESThe Most Helpful Furniture Piece You May Ever Own
Use it as a table, a seat, a display space, a footrest ... and indoors or out. Meet the ever-versatile Chinese garden stool
Full Story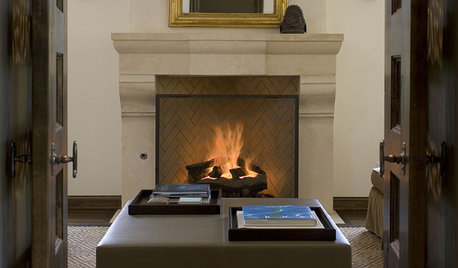
FIREPLACESRumford Fireplaces Are Hotter Than Ever
Higher efficiency and good looks are leading homeowners back to this 18th-century fireplace design
Full Story
ACCESSORIESFinish Your Look With a Fun Mix of Textiles
Why box yourself into a design corner when you can spread out ever-changing throws, rugs and even bags?
Full Story
WALL TREATMENTSPick the Right Paint Finish to Fit Your Style
The question of finish may be as crucial as color. See which of these 9 varieties suits your space — and budget
Full Story
KITCHEN DESIGNSingle-Wall Galley Kitchens Catch the 'I'
I-shape kitchen layouts take a streamlined, flexible approach and can be easy on the wallet too
Full Story
INSIDE HOUZZInside Houzz: Updates to the Houzz App for iPhone and iPad
With a redesign and new features, the Houzz app is better than ever
Full StorySponsored
thinman
schoolhouse_gwOriginal Author
Related Professionals
Eden Prairie Landscape Architects & Landscape Designers · Maple Valley Landscape Contractors · Burien Landscape Contractors · Columbine Landscape Contractors · Farmington Landscape Contractors · Forest Hills Landscape Contractors · Gaithersburg Landscape Contractors · Parker Landscape Contractors · Tuscaloosa Landscape Contractors · Goldenrod Landscape Contractors · Reno Roofing & Gutters · Woodstock Roofing & Gutters · Wichita Siding & Exteriors · Saratoga Springs Siding & Exteriors · Tustin Siding & Exteriorsthinman
schoolhouse_gwOriginal Author
schoolhouse_gwOriginal Author
aftermidnight Zone7b B.C. Canada
thinman
schoolhouse_gwOriginal Author
natal
mnwsgal
schoolhouse_gwOriginal Author
natal
schoolhouse_gwOriginal Author
lavender_lass
schoolhouse_gwOriginal Author
schoolhouse_gwOriginal Author
girlgroupgirl
aftermidnight Zone7b B.C. Canada
schoolhouse_gwOriginal Author
mnwsgal
schoolhouse_gwOriginal Author
aftermidnight Zone7b B.C. Canada
schoolhouse_gwOriginal Author
natal
mnwsgal
schoolhouse_gwOriginal Author
aftermidnight Zone7b B.C. Canada
schoolhouse_gwOriginal Author
natal
girlgroupgirl
schoolhouse_gwOriginal Author
schoolhouse_gwOriginal Author
schoolhouse_gwOriginal Author
mnwsgal
memo3
schoolhouse_gwOriginal Author
natal
schoolhouse_gwOriginal Author