


Starting DL seeds
I'm sure it's been asked numerous times and I apologize for asking again... :-)
What is the best way to start your seeds and when? Is it better to winter sow them or start them in cups under lights? If started in cups, do they need the 'baggie tents' over them? Do you water from the top or just sit them in water trays?
Any information is greatly appreciated!!
Em
Comments (69)

Julia WV (6b)
13 years agoNo it doesn't matter. Someone had once written that seeds will rehydrate and then sink to the bottom. I haven't seen that be the case as some of mine did and some didn't and they still germinated.

hostarookie
Original Author13 years agoI have white nubbies, I have white nubbies! :-) Three out of the five that I started with are showing little white radicles already. How long do they need to stay in the presoak before planting them up, or do you wait for the little nubbies to be a certain size/length?
Now that I know I have this method down, I'll start the other several hundred that I have. Actually, is it to early or do most people wait until a certain time to start? I guess some of it might be determined by space, lighting, etc?
Thanks for everyone's help!
Em
Related Professionals
Ashland Landscape Architects & Landscape Designers · Horsham Landscape Architects & Landscape Designers · Suffern Landscape Architects & Landscape Designers · Hartford Landscape Contractors · Arlington Landscape Contractors · North Richland Hills Landscape Contractors · Seminole Landscape Contractors · Suitland Landscape Contractors · Waipahu Landscape Contractors · Ansonia Landscape Contractors · Ashburn General Contractors · Belleville General Contractors · Plano General Contractors · Towson General Contractors · Winfield General Contractorsswontgirl_z5a
13 years agoPlant them as soon as you see the little white nubbies! The hard part is done- no use waiting any longer.
I put 2 -4 in a cup(depending on seed size, tets or dips). It is the root length they need more than the distance around. If that number hasn't germinated yet I use a toothpick stuck in the soil at the edge to mark where I put one seed until the cup is full. Then remove all the toothpicks and mark how many you put in that cup. I use tall styrofoam cups and write on them with a pen. The next year I write on a different side.
I have usually started by now but am waiting until after Christmas this year. With the cost of electricity I am waiting a bit longer. I am going to try to germinate as many at once as possible instead of stretching it out. I think they will do just as good.
Debbiehostarookie
Original Author13 years agoThanks Debbie! I'll get them planted up tonight... I started more in the presoak last night. This is addicting!
swontgirl_z5a
13 years agoI should add that if the white radicles have started to bend in one direction put that heading downwards as that is the direction the root will grow. The stem will grow up from it. It is really cool to see how daylily seeds grow. Maybe all seeds are like that but I think it's really neat!
Debbiehostarookie
Original Author13 years agoYet another question with the process... :-)
After planting the germinated seeds into cups, about how long does it take to see 'green?' Should they be watered when they're in the cups even before seeing green? Hopefully it's ok as I did place a little bit of water in the tray right after potting them up.
I'm very anxious, can ya tell?!?!
Em

Ed
13 years agodementieva,
I'm a member of the Lone Star Daylily Society. We meet the third Sunday of each month at the Alvin Senior Center in Alvin. If you come to the meeting this month, I'll be happy to give you a bunch of seeds, leftover from this years planting. You can check out our club at www.lonestardaylilysociety.org. Just let me know if you're coming.
Edswontgirl_z5a
13 years agoEm,
It can take a few days to a week to see green coming up. Sometimes longer.
If your seed starter mix was moist you shouldn't have to water the seeds for a while. They really don't need that much moisture until there is a plant there to use it. Less moisture is better than more.
Debbieozzysboy
13 years agoDebbie:
I hear ya on the electricity--fuel this year is ridiculous. But I did discover last year that the compact flourescents which are marked as 23 Watts with the same light output of a 100 Watt bulb WORK GREAT--grow lights were outrageously priced and had high energy consumption, esp the HID lights and LEDs were through the roof expensive, so I figured I'd try the cheaper lights which started really getting pushed last year. I picked up a large box of them from Home Depot as well as reflector dishes (each reflector was around $10 and the box of bulbs was around $20/30) and put them on 24/7 with my daylily seedlings last year. With 18 of them on full time, its about the same energy usage as having 4 and a half 100 Watt bulbs on continually. I also used some reflective insulation behind my racks of cups to further reflect light. No issues of vigor-- the seedlings were gigantic by spring time. I'm not sure of what the actual spectrum of light thrown by the bulbs is, but it didn't seem to be lacking...The light is BRIGHT! Seems to help with my SAD as well, so 2 birds, 1 stone hehehe. As an aside, I like the quality of the light enough to have replaced all the GE Reveal bulbs I had throughout the house for my own usage.
Hope that helps w/your energy bills.
-eric
carmen_grower_2007
13 years agoPossibly this was already mentioned. I no longer grow daylilies but had a fool proof way when I did for many decades.
I used quart sized zip-locks. Take a handful of damp potting mix (squeezed-out sponge damp) and put it in the bag. Add a bunch of seeds of one cross -- I would use as many as 50. Put the bags in a shoe box and set outdoors in March (Z5) out of the sun. Within 10 days they are sprouted and ready to plant a week or so after that right in the ground. No hardening off necessary.
hostarookie
Original Author13 years agoShould I be concerned if I'm not seeing green after about 2 weeks?
diggingde
13 years agoHR-I started some outdoors last April and had a few crosses take 10 wks to germinate.
maryneedssleep
13 years agoHostarookie,
They germinated (had white radicles) over 2 weeks ago, but you're still not seeing green? How deep did you plant them? (How deep SHOULD they be planted? I'm about to do this for the first time myself...)Are you using bottom heat?
I know that if I start tomatoes too early in my attached and semi-heated garage, even with grow lights, the underside of the leaves turns purple (indicating phosphorous deficiency due to cold temperatures preventing the roots from taking up phos). Not sure I had heat mats for all the trays then though.
Since the tomatoes had trouble in my garage, does that mean daylilies are likely to have trouble if I start them now? Do they show any obvious physical signs if they're too cold? If so, could I add bottom heat for part of the day even after seeing green, or would any bottom heat make them too spindly?
Thanks everybody...
Julia WV (6b)
13 years agoYou would plant your germinated seed the same depth as the size of the seed.
I use the end of a pencil to make the hole in the promix, then plant the germinated seed (radicle showing)sideways in the planting hole and then gently cover over the hole with promix. Some people plant with the radicle facing downward and still had green show.
I do use a heat mat to set my cups on until I see green showing (bottom heat). The baggies over the tops of the cups works similar to greenhouse effect. Once they show green, I then move the baggie and put them under the grow lights.
My understanding is that no light is needed until you see green coming up.
I thought I read somewhere that the optimum temperature for growing daylily seeds indoors is 60 -65 degrees F.Do a search here on the forum on seed starting and you'll get alot of information and tips. Some used the baggies and others didn't. Some used heat mats and others didn't.
Some presoak and others didn't.Good luck
Juliaswontgirl_z5a
13 years agoHi,
Any green yet Hostarookie?If you planted them deeper than the size of the seed it might take longer.
I started soaking my seeds on Jan 3 and the majority have already germinated. I think waiting longer is helping with my germintation. At least it seems to be going faster.I see no top growth yet though. My heating mat is only big enough to put the soaking seeds on. Once my styrofoam cups are full I take them down to the basement. I don't put baggies over them but watch to see that the soil doesn't dry out on the top at least until they get downstairs where it is much cooler.
Like Julia I lay the seed in the hole sideways. If the radicle has bent I put that facing downwards. This the root. The green stem actually grows upwards out of this root though when it gets big enough. If some of your roots were going the wrong way they might have had to correct themselves and that is what's taking so long? Just a thought.
Debbie.hostarookie
Original Author13 years agoStill no green... they are planted at seed size depth, however I didn't plant them on their sides. I put the radicles pointing down. I figured I would be seeing something by now though. :-(
I have others that have been soaking and are now ready to plant. This time I think I'll try them on their side.
Debbie, you said you don't use baggies over top of your cups. I thought it needed to be done to retain the moisture until you have green sprouts. Is that not the case?
swontgirl_z5a
13 years agoHi Hostarookie,
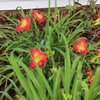
If you put the radicle at the bottom it will just take a while longer to see the green coming up. I would wait a bit yet. I have never used baggies. Seeds growing outside don't need more humidity to germinate. I guess it helps to keep the top of your soil moist but I keep a good eye on that. You can mist it if you like.I figure if the seed has already started to germinate before you plant it, it will keep growing in the soil. I know if your seedlings are still on heat mat the soil will dry out a lot faster. Baggies just seems like a hassle to me. Here is a photo of a seedling coming up.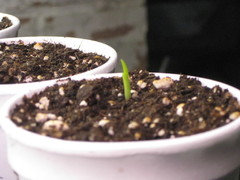
Here are a few more.
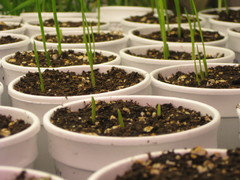
Debbie

jeanne
13 years agoHi Em,
If you look at a fully developed radicle closely you'll notice an octopus shape at the tip. That's the crown plate and it should lay flush with ground level. The roots will grow from the bottom and the radicle above the plate will split, that's where the first leaves emerge. I never plant the seeds, just lay them sideways with radicle pointed down like Debbie and Julie said.
I put a layer of sand over the promix to keep sawflies (which seem to ride in every year on the houseplants) away, make a depression in the sand with the eraser end of a pencil and place the seed right at ground level. I like to putter with my seedlings and I don't start very many (and I'm home all day) so instead of putting baggies over them I spoon feed them the water/hyrogen peroxide solution several times a day. Staying busy by the window makes the winter go by much quicker so it's a win-win for me.
HTH,
Jeanneswontgirl_z5a
13 years agoHey Jeanne,
That's really interesting. I don't know much about seed germination but have dug up enough daylily seeds to have seen how the leaves grow up out of what looks like the root.( and not from the other end of the seeds like I would have thought)
Do you wait until the radicle bends then before you plant it? I just figured if it hadn't bent it would figure out what was up and what was down on it's own after I planted it. If the radicle was planted heading up it would bend around and correct itself wouldn't it? It would just take a bit longer.
I started soaking my seeds last Monday and I have a few shoots starting to appear today. I love to just watch them and sometimes take a chair to the basement and sit. It makes me feel like spring is coming! I got some new sticky strips today and replaced all of my old ones. Haven't seen any fungus gnats but better to be prepared.And Em
another thing to watch out for is sometimes in the first couple of days after planting,instead of the root growing down into the soil the root will push the seed up out of the soil and you have to replant it. Maybe this doesn't happen with sand on the top like Jeanne does but it sure happens with my promix. It is so light. It is difficult to see the dark seed on top of the wet promix but look carefully to make sure they are all buried. I have already found some pushed up.
Hope yours are reaching for the sky soon.
Debbiejeanne
13 years agoHi Debbie,
I plant them when the tentacle like appendages are formed, 95% of the time the radicle is bent by then. If not, I just plant it the way it seems to get best contact with the soil. The sand doesn't prevent roots from occasionally growing upward, I grew one cross in which every seedling sent roots along the soil surface. The roots are well chamoflauged in the sand, I lost a couple of good seedlings before I noticed there was a problem and replanted them. Thanks for the reminder! :)
Jeanne
hostarookie
Original Author13 years agoJeanne - thanks for explaining it a little more for me! I planted a few more up the other day... I'll see if they sprout any faster. I haven't done anything with the first batch, I'm still waiting to see if anything happens. :-)
Debbie - are those new seedlings from the seeds you started soaking on the 3rd?? They look great!
I haven't started soaking anymore until I see that I can actually get them to grow inside. :-(
swontgirl_z5a
13 years agoHi Em, No those photos are from another year! But I do have quite a few little green shoots showing now. Yours are probably just deeper so will take a bit longer.
virgo45
13 years agoI have had a few seedlings pop up through the soil and was told it is because the soil is packed to tight and/or maybe not mosit enough. The new root cannot penetrate the soil and the rapid growth of the root forces the seedling upwards. I corrected the problem by loosening the soil with a pencil and replanted the seedling. It worked for me.
maryneedssleep
13 years agoThe strangest thing happened -- a packet of seeds that I ordered off LA (from a well-known hybridizer) arrived with 2 of the seeds already germinated. There was some condensation in the pack. So I put them in water right away and the radicles got longer! I planted them in 3 oz bathroom cups because that was all I had. I wasn't planning on starting seeds until Feb but here goes.
Yesterday I went out and bought peroxide so I can start the rest. For my small batch, I used 3/4 tsp peroxide per 1 cup water, to roughly match the ratio of 1 oz peroxide to 2 L water.
That way I don't have to store the peroxide mixture -- I'm not sure how long peroxide mixtures are stable outside of UV-protective brown plastic bottles, and I sure don't want anyone to drink it!Interestingly, Diane of Diane's Seeds says her experiments showed no difference between plain water and dilute peroxide solutions. (Link below is to her basic instructions)
Thanks everybody! Your advice on this thread will be very useful to many people for a long time.
Here is a link that might be useful: Starting Daylily Seeds (Diane's Daylilies)
maryneedssleep
13 years agoAfter I wrote that, it occurred to me that it had been a week since I looked over the seeds being stored in the fridge (dry in baggies). Wouldn't you know it, I found another germinated seed. That pack, which was from a different source, never had visible condensation, unlike those that germinated in the mail.
I'm sharing this story because someone else wrote above that germination in refrigerator conditions happens with maybe 1 out of 10,000 seeds -- but smaller scale operations aren't off the hook for checking for it, because it's sure disappointing to someone who only has about 40 seeds total!
It's probably too late for that seed, but I started soaking it along with the others in that baggie.
diggingde
13 years agoMy niece started 72 crosses in solo cups w/ promix on 12/18. She doesn't have grow lights or heating mats so they are on tables under skylights. All but 4 crosses germinated. Some of them are 12" and all have just 2 leaves. We were wondering if they can be trimmed back indoors before they become to spindly and fall over since they can't go outdoors until April. Some web references say yes and some say no. At the recommendation of a hybridizer she is going to experiment by trimming 6 cups of seedlings and see what happens.
Will report back.
virgo45
13 years agodigginde: Your seedlings are growing tall in a attempt to reach the sun light. The best solution would be to move them as close as possible to the light or provide additional lighting. The leaf of the plant manufactures food for the plant to live and grow. Cutting the leaves back will reduce the plants ability to produce food which will further weaken your seedlings and may cause them to die.
swontgirl_z5a
13 years agoHey Maryneedssleep,
I have had seeds sprouted in the mail when they got to me without any visible signs of moisture. I had a few of my own sprouted this year too before I planted them. Also a few moldy ones. I try to dry them as long as possible-certainly longer than the one or two days many sellers advertise. I would rather rehydrate them than have them go moldy. I am deciding though that moldy ones are maybe just not mature to start with.Diggingde,
I am starting my seedlings later this year to save electricity and so they won't be so tall. They are under plant lights which right now are about 2" above the soil. Mine have always shot up quite quickly but then slowed down at some point. The tall leaves get blown around quite a bit when I harden them off outside but seem to do fine when I plant them out. I know by then the roots are quite developed and this is what helps them after they get transplanted. Sometimes they start from the bottom(crown) again and the old leaves they grew inside, die off. This has never hurt them and many bloom the next summer. I have actually taken out a pair of scissors and cut all of the long straggled leaves off so they look neater. I have found earthworms pull the old leaves down holes in the ground and this confuses me as to where the actual plants are!
Your niece's do sound too tall from lack of light though and wouldn't have a good root system yet. I will be interested to see how the cut off ones do.Hey Em, Do you have any seedlings growing yet?
Debbie
hostarookie
Original Author13 years agoNotta! The last few that I potted up, I even put on their side, but still have nothing. :-(
I too received seed packets recently which had several seeds that had already germinated. Those I have soaking... I need to get them potted up, but I just haven't. lol
I'm starting to get very discouraged. lol I'm about ready to just winter sow them instead... cross my firgers and hope they make it. :-)
Em
jeanne
13 years agoThere's no huge rush to get them potted up as soon as they germinate. The link below shows germinated daylily seeds thriving on "the rocks", I don't usually let mine go on this long but as you can see they look quite happy.
I noticed there was three Forever Redeemed X Dance, Bojangles Dance sprouting this morning. So they are now on the rocks and I've officially started the first of many daylilies for 2011. Woohoo! :)
Here is a link that might be useful: Daylilies OTR - test #1
swontgirl_z5a
13 years agoWell Em, If I were you I would be carefully digging around in that soil to see what is going on. It can't hurt to try and dig a few up. I have dug down to some before and either find they are coming or the odd one has rotted.
DebbieJulia WV (6b)
13 years agohostarookie/Em
Lets see if we all can help figure out what may be happening with your seeds. Don't get discouraged, we've all been through it so maybe we can find some help.:-).
1. You got the seeds to germinate and saw the white nubbie/radicle when presoaking.
2. You planted your seeds in cups (?) with what type of seed starting mix? I went back through the posts but can't find what type of mix you are using to start your seeds in. Did you premoisten the mix before planting? The mix has to be slightly wet like a sponge which has been wrung out and not soggy. How are you planning to water your seedlings once the green leaf appears? Did you put holes in the cups or were planning on top watering with a spray bottle mist?
3. You planted the first batch on (date?)having the radicle pointing downward. About how deep? Are you using any bottom heat under the cups(?)? Are the tops of the cups covered to provide a greenhouse effect or just left open?If just leaving the tops open, are you then keeping the tops of the mixture slightly moistened so it doesn't dry out?
4. You planted a second batch of germinated seeds with the radicle pointing sideways on what date?
Perhaps some of these questions can help all of us on the forum help you NOT get discouraged but provide some help.
I've started my seeds on Jan.11. It has been slow going on some crosses to get them to germinate even for the first radicle to appear. Others, have started germinating within a couple of days but still lots of seeds of the same cross still need to germinate in the presoak. I noticed today that a cross I planted on Jan 14th with 3 in a cup has already one of the germinated seeds showing green at the top of the mix. I may not have planted it deep enough or this is a very vigorous cross.
Today, I got a cross from a seller and already I can see that 4 of the seeds germinated and the radicle is brown. So will toss those. The rest of the seeds don't look any better but will give it a try and see if presoaking will provide any germination. Disappointing but it happens.
If you need more seeds to experiment on, let me know. I have alot of seeds from ANGELS IN WAITING x UNKNOWN. The bees were busy when we went away in the summer and I had alot of bees pods on AIW. She is a very fertile daylily LOL.
Julia
hostarookie
Original Author13 years agoDebbie ~ I might try digging a little when I get home to see if I can determine anything.
Julia ~ I'll try to answer your questions, but I'm at work so I don't have all the dates and everything with me.
1. Seeds germinated and had little nubbies.
2. Seeds were planted in cups using MG potting mix (I believe), which was premoistened. This first batch I put holes in the cups to bottom water once growing.
3. I believe the first batch was planted around Dec. 22nd about the depth of the seed. This batch was covered and heated.
4. The second batch was planted around Dec. 9th on their side, same depth. This time I didn't do anything, no heat and not covered, to see if there was a difference.
I think I got all the questions answered. :-)
Julia WV (6b)
13 years agoI'm not familiar enough with MG potting mixes but is the one you used a seed starting mix or the premoistened potting mix?
Julia
rosemctier
13 years agowondering how your seeds are progressing. i am in an absolute dither about how to treat mine! too many options, too many things can go wrong, etc. i hope they came up for you!
flowergirl929
13 years agoI have been reading all the posts about starting daylily seed indoors. I have grown hundred of plants from seeds but not any daylilies. My question is are you soaking the seeds until they start to germinate? I must have missed that part of the story and am curious. I plan on starting some daylily seeds this year and am wondering if the soaking is like sweetpea seeds that sprout and then you just plant them. Sorry if this question has been covered already but I am new here. thanks
flowergirl929
13 years agoI am going to give this a try! The germination process always seems like such a miracle. I saved some seeds from last year and can experiment on them until I make some crosses this year. Just have to locate them in the frig
hostarookie
Original Author13 years agoI have green!! :-)
B-U-T (gotta have a but)
The ones that have 'green' are the last batch and I left them soaking longer. Most of them I could already see 'green' before potting them up. The original two batches never did anything...
I guess I'll just have to allow seeds to soak longer and have green before I pot them. :-) I had been busy lately and hadn't started anymore but last night I started soaking 10 more crosses. Fun, fun.
Em
swontgirl_z5a
13 years agoCongratulations Em. Glad you have something growing. I have never had green before I potted any seeds up. I would be careful letting them soak that long. On the rocks might be fine but soaking in water until the green is growing might cause them to rot. I guess we each just have to figure out what works for us.Did you dig any of the first batch up to see what happened?
Debbievirgo45
13 years agoDebbie: I agree with your comments on soaking in water until the green appears. The only reason you put them in water is to hydrate the seed to cause germination. As soon as the seedling cracks the shell it's germinated and needs the soil to grow properly. I check mine daily and plant them as soon as the seed shell cracks open. The seeds can survive a day or two in water, but there is no reason (maybe too busy)I can thing of to leave them there. The seedlings break through the soil in about three days after planting.
Julia WV (6b)
13 years agoI think I will try hostarookie's method and see what happens. I still have some seeds soaking and will pick one or two to test once they show the radicle. I haven't read previously of anyone allowing seeds to soak (unless using the on the rocks method) till the green appears but then again, maybe no one has done it before. Always new ideas to test.
Julia

mizellie
13 years agoI have tried the daylilies on the rocks method but mine were alway moldy! I now use the method that virgo45 uses and it works pretty good for me! Ellie
marricgardens
13 years agoI just wanted to say that I do not have grow lights. Instead I have a sunroom that gets a lot of light, especially after Christmas. This is my second year starting seeds and I have not yet had a problem. Right now I have about 50 seedlings, 3" tall and they are doing great. I'm hoping the rest will come. I just have to remember to keep turning them. Right now the afternoon sun is so strong that I have to put up some sheers to filter the sun because my geraniums are burning! In my opinion you don't necessarily need grow lights to grow daylilies. Marg
flowergirl929
13 years agoI got some seeds in the mail today and should have asked sooner what the peroxide actually does for the whole process. One of the seeds has a little white bump so does this mean that it's already growing and no soaking is necessary? Geez who know this would be so nerve wracking. I guess it's not like the $1.29 seeds a person buys at Farm & Fleet, if these get messed up you can't just go buy a new package. Thanks, Flowergirl
swontgirl_z5a
13 years agoFlowergirl,
The white bump on the end of the seed means it has germinated and you can plant it. Lay it sideways in the hole.
I use peroxide because it is a sanitizer. We use it in our dairy barn to sanitize our milk pipeline now instead of harsh chemicals. With the seeds I think it keeps the water from growing any bacteria. If you have excellent quality seeds and you change the water often you maybe don't need it. But I think it helps here so I use it. Sometimes one seed that maybe isn't quite mature can start to rot and cause problems with the whole bunch. Some people think the peroxide helps with the germination but i don't know about that.
I was soaking some seeds of shrubs that needed soaked and dried for 10 days before sowing. They grew quite slimy and dark looking. I soaked them in some peroxide and water and it took off the slime right away.flowergirl929
13 years agoswontgirl, thanks for the reply. Thought you might like to hear that I soaked my seeds that came in the mail right away. I soaked them for 3 days and then planted them. I marked the peat pots so I would know which was the one that was already growing and it came up pretty quickly. I call it the baby and we already have godparents for it! It is so adorable. The others are just starting to pop up. I only purchased 4 seeds and got 2 free so 6 isn't much to take care of. I have a bag full of misc. seeds from my daylilies last year and will just wait and plant them outside, not going to waste potting soil on them.


Julia WV (6b)