Shop Products
Houzz Logo Print
fignut

Chip Budding Process

fignut
16 years ago

All my Alma(supposedly Fig Mosaic Virus immune)cuttings rooted and grew like weeds. So I thought it would be interesting to use some of them to see what effect using Alma as a rootstock would have on FMV infected varieties budded to it.

The pictures show the chip budding procedure but were not necessarily in sequence, so ignore the dates. The best time to bud is when the plant is growing vigorously and will heal quickly.

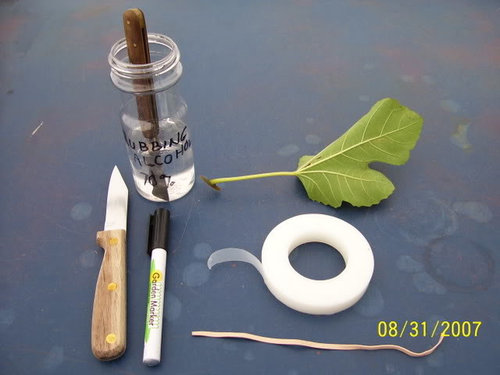
Equipment and bud with leaf still attached


1. Get a sharp, thin, short knife. There are budding knives available, but something like a paring knife or jack knife will do.

2. Have something to secure the bud. I use parafilm, which is made for budding. It breathes, stretches, and falls off on its own after a while. But a wide elastic band that has been snipped open to form an elastic strip will also work.

3. Disinfect the knife with 70% alcohol, or 10% chlorine bleach solution.

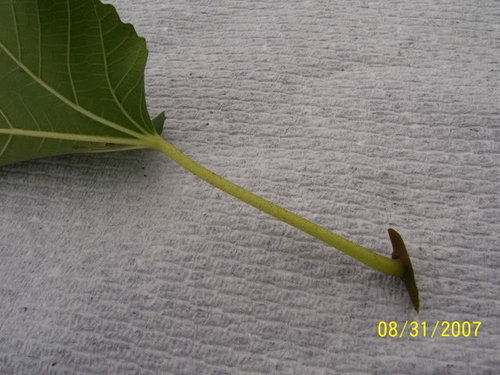
4. Choose a bud from your donor plant. You want a nice fat bud, preferably without a fig embryo. Starting a distance above the bud, carefully slice into the branch removing the bud and its attached leaf.


You donÂt have to make a deep cut  just deep enough to get under the bud. Remove the leaf leaving the stem to use as a handle.

Bayernfeige Violetta with chip removed

5. Choose a location on you rootstock fig for the bud "chip". Use the side or top of a branch or trunk. DonÂt use the bottom of a branch or let the chip face down toward the ground.

6. Using the leaf stalk as a handle, position the bud where you want it to grow on the rootstock fig. Push the blade of your knife deeply into the bark of the rootstock precisely above and below the bud chip. (I like to slice off a little on the bottom of the chip at this time as this will give exact contact - for some reason the cuts on the top usually match pretty well.) This will mark the exact size of the bud on the rootstock, and also keep you from over-cutting at the bottom. If you need more of a guide, you can mark either side of the chip with a marker.

7. Put the chip down and with your knife cut out and discard the piece of bark between the two cuts on the rootstock . It should be the same size as the bud chip. It can be a little tricky getting the width exactly right. Differences in branch diameters can result in width variations between the chip and the rootstock cutout. If the donor fig branch is thin the chip will be narrower than one from a thicker branch. To counter this, using the tip of the knife on the rootstock cutout will give a narrower width. And conversely using the base of the knife near the handle will give a wider chip. With a little practice youÂll get good size matches.

8. Wipe the cut surfaces on chip and rootstock cutout with a paper towel to remove any sap.

9. Take the parafilm (or other wrapping material) and hold it above the cut on the rootstock. With your other hand wrap a loop over this piece pinning it tight. Wrap again.

10. Position the top of the bud chip against the cut in the rootstock. Make sure there is contact bark to bark. Look at the rest of the chip to make sure there will be bark to bark contact on at least one side. Do NOT center it. For it to heal the green inner layers of the bark have to be touching.

11. Start wrapping as if bandaging an arm with an ace bandage, with enough pressure to stretch the elastic or parafilm slightly. When you've covered the bud chip you can put the end into the last loop and snug it tight, or just pull the parafilm tightly and it will adhere to itself.

12. Gently slice through the leaf stalk "handle" leaving a small stub. Do not try to remove the stalk completely - it will drop off by itself.

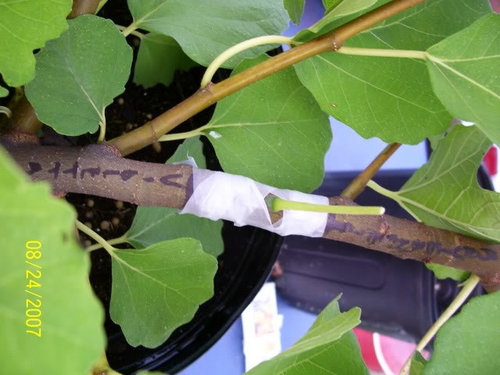
Two wrapped buds - one with "handle" still attached

13. Mark the bud well with a marker or paint. I've also put the name of the bud chip on the rootstock.

14. The bud might break on it's own once it's healed. Or it can be forced by cutting the branch above it or chipping out some bark below it. Don't be impatient, a bud put on now does not have to be forced until next year.

15. Put on a permanent, hard to miss marker of some sort. Painting the resulting branch and putting on a tag is a good idea. It is very easy to snip off your budded branch when pruning, if it isn't obviously marked. Grafting often leaves a scar that you can see for years after the procedure. Evidence of budding on the other hand, disappears very quickly.

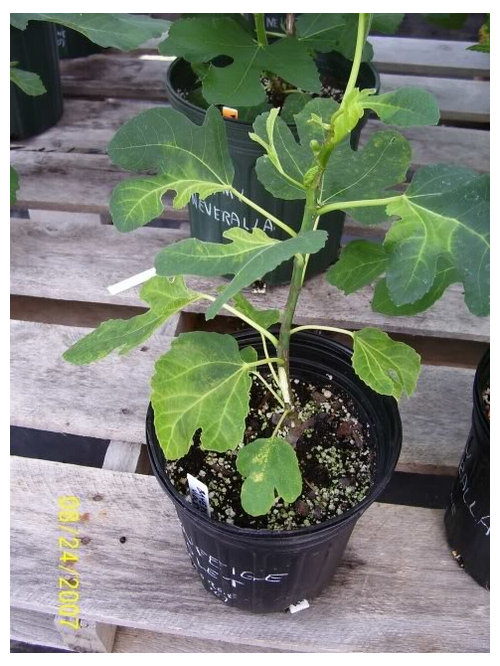
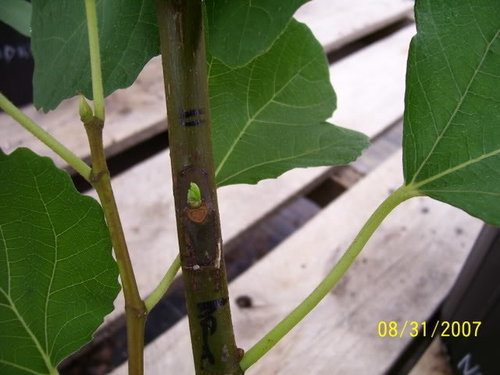
Healed chip bud sending out a shoot. This was taken on August 31, roughly three weeks after budding. Note how difficult it is to see the bud. Make sure to mark well!

Comments (19)

  • chills71
    16 years ago
    last modified: 9 years ago

    That is excellent!

    Great tutorial and an interesting idea as well.

    ~Chills

  • xon2000
    16 years ago
    last modified: 9 years ago

    Very nice and easy to understand.
    A good solution to solve the root diseases or to change the variety.

  • ejp3
    16 years ago
    last modified: 9 years ago

    Are you sure its not too late in the season to do this? I am on long island a little south of you. Great photos, nice post.

  • fignut
    Original Author
    16 years ago
    last modified: 9 years ago

    ejp3,
    Thanks.
    Yes, it is late for our area. If my trees were outside, they would be slowing down, and that's not a good time to bud. Also the buds have healed, but I would be hesitant to overwinter them in an unheated garage or shed.
    However, these trees are in a greenhouse and I have been pushing them with fertilizer; they are growing vigorously. And since they are going to have a lot of soft wood on them going into winter, I'm planing on overwintering in a place where I can control the temperature.
    There had been some posts on grafting and I thought it would be a good time to show the budding procedure. There might be folks in milder climes who could still bud.

  • paully22
    16 years ago
    last modified: 9 years ago

    Excellent news. Very easy to digest with pictures. Gracias.

  • keith-figs
    16 years ago
    last modified: 9 years ago

    That's one of the finest tutorials I've ever seen regarding this process. Thanks for the GREAT info. I'll keep this in my Fig library.

  • FO876
    16 years ago
    last modified: 9 years ago

    Excellant post and experiment.......have you tried doing this with two different types?

    It'd be kinda cool getting two different crops out of one tree.

  • fignut
    Original Author
    16 years ago
    last modified: 9 years ago

    Thanks, fortisi. I'm not putting more than one variety on at a time. I've heard that Alma is immune to FMV, but I'm not going to confuse matters by putting on multiple virus carriers, if it isn't. One variable at a time.
    Not to say you couldn't though - just try to match growth habits.
    Two things I should have mentioned in the budding post:
    1. FMV can be passed by budding and grafting and different varieties might react differently to infection. You could bud an apparently lightly FMV infected fig onto a rootstock, and that rootstock might react with major symptoms.
    2. Alma tends to be tender, so using it as a general rootstock might not be a great idea.

  • paully22
    16 years ago
    last modified: 9 years ago

    Hi Fignut,

    Appreciate if you can share the progress of your chip budding trials. Thanks.

    Paul

  • fignut
    Original Author
    16 years ago
    last modified: 9 years ago

    Paul, Will do. Right now all my plants are waiting for fig season. (They're waiting more patiently than me, LOL.)

  • ottawan_z5a
    16 years ago
    last modified: 9 years ago

    Fignut
    Very thorough tutorial. Thanks.
    Do you have any preference for a novice in budding, whether to try T-budding or Chip-budding i.e. which method has better probability of success for a person just starting the budding practice? Also, will larger area of bark with the chip-bud increase the bud survival chance or decrease it.
    I tried three T-buds last year (the first time ever). These appeared healthy and green when I removed the tapes after ten days but then gradually became brown and dried and the T-cut on the branch did not look good.

  • ottawan_z5a
    16 years ago
    last modified: 9 years ago

    Fignut, I forgot to mention that the hand-written lettering on the fig pots is very nice.
    Also, I have this feeling that one day, some time not too far in the future, my T-budded or chip-budded bud will sprout and then I will be shouting "Eureka.. it did work as fignut had shown".

  • fignut
    Original Author
    16 years ago
    last modified: 9 years ago

    Ottawan, I'm glad you like my lettered pots. I also have tags in the top of the pots, and stuck in the bottom. And I'm thinking of adding tie-on tags. My version of belt, suspenders and super glue, LOL.
    I tried T buds and had much the same result you did - a lot died. The results with the chip method are much better.
    I don't think increasing the amount of bark would help. It is just more area to heal. Not that a larger chip would be a problem (as long as the bark didn't kink).
    When I first started with grafting, I was really nervous. It seemed like such an unlikely concept - joining two separate things and having them knit together and grow as one. I was sure it would take a long time to master. Not so. I had "takes" on my first try with a jack knife and electrical tape (do NOT ever use electrical tape! LOL). It is not difficult, and it is a big thrill when you see it take. Every time - I don't care how many you do - it's still like a miracle.

  • dieseler
    15 years ago
    last modified: 9 years ago

    Fignut, i missed this thread somwhow but was brought to it by another recent thread. Im curious as to how your plant is doing now.
    Also as this is new to me , when you have a moment to answer, if the chip bud is attached to a faster growing fig plant as some are slower than others will it take on that characteristic. Im curious as to the advantages of doing this process. Thanks in advance.
    Martin

  • scion
    15 years ago
    last modified: 9 years ago

    Martin,

    It is impossible to know with certainty the rate of growth of a varietal on a particular rootstock in advance. One must graft the combination and then sit back and observe the pattern of growth of the scion with that particular rootstock.

  • fignut
    Original Author
    15 years ago
    last modified: 9 years ago

    Martin, Last season I didn't have any time to do more budding. The pictured bud died - I don't know what happened or when.
    I don't know if a fast growing rootstock will increase the growth rate of a scion. I think scion is right - you have to try and see what happens.
    Sorry - not much help.

  • dieseler
    15 years ago
    last modified: 9 years ago

    Fignut,
    thats to bad it died.
    Perhaps one day down the road i might try out of curiosity useing a ischia black on a plant if i dont get a virus free one down the road first.

  • bwoody
    14 years ago
    last modified: 9 years ago

    I'm seeking advice on grafting Black Mission buds or chips onto a 4-year-old Brown Turkey in Phoenix (100 days annually over 100 degrees!). What months are suitable for doing this? What techniques are most reliable? Thanks in advance.

  • jstall
    14 years ago
    last modified: 9 years ago

    This is a excellent post. Great learning tool, thanks fignut.

Sponsored
Snider & Metcalf Interior Design, LTD
Average rating: 5 out of 5 stars23 Reviews
Leading Interior Designers in Columbus, Ohio & Ponte Vedra, Florida