Shop Products
Houzz Logo Print
ludiciousacres

Resetting Elegans

Ludicious Acres
11 years ago

My plan for this spring was to combine all three of my Elegans into one massive planting. I had done some research and thrown a few emails out, but ultimately came to the conclusion that the area I had planned was going to be too small in the long run.

I would love to not have three separate plantings, but these are the matrons of the garden. I have developed an affinity that could never allow me to part with any just for the sake of space. So I am back to the drawing board to figure out how I can feature the other two, but the original clump is in the perfect spot and I had no intentions of moving her.

Which brings me to my post. I had today off and knew that I wanted to get outside and do SOMETHING, so I figured I'd reset the original clump and clean her up a bit.

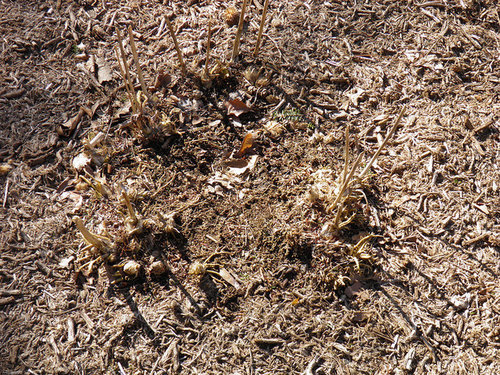
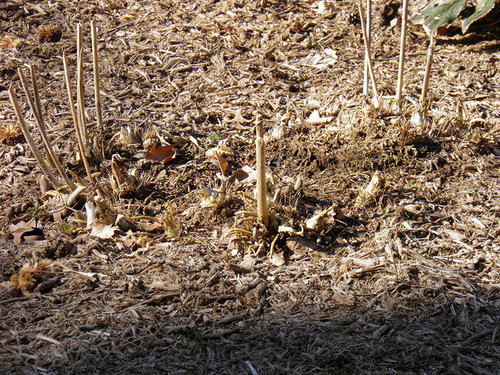
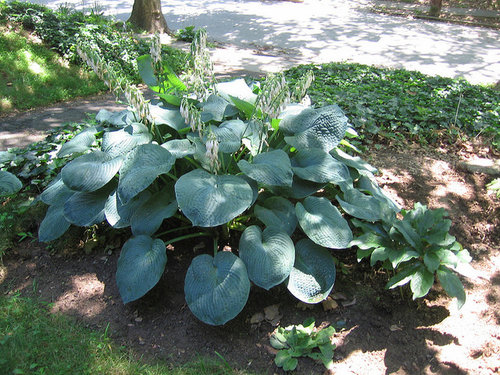
It's not severe, but the pictures below show her age. She has a bit of fairy ring going on, and slight heaving.

Here she is last year in June. ::sigh::

Since I know this will be the permanent spot for this clump, I figured I'd clean her up a bit and get rid of that fairy ring. Give her a fresh start after so many years of neglect. Digging it up also allows me to turn back the clock a few years and reduce the overall size while the other new additions have a chance to establish around her.

So away I went :)

First I pushed all of last year's mulch away.

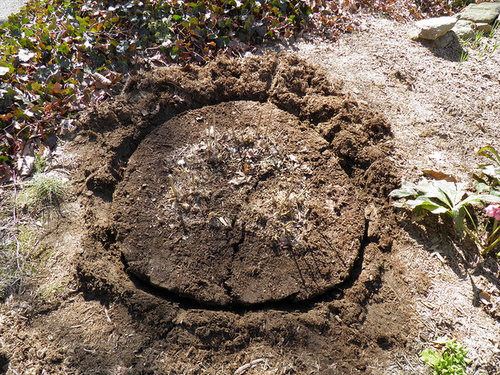
Then I slowly began to dig a hole around the crown giving me enough roots to work with. You can see the bottom right portion cracked since there is nothing left in the middle to hold it together.

Annnnd then my shovel broke . . . d**m it !!!

DON'T PANIC . . . I had another shovel :p

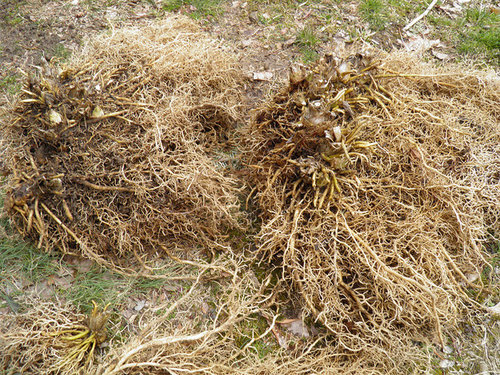
So I severed another chunk off the bottom left to give me three pieces total. Even in three pieces, they were dreadfully heavy. I knocked as much soil off as I could without taking too many roots. Then I ran them all under the hose.

You wouldn't believe the crap I found tangled in those roots. Nails, broken glass !!!, old pieces of ceramic pipe, and plenty of rocks. Poor thing :(

This was the biggest clump and pretty much half of the plant. It's about 2 feet wide.

The other two pieces were smaller, but still respectable. Any one of these divisions would have made a decent sized plant on its own.

Give you a sense of proportion.

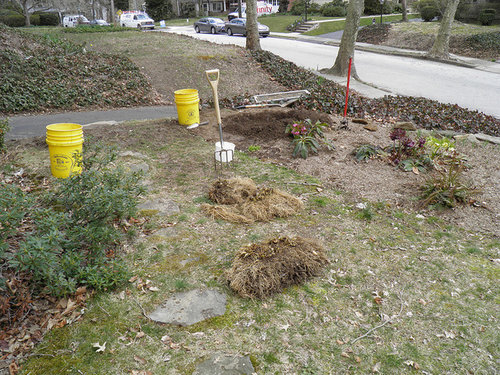
After all the divisions were washed I threw a bag of composted cow manure and another bag of mushroom manure in the hole and stirred it all up. See, other shovel.

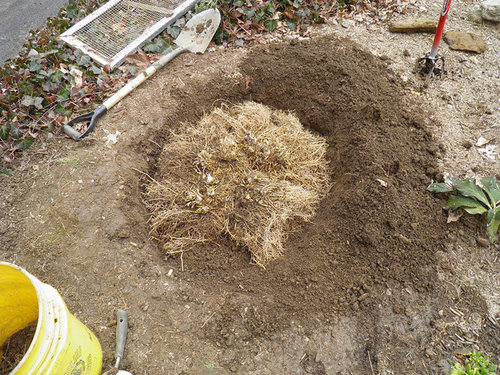
After I was done mixing in the amendments I cleared out the hole for planting.

And then VOILA !!! She is like new. No more fairy ring, no more garbage in her roots, and nice amended-sifted soil beneath her. What more could a hosta ask for. :)

These are her neighbors. You can see the hole behind them filled in and evened out.

Some might say that all this was unnecessary and I should leave a happy hosta alone. But I enjoyed the time outside and it was nice to stretch my winter muscles. I feel better now about the overall health that the plant will have in the years to come.

Thanks for reading :)

Ludi

Comments (19)

  • don_in_colorado
    11 years ago
    last modified: 9 years ago

    Good work, buddy...Hey, it's your Hosta, do what you want. If I saw 'Fairy Ring', I'd be inclined to do the very same thing. I'm sure she will appreciate it, and thank you by filling in nicely. From what I see, the roots look beefy.

    I like your choices of planting media.

    P.S. At least you didn't dig up Jimmy Hoffa (He's another foot or two farther down) :)

    Don B.

    This post was edited by Don_in_Colorado on Fri, Mar 29, 13 at 19:59

  • hostanista
    11 years ago
    last modified: 9 years ago

    Great progress pictures, Ludi! I'm sure Ms. Elegans thanks you for your herculean effort!

    Also love those hellebores!

  • Babka NorCal 9b
    11 years ago
    last modified: 9 years ago

    Outstanding! You will be rewarded for many years for all your efforts. Can you still stand up straight?

    -Babka

  • Steve Massachusetts
    11 years ago
    last modified: 9 years ago

    The fairy ring isn't such a problem. Sometimes those things can be cut out of the middle and a big Hosta will just fill it in. What was really well done was the loosening and amending of the soil. That should rejuvenate the plant very effectively. Great work, Ludi.

    Steve

  • don_in_colorado
    11 years ago
    last modified: 9 years ago

    Steve-- thanks for the info about the fairy ring. I had heard you needed to divide the hosta and eliminate that space because it was literally dying from the inside out and the whole plant will die and danger danger panic blah blah blah. Thanks for busting that myth; I have faith in what you tell us rookies.(namely me).

    Cheers,
    Don B.

  • User
    11 years ago
    last modified: 9 years ago

    Ah, Ludi, the old girl got a face lift!

    I know landscapers say not to put two or four plants, so what will be a third for your Two Sisters area? A pedestal with a cascading pot of fern on it? I am definitely into plinths and pedestals these days. If you cannot go out, go UP.

    A fern that is super strong and bright green is asparagus fern. Not sure it can take your winters, but very little phases it here. It is prickly though, and it takes an ax to split it once root bound.

    Another thought is to plant something like pink muhly grass in a tall pot as the third element of the Two Sisters.

  • ken_adrian Adrian MI cold Z5
    11 years ago
    last modified: 9 years ago

    no time to wax eloquent..

    good job..

    and the shovel deal cracked me up.. been there.. done that .. lol ... almost killed myself falling face first into the whole.. or backwards.. whatever ...

    ken

  • Jon 6a SE MA
    11 years ago
    last modified: 9 years ago

    I watched a show (Victory Garden?) at a hosta farm in New Hampshire where the owner took a reciprocating saw and cut a big plug out of the middle of a mature hosta that had a middle that was dying out. He then just worked it out then filled the hole in the center with dirt and preserved a nice big (soon to be much bigger) hosta and planted the plug to rejuvenate it into another new hosta.

    Just another tact, but you sure did a great job and you will have a few really nice new Elegans. Congrats on a job well done.

    Jon

  • hostafreak
    11 years ago
    last modified: 9 years ago

    Looks like a lot of work,Ludi! With that massive root system ,it shouldn't take long to fill back in. I never have had a problem with "fairy rings",because the leaves usually cover any skimpy spots,but as they say,it's your hosta,you can do what you want. I also,have never broken a shovel digging anything.Lol! Phil

  • Ludicious Acres
    Original Author
    11 years ago
    last modified: 9 years ago

    Thank you everyone !!! I'm so glad you enjoyed my little adventure. It is so much fun for me to do these documentation type posts. I hope it helps some of the lurkers figure out which methods they want to utilize in their own gardens.

    Don - Beefy is an understatement, her roots were ridiculous. With the larger chunk I had to slide it across the yard to the hole. I couldn't lift it even after washing all the soil off.

    Hoffa is on the other side of the yard, haven't started over there yet. :p

    Hostanista - The two Hellebore in the front of the picture are, Kingston Cardinal and Gold Finch. They are clones that were purchased from Heronswood Clonal Introduction back in 2007. I'm not the expert on Hellebore, but I am pretty sure the flower colors do not come true from seed, so Dan Hinkley was running a cloning program to preserve some of the better hybrids. I'm not sure if that is still the case since Heronswood has been bought out by Burpee.

    Babka - I write this response the morning after, and boy am I SORE. My arms and hands the most, but my lower back as well. One can only eat so much ibuprofen. Really though, it was the first major project after many months of sitting inside. The pain is a good pain :p

    Steve - I actually only thought of the sifting since I saw the old screen for the basement window lying underneath one of the azaleas. Last year we had a tank less hot water heater installed and they had to cut holes in the window for the exhaust, thus rendering the grated screen useless. So I figured, might as well get some use out of it. It is old and really weather worn. Not sure that it is a long term solution, but I want to build a sifter anyway.

    Mocc - Face lift !!! that would have been such a better title than mine. Her other two sisters are still with her in the front yard, but in separate beds. There will be 4 beds total when all is said and done, and I will feature the other two in one of the remaining beds. This clump got the best spot on top of that little hill. But the rule of three will apply to the yard as a whole with these ladies. They are just too big to plant next to each other for my tastes.

    Asparagus ferns are sold as annuals around here. My mother used to have one that she brought in every year for the winter for years when I was growing up, but they are way too messy and big for me to do that now. The orchids would get jealous. :p

    Ken - I did in fact fall forward. Thank God no one was around to see me because they probably would have laughed. That shovel was very short and I am 6 foot so I was almost hunched to use it at some points. When I began lifting the clumps out of the hole is when it went CRACK and all my inertia pushed me forward into the yard. I laid there for a bit and laughed at myself. Next time I am getting a 5 foot shovel with a metal handle. :)

    Jonny B - Thank you ! The fairy ring was not nearly as bad as I had thought. The one piece did crack and fall off when I was lifting them, but I had to shovel split the other smaller piece from the main to get them into workable portions. I have some ferns that are also showing fairy ring, but that seems to be a common characteristic with older established plants. Not sure I'm going to fuss with them though.

    Phil - Breaking shovels it is not fun, but it did make for a good laugh. :)

    Thanks again everyone for reading. There will be plenty more of these posts this year as I continue to tame the jungle.

    Ludi

  • User
    11 years ago
    last modified: 9 years ago

    Ludi, when you get to looking for shubbles, there are a couple of TOOL threads on the forum, some from last year, and I think you'll find them informative.

    The advice was to GO LONG on the handles, especially for an adz or something you swing above your head. I found a 6" wide hoe head that is good for a trencher, if you want to lay some pipe for hiding hoses or sprinklers.

    I had an epiphany yesterday, when I could not lift a 64 quart bag of MiracleGro into the car. It must have been wet is all I can think of.

  • don_in_colorado
    10 years ago
    last modified: 9 years ago

    I finally got an 'Elegans', Ludi :) My neighbor wants to get rid of some of his 'old' varieties for space to get newer introductions, and so far I've bought a few from him, including one of his 'Elegans'. I count 8 eyes on it, and it's got a nice healthy-looking root system. He's the same guy who cut the roots on the piece of 'Great Expectations' he gave to me, and I told him NO SALE if he cuts the roots on this one LOL. I'll post a pic when it leafs out; should be good-sized. (No green bananas, I want a big, blue 'Elegans' NOW).

    Regards,
    Don B.

  • gogirlterri
    10 years ago
    last modified: 9 years ago

    WOW-talk about being a latecomer on this thread! How could I have missed it.
    Ludi-your photo-story is OUTSTANDING!
    I have a Guacamole with a dead center and if I can figure out how to change blades on a recip (can't say, much less spell it-Sawzall?) saw, I might try removing just the center like Jon wrote of.
    I need every bit of help I can get doing heavy work like you'd broken your shovel doing. I wonder if two spading forks used on opposite sides would give enough leverage to lift such a well established clump. Maybe step on one and push down on the other, but then I could end up in the hole like Ken said. LOL
    Theresa

  • stoc zone 6 sweden
    10 years ago
    last modified: 9 years ago

    Can't wait till my Elegans baby gets here. You are right it will give us newbies information and photo documentation of your efforts. Nice that you added some comedy to it with the shovel! Haha

  • Ludicious Acres
    Original Author
    10 years ago
    last modified: 9 years ago

    Ohhh Don I'm so proud of you :)

    No more messing around with that big green one you keep linking as a NOID Elegans. (kidding).

    She will not disappoint. Give her plenty of shade and lots of water and she'll woo you with her womanly ways. :p

    Theresa, better late than never eh ? This was a monumental undertaking. I was sore for days after. If you struggle with bigger projects I would definitely suggest you go with Jon's suggestion and just flush out the middle and backfill with new fresh dirt.

    When I reset the three clumps I created from the original planting, I did so with the emerging pips towards the middle to remove the appearance of fairy ring.

    Here is a pic of her today. This is the same plant from above.

  • in ny zone5
    10 years ago
    last modified: 9 years ago

    Yes, garden work is really good for you. Ludi, you did a great job, keep those plants going for many more years!
    I strung 70 ft chicken wire mesh fence out to keep rabbits out. Now I have to move hostas which burn in the heat into shade spots and Guacamole and sister into those sunny places. That will be fun!
    Bernd

  • don_in_colorado
    10 years ago
    last modified: 9 years ago

    Oh, you mean THIS one, Ludi? Ha Ha Ha Yup, NOT an 'Elegans', but still, I like this one a lot, and can't wait to see what it grows up to be. Those are some BIG pips, Ludi! Looks like your 'Elegans' loves what you did for it, and will reward you with great beauty for this and many seasons to come.

    Don B.

  • Ludicious Acres
    Original Author
    10 years ago
    last modified: 9 years ago

    Oh Bernd I do not envy your task, but think of how much happier they will be once you are done. Anything we can do to accommodate our plants is worth the effort in my opinion. :)

    Don, what you can’t see are the pips on clump #3. Here, I will link a picture. These things were so thick I had to take a step back. There were a few that were almost two inches at the base.

    She’s a big girl. :p

    Elegans Clump #3 - 4/24/2013

    Edit: Looking back at the picture, it really doesn't do the pips justice. I'm serious though, these things were huge !!!

    This post was edited by Ludisia on Tue, Apr 30, 13 at 23:17

  • Ludicious Acres
    Original Author
    10 years ago
    last modified: 9 years ago

    Stoc, I’m so sorry I didn’t see your reply sandwiched in there. I really should start having it notify me via email when someone replies.

    Glad I could help in some way. I’m no expert but I value information. Anything we can do to share the knowledge makes for better gardens.

    Enjoy your Elegans once it arrives !!!

    Ludi

0
Sponsored
Winks Remodeling & Handyman Services
Average rating: 5 out of 5 stars1 Review
Custom Craftsmanship & Construction Solutions in Franklin County