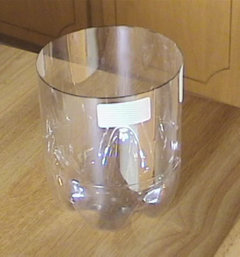
|
|
I happen to have a sudden surplus of 2 liter bottles.
And suddenly, while wondering where to store them until next year, I saw The Light ! Take six or seven 2 liter bottles. Group them around one in the center so you have a circle of bottles. Duct tape the group together at half-way up. Now pull out the center bottle so you have a kind of 'donut'. Put in the garden over a new tomato transplant. Fill with water from your hose. Instant Wall-O-Water. Cost, 10 cents deposit each in Michigan, plus duct tape. Plants will get some light from through the 2 liter bottles and eventually grow above them. The heat of the sun will warm the water in the bottles. Six bottles times two liters is 12 liters. That's three gallons, roughly. One BTU is the heat stored in one gallon of water by one degree Farenheit. If you can store twenty degrees of warmth during the day, that gets you 60 BTU's of heat stored for the cool nights. Throwing a cap over this setup would conserve that warmth to deter fr*st. And it's not unreasonable that you could store more heat in the water than that. Paint the bottles on the North side of the plant black to store more heat. Add a pinch of salt to the water to push the heat storage a bit. You might get up to 120 BTUs stored in the bottles, ideally. Enough to last through a 38 degree night. Maybe. |
Follow-Up Postings:
|
- Posted by Atillathepun Sunset Z15 CA (My Page) on Wed, Jun 1, 05 at 2:05
| One could also put foil (or reflective mulch,) on the ground to the north of the bottles, angled slightly to reflect more light on them (or on to the black paint on them.) |
|
- Posted by albert_135 (My Page) on Thu, Jun 2, 05 at 13:31
| After trying one package of wall-o-water I returned to using soda bottles much as described in the OP. I would not bother with taping them and I would not bother with the treatments of the north side or adding salt. The few BTUs captured would be ignorable. Advantages of bottles include that they can be tossed when the need has passed without any significant cost factor. |
|
- Posted by Brendan_of_Bonsai z4-5 AK (My Page) on Wed, Jun 15, 05 at 4:44
| I wouldnt bother with the salt, unless you have problems with boiling occuring then salt wouldoffer you no savings thermally, infact salt would lower the specific heat of water and make it less effective per liter. |
|
- Posted by Atillathepun Sunset Z15 CA (My Page) on Sun, Jun 19, 05 at 19:10
| Ain't physics fun? |
|
- Posted by cheyjohn_z5 6 (My Page) on Thu, Jun 23, 05 at 23:35
| Is the purpose of this to provide water to the plant as well as insulation? It's been pretty dry here this year. I do water, but some areas around me are having water restrictions now, and if that happens I need to find ways to conserve on watering my veggies. Chey |
|
| This was about heat, but watering is something I've been considering this week. I've seen these doodads where you get a 1 pint water bottle on a spike, and the water bottle contains watering crystals. I have a bag full of those crystals. I've been thinking that putting them in a 2 liter bottle, adding water, waiting for the crystals to swell up, and then poking some holes would work. As the crystals heat up in the sun, they start to sweat out their hoarded water and it drips on the plants. Re-hydrate by dunking the 2 liter in a bucket of water. |
|
- Posted by cheyjohn_z5 6 (My Page) on Fri, Jun 24, 05 at 16:18
| Jkirk, that sounds interesting! I have thought about using 2 liter bottles, buried alittle, with a couple of tiny holes in the bottom. But never heard or thought of using the crystals in them. Would it really be worth the money the crystals cost? Or would it do just as good a job filling them with water and letting the water seep out? Thanks so much for sharing this with us!!! Chey |
|
| I bought a big bag of water crystals online from a Native American owned company. Not expensive. As for using just water, I'd think it would leak out in less than an hour. |
|
- Posted by habitat_gardener z9 CA/Sunset15 (My Page) on Wed, Jul 27, 05 at 2:41
| I used bubble wrap instead of Walls-O-Water this spring for my tomatoes. (Cost difference: 12 plants, four 3-packs at $14 each including tax locally, total $56 saved.) I planted them in April, so the extra warmth provided by the water would not have been needed. Night temperatures got down to the 40s, but daytime temps were usually 60s-70s IIRC. The bubble wrap was most important in protecting the plants from wind and pests. We get afternoon winds every day, plus some rainstorm winds intermittently. Usually birds eat anything they can find in early spring, including young tomato plants, but the bubble wrap was a deterrent. One of the other gardeners in my community garden keeps the WOW all summer as a rat and squirrel barrier. (She keeps the tops turned down because she has noticed mosquito larvae in the open tubes.) |
|
| I've used 2 liter bottles with a pin hole in the bottom, and top tightly closed, to try and water plants slowly. They don't last long, only about 3-4 hours. I am looking for something that would last a few days, like when I'm on vacation. The stores sell some type of ceramic cap with a bottle but those are expensive, about $10 each. Anyone have any other ideas? |
|
| this is great stuff folks! talk about brain candy! |
|
- Posted by wackyweeder z5 ohio (My Page) on Sun, Oct 16, 05 at 22:13
| Holy cow! Thanks for the idea! I have been trying to figure a way to dupe that (WOW) forever, cuz I sure was not paying for those things. |
|
- Posted by bmoser z6PA (b2m2@moserproduce.com) on Mon, Oct 17, 05 at 15:38
| I always thought filling 1000+ soda bottles for 150 tomato plants would be time consuming so I just stick the bottom of a clear 55gal garbage bag over an inverted tomato cage, let it drape to ground level and then doubled over itself back to the top. When you put water in it(between layers)with a hose only use 5-6 gal. even though it will seem like little. Its the amount of water that matters, not the height on the cage. After your plants outgrow the cage,poke the bags and reuse them for garbage (that won't leak). If you don't have tomato cages you probably will need to make some. I only let them on long enough to get the plants thru the first month of planting; then use string line draped from the greenhouse perlins to support plants. But it will make a difference. I plan to expand on this method this year since all fossil fuel heat sources are expensive. |
|
| Veggieman, "I always thought filling 1000+ soda bottles for 150 tomato plants..." You must be raising tomatoes to sell. A dozen or two tomato plants keep our family well supplied. I'm interested in your garbage bag wall-of-water. I think I may experiment with that. I have several tomato cages that I made from concrete re-mesh wire. Most of them are 4½ feet tall, so I may have to use a few of my half-height cages for the experiment. Incidentally, I use 2-liter soft drink bottles to make 1-liter pots to start large seedlings in.
MM |
|
- Posted by watermanjeff z7 AR (My Page) on Fri, Feb 10, 06 at 12:43
| To use the bottles for watering, try using strips of fabric as a siphon. Old sheets or towels torn into strips work well. Pre-moisten and lower to the bottom of the bottle, draping down the outside and leave a little on the soil. It will "wick" the moisture out of the top and onto the soil at the base of your plants.Keep in mind, though, that a considerable amount will evaporate. If you want to increase the length of time your "plantsitter" will operate, just increase the capacity of the container. I have used five gallon buckets with good results. |
|
- Posted by aliceinvirginia (My Page) on Thu, Mar 26, 09 at 0:15
| Last yearI tried water crystals in 2 liter bottles with holes. Didn't work very well because the crystals just swelled up and blocked the holes. I read a suggestion to cut the bottom off a bottle, invert into plant with a small hole in the bottom, then put a plastic ziploc bag inside with water in it. Most plastic bags leak slowly over time, so that ends up as a drip system. I'd probably only use that as a system to not water as often, rather than a vacation situation. Alice |
|
- Posted by cyrus_gardner (My Page) on Fri, Mar 27, 09 at 6:35
| re: bottle watering: I have experimented with this bottle watering method. |
|
| Hi saw these messages and thought I would share with you my thought, it may be rubbish, but is just a thought! frustrated with the short growing season here I looked into wall of water and thought what a fantastic idea, however as a frugal gardener the price is way to high! anyway it was my birthday last week and we had a party, boxed wine was brought in and as the boxes emptied I thought? hold up! wall of water! anyway hubby had already butchered two before I could stop him to get the last drops out, but the third, after I told him my plan, he devised a method of getting the last of the wine out and they are easy to fill, having tried it! I reacon two tied together will work really well and they are reflective, so should stay warmer! anybody tryed this? |
|
| Has anyone thought about getting 1. Water bottles in the size of your choice depending on the size of the plant. 2. Zip lock bags - sandwich, pint or gallon size.Small trash can bags A. Cut the tops off bottles at highest widest point. B. Place a few small rocks on the bottom of the bag just enough to weight the bag down then add soil,fertilizer plant or seeds to zip lock bag, zip bag partially closed. C. Fill bottle with water partial way up. (Other container ideas lrg styrofoam or plastic cups). |
|
| Two liter pop bottles sounds like good idea. Will try them. They hold much more heat than the original post indicates. One BTU is the heat required to raise one POUND of water one degree F. instead of one GALLON. Therefore, using the figures in the original post, the amount of heat stored in the six 2 liter pop bottles would be eight times more (8 pounds of water per gallon), or about 480 BTUs. A big bonus and not insignificant. |
|
| Has anyone ever used zip lock bags placed around the plant like a Wall-of-Water? These could be placed inside the tomoto ring to create a het zone around the plant? Or maybe empty plastic water bottles? Thoughts? |
|
| For a couple of years I had a garden spot away from my house, with no water supply available so if I wanted to supplement rainfall I had to haul gallon jugs of water. To make my watering efficient, when I planted my peppers & tomatoes in the spring, I dug down and buried empty gallon plastic jugs, one between each plant. I had poked 4-5 holes in the bottom of each, of course, and left the caps on until later in the summer. Once the weather warmed, and after a good soaking rain, I mulched the beds 4-6" deep with chopped leaves, being sure to cover the tops of the (so far empty and still capped) bottles to protect them from the sun since I had found that the plastic degrades and becomes brittle when exposed to the sun. (In previous years, just cultivating around the bottles inevitably resulted in my breaking the tops off by midsummer.) When the weather reached a point where I actually needed to water, I cleared the mulch away for the moment and poured a gallon of water into each buried bottle. I set the cap loosely back atop each bottle to keep the leaf debris from falling in and clogging the exit holes in the bottom, then pulled the mulch back up to protect the plastic. I did not care about how long it took for the bottle to empty-- it seemed like a gallon or two a week per plant was sufficient, and the best part is that by burying the bottles the water went right down to the root zone where it was most effective. As for using wall-o-waters, since I had gotten some free from a friend, I tried them last year with 3 really early tomato plants I started specifically to experiment with. While they survived a good bit of frosty weather, in the end the plants I had started weeks later and planted out a month after the first ones when the weather had warmed quickly caught up to the wall-o-water ones and all the tomatoes pretty much bloomed & set fruit at the same time & rate. So my conclusion is that it was satisfying to my eager gardener's soul to be out planting early, but it really made no difference in overall plant performance. I have found the same to be true with early plantings of such things as peas and salad crops, too. Early plantings may survive, but later plantings quickly catch up and may even surpass earlier ones that have been stressed by the weather. |
|
| Has anyone tried using those water bottles you get by the case as a wall of water? Seems like they would be a cheap alternative??? Gumpa |
|
| My experience concurs with weedlady's comments: ".... satisfying to my eager gardener's soul to be out planting early, but it really made no difference in overall plant performance...same ... true with early plantings ...peas and salad crops... Early plantings may survive, but later plantings quickly catch up and may even surpass earlier ones that have been stressed by the weather. " Last year, we had a very cold wet spring, so I didn't bother with any tomato protections like in years' past & just waited to put them out when the weather settled enough to have 50 degree nights just after Father's Day. Our last frost date is May 15. The tomatoes transplanted well & just took off instead of pouting around like usual in the cool weather. Harvest wasn't much different & the planting was so much easier as well as tending without watering jugs, wall of waters, plastics, etc. Hope that helps~Corrine |
|
- Posted by snoggerboy RSA (My Page) on Fri, May 25, 12 at 4:25
| Put a strip of Black Plastic in a soda bottles of water near plants. The Black plastic strip will heat the water absorbed from the sun and released into the water. It will heat up a lot more than clear plastic only. A small diameter tube or a tube slit can also be used. |
|
| In 2012 I tried making my own Wall-o-water using vacuum bags from Foodsaver, the narrow portion control bags. They are narrow, heat-sealable bags about 7 inches long. I fill them to about 3/4 full and just heat seal (using no vacuum of course) them after forcing out as much air as I can. This way when they get warm and expand they don't burst. I put them around the plant, long-side up, in a little wire frame I made with 1/2" hardware cloth. The are stacked 3-high in the wire frame and seem to work very well. I made 3 last year to try and have made an additional 13 this year. I suspect they will last several years and will just replace them as needed. Has anyone done the same and if so, what did they do differently? |
Please Note: Only registered members are able to post messages to this forum. If you are a member, please log in. If you aren't yet a member, join now!
Return to the Garden Experiments Forum
Instructions
- You must be a registered member and logged in to post messages on our forums.
- Posting is a two-step process. Once you have composed your message, you will be taken to the preview page. You will then have a chance to review the contents and make changes.
- After posting your message, you may need to refresh the forum page in order to see it.
- It is illegal to post copyrighted material without the owner's consent.
- HTML codes are allowed in the message field only.
- No advertising is allowed in any of the forums.
- If you would like to practice posting or uploading photos, please visit our Test forum.
- If you need assistance, please Contact Us and we will be happy to help.