Shop Products
Houzz Logo Print
2ajsmama

Help with HT construction, beds

2ajsmama
9 years ago

We got the baseboards laid out and joined (more or less square and level - I think 1 end is 13'8" and the other is 13'7.5", 1/2" off over 65ft isn't bad). Figured place hoops 39" apart - they had been 36" but since we really have to replace all the straps we can put them wherever we want, most of the straps were pulled off or bent when we moved it.

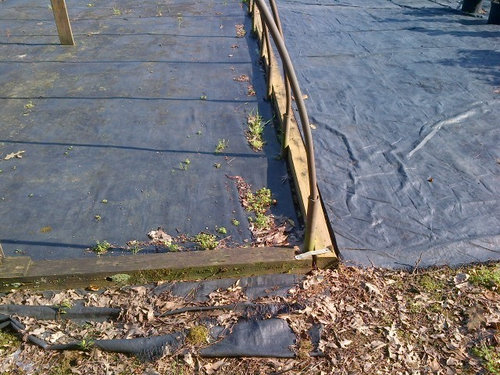
Here is a photo DH took before we took it down - hoops were just set into chain link top rail "receivers" that had been hammered about 8" into the ground, on the inside of the baseboards. We figured the nursery had used furring strips on the outside top of the baseboards to secure the plastic. They didn't leave the plastic up over the winter, so used cheap stuff they tore off each year. Didn't plant in the ground, just set pots on top of the landscape fabric (we got that too, still good except for holes for sprinklers coming up).

So should we put the hoops on the inside and pull plastic over, attach to hipboards with furring strips (I'm thinking of making that pretty permanent, might have to take off over the winter b/c of snow)? I'm also thinking rain gutters with barrels, don't know if we need some ropes (poly?) to keep top from billowing, how to do all that.

I'd like roll-up sides, not sure how to do those either if doing gutters on the hipboards. Maybe roll-down sides instead?

Plastic will go up probably Sept, I can't see putting it up and then worrying about venting (this year at least) when it gets hot. But we need to figure the hoop placement ASAP so I can get side beds prepped. I'm thinking use that cypress I bought last year for hip boards and for walls on the beds, so I can go deeper than the 4" baseboards. Sandy rocky fill there now, I won't put fabric down b/c I want the roots to go down in but I do want to put 6" (or whatever depth I can get, I think the cypress is 6" wide) composted manure on top - won't double dig b/c I'm afraid of bathtub effect. Center bed may just be mounded - I'll have to see how much the compost wants to spread, I may have to build walls for a raised bed there too but right now just want to build them along the sides, not sure how much cypress I have.

So hoops on the inside, receivers strapped to baseboards as originally done, but then should the cypress raised bed walls be secured to the hoops and/or end walls, or just free-standing (in which case I'd probably just make 16x2 "frames" and set them an inch max down into the fill, 4 in a row so will lose some length due to the thickness of the ends, doubled up in 3 places)?

I'm thinking 2ft width, center bed 4ft, so I can reach everything, obviously shorter plants on the outsides (peppers, det. tomatoes?) and taller (indet. tomatoes) in the center. Leaves me two 2.5ft wide aisles - hate to lose the space but I don't think I can fit 4 beds in there, esp. if I want the height (only about 7-7.5ft) in the very center for growing.

No one has commented on my other thread, we do plan on running rebar (how long?) down through predrilled holes (prob. every 8ft) in the baseboards and bending it over the outside to anchor the baseboards to the ground, since I don't trust the short "receivers" for the hoops to hold the whole thing down once we get plastic on. Photo shows 2x4 posts inside the original set up, I don't remember how far apart, they weren't set in concrete but I don't know why we didn't take those too. I'm wondering if 10ft T posts driven in (how far apart over 65ft?) and somehow tied into the purlin(s) would be good?

Sorry so many questions, trying to get as much as possible done in next couple of weeks, rebar may go in later before plastic since I don't think we have to worry much about wind with just the bare hoops up (or we can set those in the receivers later but worry about damaging plants) but we have to get the receivers in and secured to baseboards (and bed walls secured to receivers if that's what we're doing) and the T posts in place before I can even think about planting - which I'd like to do by June 7.

1.5" of rain Thurs/Fri so it's pretty wet out there, but hope it will be dry enough to get all the receivers pounded in by the holiday. I can start building the frames for the side beds this week. Thanks - pictures would help if anyone has done something like this (raised beds, rebar anchors, roll-up or down sides, T post tied into purlins).
Comments (18)

  • cole_robbie
    9 years ago
    last modified: 9 years ago

    The hoops definitely go inside the baseboard.

    I've been using EMT conduit to connect my hoops, which are bent out of top rail. The top rail is 1 3/8" - that is the outer diameter. I've been connecting it with 1 1/2" EMT conduit, and that measurement is the inside diameter of the EMT. They slide together and tek-screw easily. But whether or not any of that applies to you depends on the dimensions of the metal pipe or tubing that make up your hoops.

    I am still learning in regard to roll-up sides. My clearspan building instructions said to make them out of top rail that the bottom plastic rolls up around. Mine sag like crazy and don't work very well at all, but other people on here have the same design and don't have that problem.

    With my high tunnel, I have been trying to follow jrslick's design. For a 48' tunnel, I permanently attached the first 12' from each end, which is my own idea to combat high winds. Then the middle goes up and down. There's no pipe, clamps hold it up. A few pieces of batten tape keep it from flapping out. I have wiggle wire on one side and sand bags on the other. I think I like the sand bags better. The wiggle wire is too much work to take on and off every day.

  • randy41_1
    9 years ago
    last modified: 9 years ago

    wiggle wire and channel is much better than furring strips to hold the film. i think your raised beds should be free standing and not tied into the frame of the structure. it will cause uneven tension on the bows. instead of using rebar as anchors i would use some kind of screw in anchors. rebar is pretty easy to pull out of wet soil. when you make a curtain wall (roll up sides) you have to attach it evenly to the roll bar. I used waterproof duct tape for this for one of the hoophouses and its worked fine for a couple of years now. if you put the film on sooner you will see higher yield and quality in what you grow.

  • 2ajsmama
    Original Author
    9 years ago
    last modified: 9 years ago

    Thanks - I'd have to measure the ID and OD of everything, but the hoops are fairly big (I think I measured something like 1 3/8" last year), the purlins (3) are smaller, maybe about 1" - the center purlin may be a little bigger than the side 2. So I think since everything is steel this will be pretty sturdy, DH and I can each take end of a hoop and flex it enough to fit inside the 13'8", smaller purlins seem to have pretty thick walls so I don't think they flex as much but we haven't tried.

    I was going to do the 2 furring strip plastic sandwich on the hipboards above the (future?) gutters, have to measure how high we'll put those so how much plastic but I'm also thinking narrower plastic or remnants will be cheaper than wide enough to go all the way to the ground so the "roof" will stay on all year (? depending on snow load), gutters will probably come down so they don't ice up, don't know about side walls.

    Would I have to put another hipboard below the one with the gutters to attach the sidewall plastic to?

    Any ideas about the raised bed frames - attached or freestanding? Two 2ft wide beds and a 4ft wide with 2.5ft aisles or is there a better way to make use of space?

    Rebar (or something a little softer we can hammer into a hook at the top) to secure baseboards to ground? T posts attached to purlins (just the center one?) instead of cemented-in posts? I'm trying to make this "temporary". But winds are b/t 15-20 mph right now and they can easily get over 30mph at times.

    OK, so the 12ft of sidewall on each end is permanently attached, only the middle 24ft rolls up? Not sure I follow about the clamps?

    End walls are going to be built later this summer when the plastic goes up, I want a door at the north end for access (easiest, there's a knob of ledge rising up on south side), will cut the 13ft end in the middle and frame it out (have old storm door, OK for season extension but not winter, have slider but no track). South end I'd like to run drip line in case I have to drive up on the hill with barrels in truck to water, but I'd really like to figure a way to use rain barrels, I think N end might be a little higher than S end so slant the gutters to the N, then run drip from N to S and hope there's enough pressure to go 65ft. Else I'll be handwatering until I can get a solar-powered pump or something. I was hoping keeping sides rolled up during the summer will let some rain in.

    I have some old windows, 1 fixed pane and 1 "storm" (no screen) that tilts out I figured I'd put on S side for ventilation - maybe 1 on each side of door on N side too.

  • 2ajsmama
    Original Author
    9 years ago
    last modified: 9 years ago

    Thanks Randy, typing at same time. Would screw in anchors go through the BB or off to sides? How to attach?

    I just don't know if we've got time to get plastic up early in summer, and then there is the problem of irrigation. I'd like to keep the indeterminates going longer in the fall (or start a 2nd planting of determinates if that's better) and will have to deal with it then, but really don't want to have to handwater the whole summer, worry about heat/venting this first year, so I figured for next few months it's really just going to be a fancy deer fence (I hope the hoops scare them off and they don't wander right in - otherwise I'll have to get that game bird netting). Should have gotten this done earlier, but winter comes quick around here ground froze too early and snow left too late (and then the rains came). Every year I feel like I'm so behind just getting things planted.

    I came in from weeding the fenced-in old tomato area (again, should have been prepped long ago, planting pole and bush beans there this year plus 1 row indeterminate tomatoes where pole beans were last year) b/c it started to rain, can't figure out if it's going to do much but I probably have to get cleaned up anyway - have to pick up DD at 4.

  • cole_robbie
    9 years ago
    last modified: 9 years ago

    The alternative to "roll-up" sides is simply pulling the plastic up instead of rolling it around a pipe. The hoops are on the inside, batten cord on the outside to keep it from flapping back and forth. You have to hold the plastic up somehow, with bungees or clamps. Lowes sells a big bag of plastic spring clamps for I think $8.

  • 2ajsmama
    Original Author
    9 years ago
    last modified: 9 years ago

    Another photo - I need to order more 1.5" galvanized steel 2 hole clamps to attach the receivers to the baseboards and hip boards, a lot of stuff got bent and local big box carries them by the piece. Found a place online for $4/10-pack. But while I'm at it I also need to attach purlins to hoops, this was how it was originally done but I don't know if we're going to line up exactly the same (I guess we can go to 3ft spacing instead of 39", I think it was 3ft originally but our length is weird even though we're using 4 lengths of the original baseboard).

    So, I've seen those clamps that go across like in an X and bolt together underneath but I have no idea what they're called. Anybody have a source, will need 60 for 3 purlins and 20 hoops. Or a better/cheaper way to do it?

  • randy41_1
    9 years ago
    last modified: 9 years ago

    there's a supplier that used to be called jaderloon that sells what you are looking for (i think). they changed their name recently but a google search should find it. getting the right size is important. alternatively you can use U bolts.

  • 2ajsmama
    Original Author
    9 years ago
    last modified: 9 years ago

    The ones screwed into the purlins say Victor Snap On 1 H.W. so 1 inch (the others are 1.5"), I looked for Victor online but no 1 H. W. listed. I'll check jaderloon and U bolts, thanks.

    MSC Direct has the 1.5" 2 hole clamps, I'll try them first for U bolts. Really don't want to put more holes in the purlins.

    Thanks

  • jrslick (North Central Kansas, Zone 5B)
    9 years ago
    last modified: 9 years ago

    Here is a quick and easy method to attach the purlin to hoop. I have two ideas.

    Number 1:

    Cross connector Clamp. Yes they are expensive, but they do a good job. Just borrow or buy a cordless impact driver and it will make your job much easier. A cordless drill works too.

  • jrslick (North Central Kansas, Zone 5B)
    9 years ago
    last modified: 9 years ago

    Here is method number two:

    Number Two: A large screw type hose clamp. I used these on my hoop building when I ran out of cross connectors. You just have to unscrew the band all the way, put it around the pipes, stick the band back in and tighten it up. I also put a piece of tape on the top. They pull down tight and conform to the shape of the pipes when all done.

    They are much cheaper and probably readily available at any hardware or home improvement center.

  • 2ajsmama
    Original Author
    9 years ago
    last modified: 9 years ago

    OK, yes jaderloon has those for $1.78 a pair (50 pair per box so about 40 more than I need but will save them for next building) - or Farmtek has them $2.39 each I think. Plus S/H. MSC direct doesn't have them that I can tell. Any other ideas for sources? Though $1.78 a pair (if that is for 2 locations, not just 1 connection) seems pretty good.

    I guess I could go with hose clamps and duct tape but thought the crossovers would be sturdier (more for wind than snow since I plan on taking plastic off, but DH wants to "test it" this winter - not that I want to have 100's of $$ of plastic up for 3 months, growing for 1 month, and then have heavy snow and collapse the thing - though of course we'll leave the structure up).

    BTW, looking at the last photo I posted, the purlin is on TOP of the hoops (I know b/c the small clamps are still connected on 1 end to the purlins, not on hoops). Aren't the purlins supposed to be UNDER the hoops? Of course they didn't leave plastic on during winter, and since they didn't anchor at all must not have wind like we do.

  • randy41_1
    9 years ago
    last modified: 9 years ago

    jay's first picture are what they sell at jaderloon. they also sell the pipe clamps with the screw holes.

    Here is a link that might be useful: cross connectors

  • cole_robbie
    9 years ago
    last modified: 9 years ago

    I think the purlin clamp is worth the money. I bought mine at lostcreek.net

  • 2ajsmama
    Original Author
    9 years ago
    last modified: 9 years ago

    I looked at their sites during my Internet travels last night. Didn't see anything like what Jay posted, seems all their stuff is sized for 1/2" EMT. Did you get something that looks like Jay's 1st pic?

    Jaderloon might have best price. Just have to see what a pair is - think it's just 1 connector, 2 pieces. So might have to go with someone who sells by the piece since I need 60, not 100.

  • 2ajsmama
    Original Author
    9 years ago
    last modified: 9 years ago

    OK, a "pair" makes 1 connection. Jaderloon is very nice, sending me a sample of 1"x1" before I order to make sure it fits. Though they said they don't have enough in stock to fill my order, have to retool b/c they're making another size right now.

    Question though - if hoops go on inside, how do you manage the end hoops? Doesn't the outside of the end hoop have to line up with the outside of the end wall? In 1st picture you can see end "threshold" was notched (we goofed and fitted the notch to the end of the side wall but can unscrew, pull off the strap and move) but the other end wasn't notched so I'm not sure how this was put together, may have to take a wood chisel to it and notch that one out to line up hoops with the ones inside?

    I think I'm going with the battens on the sides, debating wiggle wire (or Jaderloon's version) for end walls, but has anyone used the fabric clamps like Farmtek sells? Do they hold? Do they rip the plastic?

    Here is a link that might be useful: Farmtek Labor Saver Fabric clips

  • randy41_1
    9 years ago
    last modified: 9 years ago

    the end bow is where you hang the end wall framing from so it actually becomes part of the end wall. i would remove that end base piece and bury the ends of some 2x4's and attach their other ends to the bow. you can just bury the end of the film and not need the endwall baseboard.

  • 2ajsmama
    Original Author
    9 years ago
    last modified: 9 years ago

    I was going to frame one end with 1 or 2 windows for venting and the other with a door though. Just need to attach plastic (on south side) around the windows, door end (north so not much sun) can be all plywood but need to wrap plastic down around the edges and be able to remove/reinstall/replace it.

  • 2ajsmama
    Original Author
    9 years ago
    last modified: 9 years ago

    Finally got the beds finished - the pile of manure in the middle needs some shaping still, but got it spread to the north end, since I had 9.5ft between the wooden beds on the sides I figured a 4 ft wide bed in the middle (for now - DH would kill me if I suggested digging along the length to make 2 beds). Rather than run the 10 T posts we had (only 6fters) down the middle since the pile widens to 5 ft in some places, I had him start at the north end figuring tallest indeterminates would go there, posts 2ft apart centered between the side beds so at 5ft and 8ft in 14ft wide tunnel, every 7.5ft or so (depending on rocks) half the length, 2 rows to FL weave. I'll put wooden stakes in between the metal ones.

    1ft of soil/composted manure to each side of each post - sloping sides for now (have to buy lumber to frame eventually if want to keep this deep, we didn't loosen the compacted soil beneath before putting the manure in). I hope this is enough to support indeterminates Brandywine, Mark Twain, Orange Minsk, Golden Queen?

    Figured I would stagger the plants in the 2 rows, even though posts are lined up to make it easier on DH? Set plants 20" apart in rows (since my posts are about 7.5ft apart and wooden stakes going between those), with 2ft C-C between the rows (more between plants if on diagonal) and 1ft from center of row to edge of bed? I know a lot of people say 3ft between plants but given the deep loose rich (may need N but high in everything else) soil is this OK for spacing? Or should I have run 1 row down the middle (though it would be hard for me to reach, and DH will kill me if he has to pull 10 posts and reset them, he says he hates putting anything in the ground in New England!)?

    I need more posts for the south end of the bed but since it's wider I need to work on it a bit first, I want to get these tomatoes in ASAP, figured the determinates or maybe just stuff like basil can go in the south end this year. Peppers (and maybe more determinate tomatoes) are going in the west beds, thinking of what would do best in east beds - if nightshades don't fill them all, maybe carrots, though I don't think we did as good a job sifting out rocks and breaking up clumps as in the first beds I built (I was getting tired and DH helped me on the east side, he did the last 24 ft himself).

Sponsored
Bella Casa LLC
Average rating: 5 out of 5 stars17 Reviews
The Leading Interior Design Studio in Franklin County