


Scrounger's hoop house.
rustico_2009
11 years ago
Related Stories
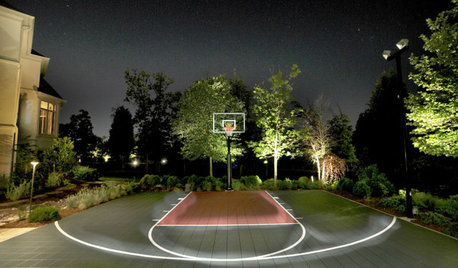
GARDENING AND LANDSCAPINGBe a Good Sport: Build a Backyard Basketball Court
With March Madness in the air, be the coolest parent ever or live out your own hoop dreams with a slammin' basketball court
Full Story
FUN HOUZZThe Narrowest House in the World?
This 4-foot-wide workshop has eating, sleeping and working spaces in its 150 square feet. Chime in on how livable you find it
Full Story
THE ART OF ARCHITECTUREFinding the Perfect Home for a New House
Sun, soil, water, topography and more offer important cues to siting your house on the land
Full Story
HOUZZ TOURSHouzz Tour: New Love and a Fresh Start in a Midcentury Ranch House
A Nashville couple, both interior designers, fall for a neglected 1960 home. Their renovation story has a happy ending
Full Story
DIY PROJECTSSpruce Up the House With 50 Clever DIY Ideas
How to make a modern chandelier, glam dresser, chalkboard table and more
Full Story
HOMES AROUND THE WORLDHouzz Tour: An Island Vacation House in New Zealand
The dreams of a courageous couple become reality in a home where family and friends come together
Full Story
HOUZZ TOURSMy Houzz: Curiosities Tell a Story
An interiors stylist uses her house as a 3D timeline of her tales and travels
Full Story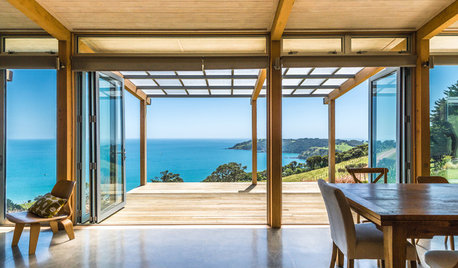
VACATION HOMESWe Can Dream: Maori-Inspired Island Home With Views of Land and Sea
This family vacation house near Auckland, New Zealand, is designed to blend in with its surroundings
Full Story
TRADITIONAL HOMESHouzz Tour: Basement Now a Light-Filled Family Living Space
Merging a house and a basement flat into one townhouse creates a spacious family home in London
Full Story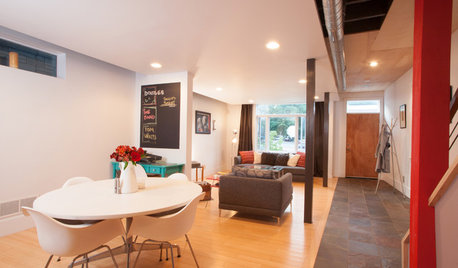
HOUZZ TOURSMy Houzz: Major DIY Love Transforms a Neglected Pittsburgh Home
Labor-intensive handiwork by a devoted couple takes a 3-story house from water damaged to wonderful
Full Story
cole_robbie
rustico_2009Original Author
Related Professionals
70037 Landscape Architects & Landscape Designers · Clark Landscape Architects & Landscape Designers · Kyle Landscape Architects & Landscape Designers · Lyons Landscape Architects & Landscape Designers · Beverly Hills Landscape Contractors · Los Banos Landscape Contractors · New Cassel Landscape Contractors · Rosemount Landscape Contractors · West Haverstraw Landscape Contractors · Westchester Landscape Contractors · Ansonia Landscape Contractors · Chino Hills Solar Energy Systems · Coto De Caza Solar Energy Systems · Elmwood Park Solar Energy Systems · Riverside Solar Energy Systemsjrslick (North Central Kansas, Zone 5B)
rustico_2009Original Author
jrslick (North Central Kansas, Zone 5B)
rustico_2009Original Author
little_minnie
rustico_2009Original Author
cole_robbie
rustico_2009Original Author
2ajsmama
rustico_2009Original Author
rustico_2009Original Author
randy41_1
rustico_2009Original Author
2ajsmama
rustico_2009Original Author
2ajsmama
randy41_1
jrslick (North Central Kansas, Zone 5B)
2ajsmama
rustico_2009Original Author
rustico_2009Original Author
myfamilysfarm
randy41_1
jrslick (North Central Kansas, Zone 5B)
jrslick (North Central Kansas, Zone 5B)
rustico_2009Original Author
rustico_2009Original Author
randy41_1
cole_robbie
2ajsmama
rustico_2009Original Author
rustico_2009Original Author
randy41_1
2ajsmama
myfamilysfarm
randy41_1
2ajsmama
2ajsmama
myfamilysfarm
jrslick (North Central Kansas, Zone 5B)
2ajsmama
randy41_1
rustico_2009Original Author
rustico_2009Original Author
Rich_Miller
myfamilysfarm
cole_robbie
Rich_Miller