


Need Some Advice for My Broken Plumeria
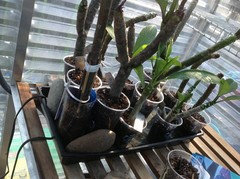
I live in Oregon and, naturally, I keep my 6-year-old plumeria indoors during the winter and move it outside to the sunniest spot I can during the summer. I keep it outside, in its 18" pot, until the night-time temperatures drop to the mid- or low-40's.
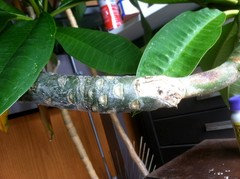
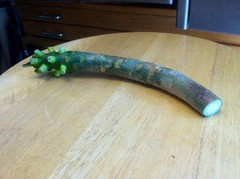
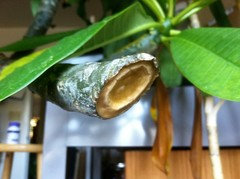
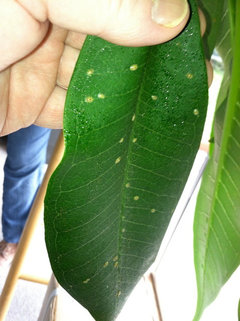
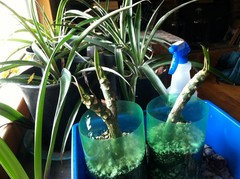
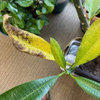
Yesterday, during a wind-storm, my plumeria was blown over, pot and all. When I saw it and rushed out to set it back upright, I found that a branch had broken off! The branch is about 12" long and has a 'Y' very close to its end. The branches of the 'Y' are no more than 2-1/2" in length. I'll post some pictures of the tree, the branch, the break and the wound in the mother tree. The picture below shows the wound.
I've done a good bit of reading, on this forum, and wish to thank all of those who have left such good advice for others on this forum. However I couldn't wade through all 329 results for 'broken plumeria', so I am hoping that I can summarize what I have learned here and ask one or two important questions I haven't yet found answers for. Please excuse my ignorance and forgive me if this approach constitutes bad manners on this forum.
My first and most important question has to do with my beloved tree. What, if anything, should I do to treat the wound created by the break? The branch has a kind of knob in the center, which has left a deep hole in the stem of the mother branch; I'm concerned about rot or other damage that could affect the entire tree.
Do I paint it with some substance to keep it from losing moisture and/or introducing rot? That seems to be the logical thing to do (and I've seen several postings that mention it) but I know nothing in this area and wouldn't want to do it if I shouldn't; nor do I know what, if anything, I should treat it with. Can you advise me on this?
Second, I want to root the broken branch, if at all possible. I gather from other forum postings that this is very do-able but I have never done it. My understanding is that I should:
1) Immediately remove the leaves to prevent moisture loss. Should I remove all the leaves or just the mature ones?
2) Several postings suggest cutting a branch into several cuttings. I assume that the tips on the 'Y' are probably too small for this approach; would that be correct?
3) Cut the end of the stem square to its axis and let it dry for a week or so to callus over. Some postings seem to suggest dipping the end in RooTone or other rooting formula as part of the callusing process; which is best?
4) After a week or so, plant it in a perlite/soil mix (mix seems to be anywhere from half-and-half to 2/3 perlite to 1/3 soil), water it thoroughly ONCE, stake it up to support it and then leave it alone.
4a) Autumn is setting in, here but I assume that I should go ahead and try to root this now.
4b) I also assume that I should put it in a large enough pot that I can leave it there, staked up and not watered, until spring.
I have a nice living room window with good southwest exposure to the winter sun ... when it shines (this is Oregon, after all). I have actually had this tree bloom once (and only once) and that happened in December of 2009, when I came home from the hospital after abdominal surgery. (I've always kind of thought that it bloomed out of pity and the spirit of aloha when it sensed my condition!) So it can get enough light to survive and grow, though spider mites tend to become a real problem after months indoors.
Any advice will be very gratefully received and carefully considered. Thanks in advance and thanks again to all those who have left the good advice that has gotten me this far!
Valdaquende

Comments (67)

Loveplants2 8b Virginia Beach, Virginia
10 years agolast modified: 9 years agoAnother rooting area!!
Take care,
Laura
Related Professionals
Arnold Landscape Architects & Landscape Designers · Forest Acres Landscape Architects & Landscape Designers · Prairie Ridge Landscape Architects & Landscape Designers · Middletown Landscape Contractors · Bristol Landscape Contractors · Brockton Landscape Contractors · Fort Hunt Landscape Contractors · Fuquay-Varina Landscape Contractors · Haverhill Landscape Contractors · Las Vegas Landscape Contractors · Soddy Daisy Landscape Contractors · Wentzville Landscape Contractors · Quartz Hill Landscape Contractors · Philadelphia Siding & Exteriors · Saint Charles Siding & Exteriors
Valdaquende
Original Author10 years agolast modified: 9 years agoLaura, thanks for the excellent description and photos; they really help! A number of other things are more apparent to me now about the way knowledgeable people grow and handle plumerias; thanks again!
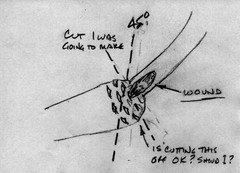
I have a concern about the 45˚ cut. The wound is at the base of the tip that the branch grew out of. I WAS going to cut straight across the base of the child-branch to preserve as much of the parent branch-end as I could. I fear that if I cut at 45˚, I'll be cutting right through a lot of the leaf nodes and the club-end of the parent branch. I've attached a drawing to clarify my description. Is a 45˚ cut right in this situation?
I'm ready to perform the operation; I just want to make sure that I do more good than harm!
Valdaquende
Original Author10 years agolast modified: 9 years agoHere's a picture that is, perhaps, more informative than my drawing.
Does it make a difference which way the 45˚ goes? Should it face up or down or sideways or does it matter? Probably not, but better to ask and look foolish than to fail to ask and look foolish.
Also, is it a good idea to paint the ends with H2O2 and let it dry before applying the glue or DAP?
Thanks again, to you and all, for sharing your knowledge, experience and enthusiasm so freely!
Loveplants2 8b Virginia Beach, Virginia
10 years agolast modified: 9 years agoHi!!!
It's always good to ask...
You certainly are not asking foolish questions.. I think you are asking very important questions and I'm sure this thread of yours will help many growers.. So thank you for your time as well!!!
Always good to clarify and understand what you are doing and I must say, I am impressed at how well you are Interested in doing what is best for your tree.
As far as the 45 degree angle ... We always try to cut any tree with this method to keep the rain and any moisture away from the actual cut itself. This means to keep the cut so that it faces away from the upside. Try not to be to concerned at cutting and worrying about keeping the leaf nodes that are so tight near the cutting. I have cut well below some areas and have had back budding on the branch at the cut tip. So.. To answer the question, Look at the branch and just cut at 45 degree angle where you have marked.
I personally wouldn't put any water or substance on the wound. Let Mother Nature seal it with its own latex ( have the shears clean tho..) after it sets, then use your sealant. Some may use other products, but this is my method. I'm sure others can offer their methods? I just want you to feel good and comfortable cutting and sealing. Once you do it for the first time.. It will be second nature.. ;-) be sure to seal all the way to cover the entire surface of the cut . You want to keep moisture out.
Good luck!!
You will do the right thing. You have it all under control and I'm sure your tree will thank you.
Make sure you do stake that mother tree. It is very top heavy and it needs some extra help keeping it upright. Then pot up next year In The spring and it will really grow well for you!!!
Take care,
Laura
 PRO
PROthe_first_kms2
10 years agolast modified: 9 years agoYou are in good hands with the above advice. Maybe I missed it in the text but would like to say its significantly more difficult to remove a rooted cutting from a bottle which still has the top part on it as in your drawing. Best of luck with it.

jandey1
10 years agolast modified: 9 years agoA word of warning: Please don't use hydrogen peroxide on any cuttings. Full strength HP--like alcohol--acts like a poison if taken up into the wood, so be careful using it on even wounds.
Valdaquende
Original Author10 years agolast modified: 9 years agoWell, I've done it! It went to my heart to do it but I believe I've done it well.
I cut at 45˚, using a brand-new and thoroughly-cleaned utility-knife blade. My pruners left a rough, partially-crushed surface that I thought would provide lots of imperfections in which nasty things might hide. The razor-edge of the blade (thoroughly cleaned in Everclear and wiped with a clean cloth) made a smooth, even cut.
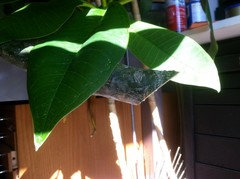
Then I cut the wound-end off of the severed branch, trimmed the leaves off (except for the tiny ones on the end) and am allowing it to dry now. In 30 minutes or so, I'll dip it in root hormone and put it in the mulch that the other one is in (see photo of several posts ago). A photo of the branch is below.
I can't tell you how grateful I am for your help and encouragement. Being a bachelor with few social attachments (but more than my share of wonderful friends), I have, perhaps, a more pronounced attachment to my plants than many; they are friends, rather than possessions. And, having had a near-death experience, I am fully cognizant of the miraculous nature of each and every living thing. I've coaxed and cherished this tree for 7 years now and it's almost like a child to me. Your words of wisdom and encouragement have helped me help the tree and, if the fates are good to me, given me two more trees!
As I said, I'll post developments and photos as they occur so that you can correct me as necessary and so that others can share what you've shared with me, starting with a couple of additional photos below.
Again, Many, Many Thanks!
Valdaquendë

Valdaquende
Original Author10 years agolast modified: 9 years agoHere is a side-view of the cut tree ...
Valdaquende
Original Author10 years agolast modified: 9 years agoAnd here's the cut branch, trimmed and drying ...
Valdaquende
Original Author10 years agolast modified: 9 years agoThe Adventure Continues!
I had dipped the cut branch in root hormone and went in to put it in a container of mulch, as I had the first one (the original broken branch). When I pulled the first one out of the mulch to inspect its progress, I found that the cut end was covered in bugs that closely resemble what we used to call 'sow bugs'!
I immediately cleaned my utility knife blade and cut 1" off of the end and am letting it dry, after which I'll dip it in root hormone. Then, where should I put it? If I recall correctly, sphagnum moss that you buy in gardening stores is sterilized; maybe I should use that.
Here's a picture of the bugs:

Valdaquende
Original Author10 years agolast modified: 9 years agoHere's a picture of the re-cut cut-branch as it now sits awaiting its root hormone. As you can see the leaf-stubs are falling off but the tiny leaves (and one larger one I didn't remove) look fine.

pcput
10 years agolast modified: 9 years agoLooks like you followed the advise here and did a "great" job. The first cut is always the hardest. You can leave the cuttings just as they are to callus (not put in anything) or some put them in perlite. The mulch they talk about is bags bought at the store not picked up from the ground. That's probably how you got the bugs in it. I never had much luck with it as my mulch always grew mold. There are other substrates to callus the cuttings in but many have been done with nothing at all. I'm sure you will do just fine. "Congrats" on the twins.
PegLoveplants2 8b Virginia Beach, Virginia
10 years agolast modified: 9 years agoHI there!!!
Wow!!!
Beautiful work I must say!!! look at how clean those cuts are.. Are you sure you're not in the medical field? ;-)
Seriously, you have done a terrific job with this whole adventure on how and what to do. Next time you need to treat your trees, it will be so easy for you!!!
Confidence and actually physically working on your tree means more than anything. CONGRATULATIONS!!!
I agree with Peg about that mulch that you had the other stem in. It looked very moist, but I was going to let you try and see what you thought. Everyone has there ways of callusing there cuttings. Some like to use mulch, lots of topics on this, some use humidity chambers, some just use the good old perlite and some just do it the old way and dip in Root tone and leave it on a newspaper and away from heat for 7-10 days. There are so many ways to callus. Jim Little uses Perlie.. Bud likes to dip In Root tone and let callus naturally. Everyone has a different way. You will find what works for you.
I just cut the cutting dip In Roottone and let it harden up and sit for two weeks. Then I pot up to root.
K. Had mentioned about the top of the bottle... As I had mentioned up thread that I cut the tops off of the neck. This is really important to do this because it will be a challenge to get it out. If you do use bottles, cut the neck off of the bottle so that the bottle is the same circumference around the sides. Make it easy on yourself when you decide what to use. Clear plastic cups with cuts at the bottom for drainage work well, since I just turn upside down and gently squeeze the root ball from the cup after it has a nice root system.
I was touched by your story about how much these plants mean to you and I am certainly glad to be able to help you keep your friend happy and healthy!!
You actually gave me chills reading how passionate you are about your trees. It really is a wonderful story!!My feelings for my trees are the same, they give me the peace that I look forward to when I come home from work... They truly are our friends and I believe most of us here on this forum feel the exact same way you do!! That is why we care so much for our beauties... Most plant people are this way..
So you are In The right place!!! Welcome!!!!
Stake that mother tree.. Keep her happy too!!! Then in the spring pot her up to a larger container so she will not be so top heavy!!!
You could use several stakes In the container now.. if you want to you could remove some of the heavier leaves at the bottom of the tree branches to alleviate the weight from the limbs. If you choose to leave them. Staking will help a lot until Mother Nature starts to shed them naturally for the winter.
Good luck!!!
STRONG WORK I WILL SAY!!!!
wish I had one of those icons to have someone applauding you!!!
Take care,
Laura
Valdaquende
Original Author10 years agolast modified: 9 years agoLaura,
Thanks for the praise and for your supportive and experienced perspective and advice. I'm also glad you understood my relationship to my plants (and all living things, for that matter).
I am attaching a photo of the cut trunk; I chose the woodworking glue, since I could use that for other things around the house. I'll also post revised sketches of the bottle and rooting tub.
I put the two cuttings in my utility closet; it is cool and dark in there; is dark OK? The cuttings still have the tiny leaves on the tips; will darkness be a problem for them?
In my zone, you cannot leave a plumeria outside in the winter; well, you can do it once, but only once! After that you have to get another plumeria ...
For this reason, I bring it inside about this time of year; once the nights drop into the 40's, in it comes. It should be OK without stakes, as long as it is not subject to wind, should it not? I WILL use stakes when I put it out next spring!
Also, I have never let it go dormant. I keep it in a window with southwest exposure; it doesn't get as much light as it would like but it it seems to be OK, as long as I can keep the spider mites under control (a difficult task toward the early spring). This year, in the early spring, it threw a flower-spike but the mites killed it. It was SO close!
Is the tree better off if I let it go dormant? I read, on another thread, that one should stop watering the tree, let all the leaves drop off and then uproot it, wrap it in a black, plastic bag and put it in a cool place for the winter, getting it out and planting it in the spring. I like the idea of letting it live all year but I don't want to overtax or jeopardize the tree or make it unhappy.
If I were to uproot it for the winter, could I then reorient the stem, when I replant it, to make the stem more vertical and thus make the tree stronger and, perhaps, less liable to tip or break?
Again, thanks, Laura! I have so appreciated your help and that of everyone who has given it.
J.R.R.Tolkien considered gardeners to be worthy of honor and high esteem in any community. The generosity of the people on this thread and these forums kind of revives one's hope for a human race which often seems obsessed with acquisitiveness, conflict, disharmony and human separation.
Thanks Again! May Starlight Light \Your Way!
Valdaquende
Valdaquende
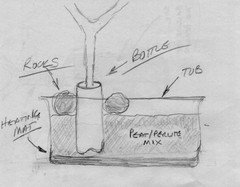
Original Author10 years agolast modified: 9 years agoHere is a revised sketch of the rooting station ...
Valdaquende
Original Author10 years agolast modified: 9 years agoAnd here's the revised bottle (thanks Peg, PowderPuf, Laura and others!) ...

Loveplants2 8b Virginia Beach, Virginia
10 years agolast modified: 9 years agoHi !!
Everything looks great!!
You have had this beautiful tree for 7 years now... Continue to care for it the exact same way you have in the past. It thrives with whatever you are doing during the winter. I wouldn't change one thing, or its location!!!
The rooting container still looks like you have it filled with soil or mix in your diagram from above? It might be a different method, but I don't fill the container with anything but bottles or cups with cuttings and rocks inside to keep them secure. This is just my opinion. I haven't seen many put soil inside ....
The cuts looks great and I'm Glad you feel good about what you have accomplished!! What a feeling eh?
The bottle looks good In Your illustration ... Peg tapes the stick to the outside of the bottle.. Just to clarify!!!
This is a tough time to root. But it's possible. Don't be discouraged at how long it could take. I would use a light mix.. Maybe half perlite and half cactus mix Instead of anything heavy that retains moisture.
Again, continue to take good care as you have in the past. Don't try and change what you have been doing for the winter. The tree does well for you, so why try something different? ;-)
Just leave the cuttings in another room.. They don't need to go In a closet. Just let it callus for 10 days and then pot up and water once. Remember to keep an eye on the cutting, but leave it alone. The more we move and lift and look makes it more difficult to root. They like to be left alone while rooting. This is why we use clear bottles... We can peek and see what is happening. If you think it needs moisture, mist every so often... But not to heavy with the moisture. You want it to stay dry, but have enough moisture so it doesn't shrivel up.
I hope you have good luck rooting, but don't be upset if it doesn't work this time. We all have issues with rooting, so I don't want you to feel badly if it Does...Remember, even in the summer.. It can take 8 weeks to root or longer. So, it can take longer in the winter...
Take good care and keep up the great job!!!
You Are more than welcome... I do understand how our trees are our babies, believe me!! I love them all... ( probably too much!!!). Lol!!!
Laura
georgecc
10 years agolast modified: 9 years agoI have learned so much in this post! Thanks to everyone, and thanks to Valdaquendë for asking so many good questions. There's great advise here, and not just a great plan, but a beauifully illustrated one, too! A picture is worth a lot.
Good luck, Valdaquendë, with your trees now! Oh, and I've been meaning to ask. What is the flower like that time it bloomed? What did it look and smell like? I want to picture it all. And welcome to the group!
Valdaquende
Original Author10 years agolast modified: 9 years agoMy apologies, SimiDude, for not answering sooner. I am a man of many projects and have been otherwise engaged for some days!
I am so glad you found this thread informative. The detail, insight and perspective of the gardeners who have so generously advised me in this thread should be useful to anyone trying to cultivate plumeria and I've tried to ask the right questions and provide enough in the way of drawings to make it easier for those who come after.
Later today, I'll post a corrected drawing of the rooting station, omitting the soil between the bottles as Laura suggested.
Being a person of many crafts, hobbies, projects and interests, I have learned enormously from people who have gone before. So I've made a habit of trying to leave the clearest trail in my wake in an effort to help others.
My tree, when it bloomed, was about 10" tall; its flowers were a pale yellow with a white fringe on the petals. And the scent filled the living room; I had just been through a serious abdominal surgery and used to sit on the couch and just inhale the lovely scent. I've always felt that it just felt sorry for me and bloomed in sympathy. I was on serious pain meds at that time but that's what I remember.
I promise to post photos to this thread the next time it blooms!
Again, my sincerest thanks to all of you who helped me; I do so appreciate you all! I'll post updates as time goes by so that you can see what you have wrought!
May the Stars Shine Upon You!
Valdaquende
Valdaquende
Original Author10 years agolast modified: 9 years agoCORRECTION: When I viewed the last post, it looked like I had said my plumeria was 10 feet tall when it bloomed. My plumeria was 10 INCHES tall, when i bloomed, NOT 10 feet!
This post was edited by Valdaquende on Thu, Oct 10, 13 at 13:15
Valdaquende
Original Author10 years agolast modified: 9 years agoFriends,
Today I am potting the cuttings. I have to admit that I'm late in doing so; a number of events have occurred and I made the mistake of putting them in a place where they were not visible and, well, 'out-of-sight-out-of-mind' ... from now on, I'll put things like this on my calendar!
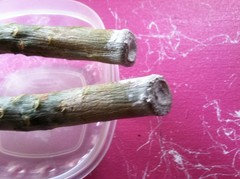
It has been three weeks since I cut them and their bark appears a little wrinkled (photos below) but they are well-callused and I'm going to try to root them. I found the heating mat that Laura recommended and got a plastic tray, about 4" deep, to use as a sprouting station. I'm using peat moss and perlite in a 50-50 mix, per powderpuff's recommendation above.
I noted that, with the heating pad and sprouting tray, came two packages. One was labelled 'Mykos' and is a 'Pure Mycorrhizal Inocculant' and the other is labelled 'Azor' and is a Nitrogen-fixing bacteria. Should I be using either or both of these? I realize that they are considered to be beneficial to plants in general but are they advisable for plumerias?
I'm going to prepare everything except mixing the soil, so that if you have have any words of wisdom I can act accordingly when I mix and plant.
Thanks for reading and considering this; as always I very much appreciate your help!
Have a Wonderful Day!
Valdaquende
Original Author10 years agolast modified: 9 years agoHere is a close-up of the callused ends (with wrinkles). In looking back over the thread, I realized that I had neglected to put the cuttings in moss. After the bug debacle (see above) I meant to get some but, again, out-of-sight-out-of-mind. I shan't be surprised to hear you say that I've doomed them already ...
Also, after reconsidering the spider-mite problem I mentioned earlier, I decided to move my office furniture around and put the tree (and the cuttings) in my office away from the other plants. Most of my plants live in the living room during the winter but I've had a terrible problem with spider mites on the plumeria toward the end of winter; it cost me a flower-spike this year.
My office gets the best and warmest light (caveat: this is Oregon) and I'm thinking that being away from the other plants (hibiscus, bird-of-paradise plants and peace lilies) may reduce its exposure to the mites.
Thanks Again; Have a Great Day!
- PRO
the_first_kms2
10 years agolast modified: 9 years agoYou just inadvertantly reminded me that I have some broken branches put aside for callus as well. I would say your cuttings look to be in reasonably good shape. A bit dehydrated but not decisively so.
I am not familiar with any benefits of the packets you described in rooting Plumeria cuttings. Referencing Jim Little's Book in which he describes beach sand as having certain positive values for rooting cuttings to include being relatively sterile. Perhaps the context does not apply but I would save those packets for another time.
I like using smaller individual containers for rooting because they are easier to keep the rooting media warm. Best of Luck with them.
Valdaquende
Original Author10 years agolast modified: 9 years agoDear Friends,
Thanks for your wonderful advice, last October! I wanted to follow-up for the benefit of those who may read this thread and want to know how well your advice worked. I also have a question or two about the plumeria cuttings I started and one about the plumeria itself.
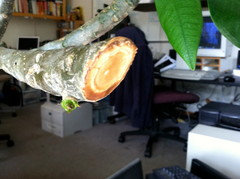
First: The plumeria survived the surgery very well and, in fact, is healthier than it's ever been! The cut branch healed very well and the woodworker's glue seems to have been the perfect thing. You advised me to cut the branch just above a node (so that the node remained on the branch) and that node is now just beginning to show the baby spikes of future leaves. I'm attaching a photo of the branch. Thank you for the excellent advice!
The other questions will follow as separate postings so I can keep the photos with the postings. Again, THANKS!
Valdaquende
Original Author10 years agolast modified: 9 years agoAs I mentioned back at the beginning of this thread, my plumeria has been plagued with spider mites, which appear each winter as I keep the tree indoors to protect it from the frost. Some years back it threw a flower spike but that was killed by the mites. This year, as I mentioned above, I moved the furniture in my office in order to accommodate the plumeria, thinking to separate it from the other plants that I keep indoors in winter and hoping that the isolation would prevent the annual infestation of mites. This did not work. I also tried spraying with a soap solution, wiping the leaves weekly to try to control them and, finally, Thompson's Wood Oil Soap. None of these worked.
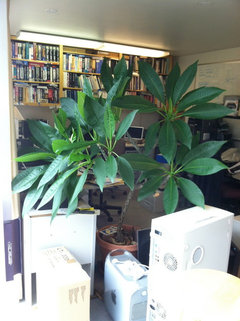
I did a lot of reading, though, and decided to try Neem oil on it. What a difference! The mites were gone after the first application! I researched the life cycle of spider mites and found that they have a fertility cycle of about three days, so I applied the Neem oil again after three days. I have not seen one spider mite since. Two applications were all it took! Here is a photo of my formerly-anemic, formerly spider-mite-infested plumeria ...
Valdaquende
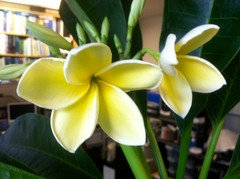
Original Author10 years agolast modified: 9 years agoNow that the mites are gone, the tree has thrown a flower spike and is well on the way to blooming and, having no spider mites to contend with, I fully expect it to bloom for the second time in the 8 years since I started it! I'm attaching a photo of the flower spike. I am SO excited! Again, many thanks for your wonderful guidance!

Valdaquende
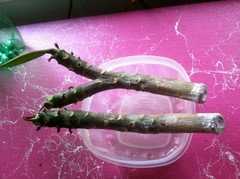
Original Author10 years agolast modified: 9 years agoI put the cuttings in a soil mix and container as discussed and shown above, set them on a heating pad, watered them thoroughly ONCE and left them all winter. The have survived, it appears. I am attaching a picture of them. They haven't shown signs of throwing actual leaves but there ARE little leaf-spikes as you can see. A few weeks ago, I noted that THEY had spider mites on them; again, two light applications of Neem oil seem to have eliminated the mites.
My question is, when do I start giving them water? It's been about 6 months now and they look like they could use some, but then who am I to judge? I see no sign of roots on the inside of the container but the cuttings look pretty good and they do have little leaf-spikes on them. I don't know how to proceed. So I thought I'd ask you; how can I tell when to start watering?
Here are a few photos of the cuttings ...

Valdaquende
Original Author10 years agolast modified: 9 years agoHere's the other cutting. It also has tiny leaf-spikes, though I had a hard time focusing them adequately ...

Valdaquende
Original Author10 years agolast modified: 9 years agoAnd here's a photo of the cuttings in the tray with the heat-pad ...

pcput
10 years agolast modified: 9 years agoSo nice to have the update to your tree. "Mom" looks wonderful! Neem oil is good stuff. Your babies have done well so keep up the good work. I'm sure others will jump in. No watering until you have leaves. Although it's showing growth it may not have any roots. You can mist them in the mean time. Our plumerias are amazing being able to grow and even bloom with no roots at all. Do keep us informed and we can't wait to see those beautiful flower pics. "Congrats" Peg
Valdaquende
Original Author10 years agolast modified: 9 years agoThanks, Peg, both for your previous guidance and your recent reply. I didn't realize that they could grow leaves ad blooms without rooting!
How often can/should I mist them? And I assume that I can be sure they are rooting when I see the roots in the sides of the containers and not until?
Again, many thanks to You and All!
Valdaquende
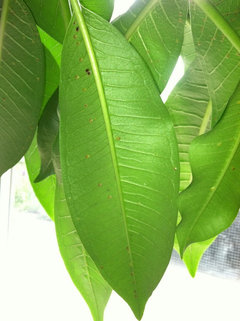
Original Author10 years agolast modified: 9 years agoI recently found a few spots on the leaves of my plumeria. I wasn't initially concerned but they seem to be spreading.
They take the form of small, green bumps on the underside of the leaves. Each bump is about 1/8" in diameter. They are green in color and are attached to the leaf at the edges, much like a limpet. They can be gently removed with a fingernail.
The bump produces a corresponding dimple on the top of the leaf which frequently is pale green in color. I noted that on a number of the leaves affected in this way, there is a kind of clear sap or something that appears as tiny droplets on the leaf surface.
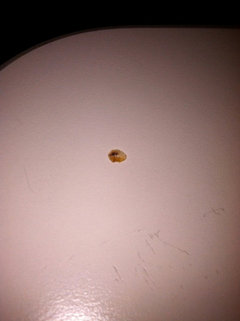
When removed and turned over (so that the 'underside' is visible), there appears to be a 'germ' or something inside it; it looks like a tiny, black speck, sometimes like a dot, sometimes like a tiny line. Sometimes the black 'germ' is larger and takes up much of the bump.
I checked a number of forums and plumie pages but could find nothing that looks like this. I know that things like Black Spot depend upon the condition of the plant and the conditions in which it finds itself, so I'd like to describe mine in the hope that this will help.
My plumeria is growing in a 20" pot in my office. It gets a moderate amount of indirect light and direct ambient light but not much sunlight. I water it every few days with 1/2 gallon of water, always on the soil, and once every 10 - 14 days I fertilize it with Ferti-lome 9-59-8 Rooting and Blooming plant food.
I'm attaching a photo of this phenomenon and will post a few more. Anything you can tell me as to what this is, whether it's inimical to the plant in some way and what, if anything, I should do about it would be appreciated. My first instinct is to re-apply the Neem Oil but I'll await the advice of others with more experience than myself.
Thanks in advance for your advice, as for your guidance and advice up to now!
Valdaquende
Original Author10 years agolast modified: 9 years agoHere is a photo of the leaf top. You can see the light-colored dimples created by the 'bumps' underneath. You can also see the 'sap' or whatever that is on the leaf's surface, though the camera flash makes it look dark in some places. It is a clear, green color in actuality.
Valdaquende
Original Author10 years agolast modified: 9 years agoHere is a photo of one of the 'bumps', which I removed gently with a fingernail and placed on a light-colored background.
If you can tell me what this is, whether I should be worried (my gut tells me I should) and what I can do about it, I'd be most grateful.
Thanks, in any case, for the time and energy you spent looking at this!
whisst
10 years agolast modified: 9 years agoHi, those are bugs, treat infected area with either soapy water or with pesticide. And if anyone has any of these cuttings available, Please let me know, cause I would love one!
whisstValdaquende
Original Author10 years agolast modified: 9 years agoThanks for that information, whisst!
I mixed 1/2 tsp dish-soap and 1/2 tsp Neem oil in a quart of water and sprayed the undersides of the leaves liberally with that mixture. I'll report the results when I've had a chance to observe them.
Any idea what kind of bugs these are?
elucas101
10 years agolast modified: 9 years agoI agree with whisst - they are some kind of sucking insect, possibly mealy bugs? Hard for me to tell exactly but they are not supposed to be there and they are up to no good. I would treat with your neem again like you did last time.
Like whisst said, you can also use a mixture of dish liquid & water, insecticidal soap, etc. too.
Similar to what you did last time, you may need to treat twice to get the full life cycle.
You're doing a great job, keep up the good work!
EDIT - I replied after you did, I see you already sprayed, good job!
This post was edited by elucas101 on Wed, Apr 23, 14 at 15:22
Loveplants2 8b Virginia Beach, Virginia
10 years agolast modified: 9 years agoHi!
Mom looks great!!! The insects look like scale to me so treat like you are...
Cuttings look like there is some activity!! Like Peg mentioned, mist if needed.
Good luck and keep posted!
Laura
jandey1
10 years agolast modified: 9 years agoSo wonderful to see your tree and cuttings doing so well--thanks for the update! You can mist three or four times a day on those cuttings, it won't hurt them.
Yes, that looks like scale on your leaves. I use a solution of rubbing alcohol to get them off the branches and trunks, but it's probably not a good idea to wipe on the leaves. Try soaps like the others have recommended. Good luck!
Valdaquende
Original Author9 years agolast modified: 9 years agoDear Friends,
The tree in this thread grew from a cutting I brought back from Maui about 8 years ago. I've kept it alive and reasonably well even in this relatively-cold clime, though it has been plagued, each winter, by spider mites. Due to the climate and the mites, it has only bloomed once, long ago.
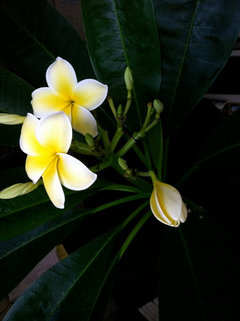
Then last year the branch was broken that gave rise to this thread and the things I've learned here have helped me make my plumeria a much happier plant. The result is that it is blooming!
In addition, I have two cuttings, both of which are putting out new leaf spikes (though I've seen no roots yet and am following directions until I do).
So I wanted to share them with you, who have done so much to help make it happen. Thanks again for your time and energy and knowledge and encouragement! If ever we should meet, I shall pour a glass of my homemade pineapple mead for you!
Thanks Again and Aloha!
elucas101
9 years agolast modified: 9 years agoWOW!!! Such great news on your blooms, that's fantastic!! Thanks so much for updating us, that bloom is beautiful!
Valdaquende
Original Author9 years agolast modified: 9 years agoDear Friends,
My beloved tree is still blooming; it just keeps going and going and going! The cuttings look great as well!
I thought I'd share a couple of pictures of the blooms and a photo of the cuttings in their current state.
I am still waiting for the cuttings to display any roots and I assume that I'll know they're here when I can see them through the sides of the containers. I never lift or otherwise disturb the containers, fearing to discourage them. I am misting them approximately 3 to 5 times a day.
Thanks again for your help and encouragement! Aloha!
Valdaquende
Original Author9 years agolast modified: 9 years agoHere's another photo of the blooms ... I didn't know that the petal tips could assume different shapes! The early ones had the rounded petal-tips you see in pictures and on those ubiquitous decals you see on car windows. But now it's as likely as not to show pointed petal tips. Who knew they could do this?
I know, I know what you're thinking ... YOU knew it! But I did not and, for me, it is one more source of ineffable delight.
Wishing You All the Best!

Valdaquende
Original Author9 years agolast modified: 9 years agoHere is a photo of the cuttings in their current state. As I said, I'll wait until I see roots on the sides of the containers before I think about potting them. Any further words of wisdom?
Aloha!
Loveplants2 8b Virginia Beach, Virginia
9 years agolast modified: 9 years agoYour blooms are beautiful!!
Congratulations on a job well done,,, I know you are so proud , and you should be!!!
You did everything right and it has paid off.. Patience was the name of the game and you also listened and applied what you learned!!!!
I'm so tickled for you!!!'
The cuttings look like there is activity. Mist only if
You think they are staying to shrivel. Let them get that bottom heat.Good luck!! You are doing fantastic!
Congratulations on the lovely blooms!!
Laura
Pondplant_kid
9 years agolast modified: 9 years agoI'm all caught up in what happened and am curious to find out what has happened. LOL
Josh
djkekoz9
last yearHi: I read your consern.I also live in oregon. I also have plumeras but I really havent had luck with them. even through Im from hawaii, the climate here is so different from hawaii growing tropical . I can tell you what I have done. so far mine is doing ok, but they are cutting . I have had them for 2 yrs.
I have used cinnamon as ani-fungal for the mother plant. and dry the others for maybe 3/4 days or even a week until they callous over…. its geting cold now try to keep them. a little warm if you can . .I hope that will help you a-little. Good luck ,Your plant is beautiful dj.


powderpuff