


Hot beds for fall rooting
I use to use hot beds quite a bit to overwinter tropicals & found they worked well to provide bottom heat for rooting roses. I had a very good success rate using this method starting in the fall.
I created the beds by digging out a trough in the garden 6" or more deep (some were 8-9" or more). I'd pile the dirt on one side & use that hill for planting veggies.
Through the year I'd fill the trough with organic material. Late summer I'd be sure to stack in plenty of rotting hay & keep it all watered.
In early fall, the best time for me to do rose cuttings, I'd set the cuttings in their pots into the hot fermenting bed. When late fall temps got cool enough I made 3-4' hoops from light weight pvc pipe stuck down into the bed. When temps got cool enough I pulled clear plastic over the hoops & anchored it. During most days I could leave it open. The combination of a hot fermenting bed around the pots, the humidity of wet hay & the cool fall temps that let me set the cuttings in full sun worked very well.
To grow great winter vegetables I would rake the soil I'd excavated from the trough back over the composting material then plant seeds--really grew great lettuce, broccoli, etc.
Comments (25)

strawchicago z5
10 years agolast modified: 9 years agoThank you, Bluegirl, for those great tips ... I sure can use those tips for my zone 5a, where late fall temp. fluctuates between freezing nights, and sunny & warm days.
It's much warmer underground, and I like your idea of PVC pipes stuck in the ground to make a shelter for rootings. In my zone 5a, I can always cover the pit with a thick thermal blanket in nights that dip below zero.
I like your tip of sinking the pots into a pit filled with rotted hay. One cold fall we filled bags with grass clippings and put them inside the garage. The whole garage was warm and toasty from the decomposing grass, despite the freezing temp. When I touched the bags, it was WARM !!
The type of potting medium: sand or moist potting soil can determine whether to cover rootings or not. The guy in the YouTube used a Walmart plastic basket. The basket has tons of holes on the sides, plus he punched more holes at the bottom. He filled it with coarse sand, stuck rootings in, then covered with a plastic bag, with occasional airing of the bag.
I don't think the above would work with moister medium, such as MG Moisture-Control potting soil, or the regular MG potting soil ... I get the worst black spots with such peat-based soil at pH 6.5, since the top layer doesn't dry out fast enough in our wet fall. Fungi thrives at neutral to slightly acidic medium.
My neighbor has indoor plants in our zone 5a winter. His plants are huge and healthy. He uses 45% composted pine fines with lime added. Composted pine fines has tannins (a fungicide), and lime is also a fungicide. In contrast, my indoor herbs got rotted, black canker, and white flies with the peat-based potting soil, which stays moist on top.
Someone once advised to put a layer of sand on top of rootings, to prevent mold. Sand dries out fast on top, but stay moist at the bottom. In contrast, peatmoss-based potting soil is wet at the top, and dry like sawdust at the bottom. I planted rose seeds in MiracleGro potting soil for seedlings, and they all died. The top was soaking wet, and the bottom was dry like sawdust.
See link below for the Walmart bin for $2.97 with many holes that the YouTube guy filled with coarse sand for his rootings:
Here is a link that might be useful: Walmart basket with holes for $2.97
This post was edited by Strawberryhill on Fri, Oct 25, 13 at 9:35

bluegirl_gw
Original Author10 years agolast modified: 9 years agoThe #1 cause for failure on rose cuttings for me is rot. I NEVER had success with the baggie method that others are so successful with, or with any method that involved using a humidity dome.
What works for me is a coarse media--lava sand, builder's sand, etc, with a little bit of coco coir. I minimize watering & sometimes use a splash of H2O2 or bleach in the water or even initially soak the media & pots in that. I keep the cuttings in as much light as possible & keep them in open air unless freezing weather is called for.
That's what works for me--another poster has excellent success rooting in pure compost--obviously a non-sterile media, but perhaps the beneficial population keeps the rot organisms at bay.
Related Professionals
North New Hyde Park Landscape Architects & Landscape Designers · McKinney Landscape Contractors · Bridgeview Landscape Contractors · Cerritos Landscape Contractors · Dudley Landscape Contractors · Fishers Landscape Contractors · Middle River Landscape Contractors · Nanuet Landscape Contractors · Rockwall Landscape Contractors · Roswell Landscape Contractors · Severna Park Landscape Contractors · Shaker Heights Landscape Contractors · Thornton Landscape Contractors · Quartz Hill Landscape Contractors · Shenandoah Landscape Contractorsstrawchicago z5
10 years agolast modified: 9 years agoHi Bluegirl: I think it depends on the weather. We have a dry phase of summer that I would definitely put a plastic bag over, since I'm lazy in watering or misting.
We also have the humid phase: 70% humidity in spring and fall, no need to cover with plastic bag.
I notice that the cuttings which I score above a bud with a knife (nicking the outer layer), plus peeling off a vertical section off the bottom: those have white calluses the entire length, esp. at the bottom.
The ones which I forgot to score above a bud, or peel off 1/2" section at the bottom ... did not callous at all, even after 2 months in moist sand.
bluegirl_gw
Original Author10 years agolast modified: 9 years agoYeah, that fellow years back, sorry I can't recall his name, but his web page was "make more roses", recommended making a couple of 1" or so scraps on the cuttings, at least one alongside a bud, before dipping in hormone.
I found that helps immensely--all the callus & roots form along those scrapes.
Using a commercial strength hormone like Rhizopan #3 increased my take, also. This fall I'm trying some Clonex.
strawchicago z5
10 years agolast modified: 9 years agoThank you, Bluegirl, for the name Rhizopan #3, I'll look for it. Some of my cuts were made randomly, and they still formed white callus (precursor to roots).
Also the guy in the YouTube stuck 4 pencils at the corner of his $2.95 Walmart basket, to keep his tent of plastic up. His method was to root trees & bushes, so I think those hard-wood don't rot as easily as the green cuttings of roses.
There's another way to keep the surface dry: watering from below like sitting on a tray of water, and using a "wicking" medium like sphagnum moss (different from peat moss). Two years ago I received bands from Burlington with that fluffy & mossy stuff inside ... the roots were deep, and roses were super-healthy. See info. below:
"Horticulturists have long known the benefits of long-fibered sphagnum moss. With its unique qualities of retaining 20 times its weight in water and its anti-bacterial sterility, sphagnum moss has become an indispensable gardening tool in the propagation and beautification process."
Here is a link that might be useful: What is long-fiber Sphagnum Moss
strawchicago z5
10 years agolast modified: 9 years agoFound a fantastic site on how to root soft-wood cutting by Cheryl Netter, zone 5, Colorado. She did that indoor, in the winter (dry & cold) with the baggie method and indirect sun. Click on the link below, then click on Table of Contents, then click on Cheryl Netter's Method of Softwood Propagation.
She explained things very well. Thank you, Cheryl, I appreciate your excellent website.
Here is a link that might be useful: Cheryl Netter on rooting soft-wood cuttings
This post was edited by Strawberryhill on Tue, Nov 26, 13 at 18:20
cnetter
10 years agolast modified: 9 years agoYou're welcome! Virtually all my OGRs and many of my older miniature roses were from rooted cuttings.
bluegirl_gw
Original Author10 years agolast modified: 9 years agoNice site! I need to try baggies again--I just never got them to work but so many folks do. Maybe I started with the media too wet...
I'm trying air-layering on a Talisman budded onto Ragged Robin. Talisman is a sentimental favorite but it's a weak rose for me. I tried budding it onto Ragged Robin (Glorie des Rosomanes) & got a nice take that is 8-9" long now. I want to root the Ragged Robin stem a bit below the Talisman graft so I'm trying air-layering. This link has a good description & photos of the method I'm trying. Fingers crossed.
Here is a link that might be useful: air layering photos & description
strawchicago z5
10 years agolast modified: 9 years agoThank you, Bluegirl, for that excellent site on air-layering. It has great photos & easy instructions. I have the best luck with soil-layering, bend down a branch, nick it, then dump soil on top.
But I can't bend down hybrid teas, so air-layering with a baggie sounds good ... will try that. Your link makes it so easy ... many thanks.
I re-read Cheryl Netter's excellent instructions on soft-wood rooting. Her method is a blessing for those with alkaline tap water. It's only ONE time watering the medium with rain water (pH 5.6) or distilled water (neutral to slightly acidic pH), then no watering for at least 1 month, since the rooting is enclosed in a baggie.
I agree with what Cheryl Netter observed: hybrid teas tend to bud out 1st, before their roots are formed. I'll re-post the link to Cheryl Netter's method of softwood rooting. The link takes to her home page first, then click on Table of Contents, then click on Cheryl Netter's softwood rooting method.
Here is a link that might be useful: Cheryl Netter's home page
This post was edited by Strawberryhill on Thu, Nov 28, 13 at 14:01
strawchicago z5
10 years agolast modified: 9 years agoI was browsing through Pinterest for roses pictures, and found a neat trick of plunging rose cuttings into a raw potato, and plant into the ground. The potato provides moisture and food for the cuttings to grow. See Pinterest link below for the procedure:
Here is a link that might be useful: Rooting roses by sticking into a raw potato
strawchicago z5
10 years agolast modified: 9 years agoIf I were to use the potatoe, I would cut it into half, and stick the cutting between the 2 halves. That way the potato won't sprout, and the cutting has some room to grow. Here's the toothpick method to induce callous on a cutting:
Posted by nandina 8b (My Page) on
Wed, Aug 23, 06 at 13:13
I have not posted this propagation method in several years. Time for a repeat. Just a reminder that all cuttings need to callus before they will root. This method allows the callusing to take place on the mother plant before the cutting is removed and is most helpful for those hard to root trees/shrubs. Plan to use the toothpick technique during the last weeks of August up until mid-September. This is a little known process and when I first posted it a number of growers contacted me, pleased to know about it as it requires no misting systems, etc.
MATERIALS REQUIRED...
A very sharp, small penknife or Exacto knife.
A small block of wood (to prevent cutting fingers!)
Some colored yarns or tape for marking purposes.
Toothpicks.
THE TOOTHPICK PROPAGATION TECHNIQUE
1. Select the stem from which you wish to take a cutting. Look along it until you locate a bud ON LAST YEAR'S GROWTH.
2. Place the block of wood behind that point and make a single VERTICAL cut all the way through the stem, just below the bud.
3. Insert a toopick through the cut.
4. Mark each cutting with colored yarn/tape so that you can locate it at a later date.
5. Walk away from your toothpick cuttings until the end of October or November. Leave them alone!
6. REMOVING THE CUTTINGS FROM THE MOTHER PLANT.
You will note that a callus has formed where you wounded the cutting and inserted a toothpick. With sharp pruning shears remove the cutting just below the toothpick. Trim off the toothpick on either side of the cutting.
7. Dip your cuttings in rooting hormone and set them in a cold frame. Water well and close up the frame for the winter. Water as needed. If you do not have a cold frame, set the cuttings right next to your house foundation on the east or north side. Lean an old window or glass pane up against the foundation to protect them.
8. Rooting should take place by mid-spring. Those with greenhouses can leave the cuttings on the mother plant into December/January before setting them to root. Commercial propagators will find this useful.
A VARIATION OF THE TOOTHPICK TECHNIQUE
This method requires a bit of practice but works well. In August/September select the stem to be used as a cutting. Locate last year's growth on the stem and grasp it between thumb and forefinger. Snap the stem lightly until it breaks in half. Leave it hanging on the plant where it will callus. Then follow instructions above for setting cuttings. Snip the cutting off, when callused, at the wounded part. This is a useful technique for azaleas and many woody shrubs and Japanese maples.
Hopefully I have explained this method so it is understood. Reading it over a few times may be necessary.AND:
Posted by nandina 8b (My Page) on
Fri, Jun 8, 07 at 10:00
I note that you are a professional so will take the time to post two techniques neither of which require misting. First, have you tried heel cuttings? Or the standard 'from seed' method?
The first rooting method I call the 'toothpick technique' which allows a cutting to callus on the plant before it is removed. For this you will need a small, thin, very sharp pen knife (or exacto knife) and a small block of wood. Locate last year's growth on a stem, place the block of wood behind that section and make one single vertical cut through the stem below a bud. This is done in August/late summer. Insert a toothpick through the cut, tie some sort of marking tape on the stem so you can find it later and walk away from it until October. At that time remove the cutting severing below the toothpick, trim the toothpick to the stem, dust with rooting hormone and stick in a cold frame. Or, cuttings can be placed in a greenhouse where they will root without misting. This is my favorite hardwood/shrub rooting method for all that type of plant especially difficult to root ones.
The second method is a variation of the first. It takes a little practice and azaleas are a good practice plant. One simply makes a downward snap below a bud on last year's growth in August partially severing the stem. Leave it to hang on the plant until October, then remove, dust with rooting hormone and set in cold frame or greenhouse. When I am working with a difficult to root plant I will also use this method, snapping the stem at a main branch creating a heel cutting.
Once you have worked with these methods you will find them easy and can expect a high level of strikes.
jim1961 / Central Pennsylvania / Zone 6
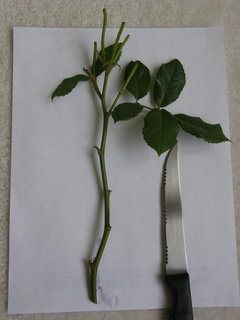
8 years agolast modified: 8 years agoI like easy Straw! I may try your way soon...How many leaflets should be on the cut 9" stem?
Can you show me a pic of what your cut 9" stems look like?

msdorkgirl
8 years agoHehe, Jim depends on how fertile your soil is and so many other things regarding cuttings ... maybe you'll have luck like Straw too.
Here, I've "heard" about people just sticking the stick in the ground and having it work, but I have not seen it happen personally. Using something to simulate a greenhouse has been necessary for me, anyway, because otherwise it's just too sunny.jim1961 / Central Pennsylvania / Zone 6
8 years agoMy neighbor last year started 2 rose cutting by putting them into the ground...Not sure how they did though as she broke her knee earlier Spring and could not care for plants...
strawchicago z5
8 years agolast modified: 8 years agoI leave 3 leaflets on a 9" stem, since where I stick them into the ground is VERY SHADY, no sun, the sun is blocked by many trees. To prevent trees' root from robbing the water, I put plastic edging around that area, but one can use big pots (bottom cut-off), plus a slash at the side, as a circular-ring around .... to retain water. For dry & sandy soil, one can insert that ring deeper. For wet & heavy clay, I would insert that circular-ring only 1 inch. deep, just enough to help that area to be moist, during light rain. I take that ring off before the heavy rain in late fall hit.
Here's Connie of hartwood excellent link on rooting, using a soda-pop to retain moisture.
http://hartwoodroses.blogspot.ca/2013/05/how-to-root-roses-from-cuttings.html
Gardenguides,com has detailed instructions on how to root:
Cut one or more stems (new growth), making the cut with a sharp blade just below a leaf node. Stems should be about 6 to 8 inches long and the cut should be made at a 45-degree angle. The best stem candidates for cuttings are tips of branches that have recently bloomed.
Remove the leaves on the lower half of the cut end of the cutting. Leave the leaves at the upper end.
Dip the cut end of the cutting into powdered growth hormone. Knock off excess growth powder.
Fill the pots with a mixture of approximately two-thirds sand and one-third peat moss, well mixed.
Make a hole in the potting mix using a pencil or similar object. Insert about half of the cutting into the soil. Tamp the soil around the cutting until it is firm. If planting multiple cuttings in the same container, plant cuttings 6 to 8 inches apart. Water until the soil is damp.
Cover the pot with a plastic bag and secure around the pot to form a make-shift greenhouse. You can also use a washed plastic 2-liter soda bottle for this. If you choose this option, cut the bottom end off and place the spout end of the bottle over the cutting, creating a mini greenhouse with an open "chimney" at the top for air circulation.
Place the pot in a warm location where it gets 4 to 6 hours of indirect light each day.
Remove the soda bottle or plastic bag occasionally to prevent the constant dampness from causing the cuttings to rot. Make sure the soil stays damp, but not overly wet. Watch for new leaf growth, which should begin in 4 to 8 weeks. At the first sign of new leaf growth remove the soda bottle and allow the rose to have at least an hour or two of direct sunlight a day.
Wait until the following fall to transplant cuttings to the garden. By that time, the root system will have developed enough to survive transplanting. Read more: How to Root Rose Bush Cuttings | Garden Guides
**** From StrawChicago: I use a serrated knife to scrape off the outer "greenish layer". I scrape off 1/2" vertical strips at the end. I also scraped BELOW each leaflet (after cutting the lower leaves off). I leave 2 to 3 upper leaflets alone. See pic. below:
msdorkgirl
8 years agoI'll also try your method Straw ... different from what I've been doing:
- long stem (mine usually only 6 inches)
- scraping below each leaflet (makes sense to expose more white to encourage rooting)
- planting directly into ground (that is something I cannot copy)
Maybe I'll have success too, I am not home during the day so can only guess where it's shady, but they still get dried up due to too much . I"ll try another spot where it's completely shady and see if it that works.jim1961 / Central Pennsylvania / Zone 6
8 years agoAwesome and thanks a million Straw for the info and pic! Do you dip your cuttings in root hormones? Some people use honey? Thanks
strawchicago z5
8 years agolast modified: 8 years agoHI friends: That wet bed (enclosed by plastic edging dug deep to prevent grass) .. it's next to 2 tall corkscrew willow. Willow tree has rooting hormone, and those 2 trees shed their leaves onto my wet & shady bed, so I don't use rooting hormone. The soft cuttings are taken early summer (after 1st flush), while the hard-cuttings are taken late fall. The hard cuttings are easier to stick into the ground, versus the soft-cuttings rot easily.
strawchicago z5
8 years agolast modified: 8 years agoHere's a good link where Karl Bapst gave info. how he achieved 95% success in rooting roses, in his zone 5a:
http://forums2.gardenweb.com/discussions/1709578/help-rooting-then-rotting?n=10
karl_bapst_rosenut(5a, NW Indiana)
I use perlite and/or expanded Jiffy 7 peat pellets to start my cuttings. Neither require sterilizing.
The peat pellets nest in the perlite which holds them erect and provides a moist environment. Perlite drains well so the cuttings don't drown.
Misting nozzles on a timer set for 5 minutes every 2 hours keeps them amply moist.
For me, starting cuttings in peat pellets allows me to remove them from the perlite without damaging the tender new roots.oldroser(z5)
They are damping off. I spread milled sphagnum moss (not peat moss but finely ground sphagnum - the stuff used in hanging baskets) over the surface. it has an anti-fungus, anti-bacterial action. You can get it at your local garden center under the name of "No Damp Off." You don't need much, it is dust fine and very light. I also use it when starting seedings - great stuff.
strawchicago z5
8 years agoIn the past years I used 50% perlite and 50% MG-potting soil to root cuttings. But that's too wet in our heavy rain. I'll try the 60% perlite and 40% MG-potting soil instead. Here's a discussion in fig forum:
http://forums.gardenweb.com/discussions/1889317/best-soil-medium-for-newly-rooted-fig-cuttings?n=1
" I did some advance reading and found that one grower said while in cups, he used a 60% perlite/40% vermiculite, then when up-potting to 1 gallon pots he used 50% hummus and 50% perlite."
*** From Straw: that works for fig, but may not work for roses. Many people report that vermiculite holds too much water and it rots.
strawchicago z5
8 years agolast modified: 8 years agoThere's an Australian soil-company that lists the percentage of soil sold for specific purpose. For rooting, they sell 5 part perlite to 1 part coco-coir. From Roses forum, 2006 thread:
http://forums.gardenweb.com/discussions/2136836/heard-this-on-tv-and-people-have-done-it?n=5
elks(US5 Can6)
Straight coir has worked best for me, with a greater number of fatter roots resulting.
Steve. Here is a link that might be useful: My Methodhttp://www3.sympatico.ca/wm.saundersrose/articles/overwintering.html
An excerpt from Steve's method: "Where most agree is that cuttings should have four leaves with usually five or seven leaflets. The bottom two should come off. From there, I make a fresh cut under water, on a diagonal just below the bottom node, that is, where the bottom leaf just came off. I score up the cane from there about 1" (2.5 cm) on each side of the cane through the bark.
I have most success striking the cuttings in 6" pots filled with coir (ground coconut shells) and a little compost. Recently, I have learned that waterings of H2O2, hydrogen peroxide, {5 ml/ 95 ml of water} increases root development in olive cuttings. Dip the prepared cutting in a strong rooting hormone, such as Rhizopon AA#3 powder (0.8% IBA in talc). The powders work better than the liquid. Last summer, I started only 24 cuttings and lost one by the end of summer, but all remaining came through the winter unscathed! I have started HTs, floribundas, shrubs and OGRs; it does not seem to matter, so enjoy." Steve Elkerton.
strawchicago z5
8 years agolast modified: 8 years agoFound a good research on what's the best pH for rooting plants, see below:
Effect of Peat Moss and Sand on Rooting Response of Cuttings
A. E. Hitchcock Botanical Gazette Vol. 86, No. 2 (Oct., 1928), pp. 121-148
http://www.jstor.org/stable/2470656?seq=1#page_scan_tab_contents
Abstract
1. According to their rooting response in peat moss and in sand, 96 varieties of cuttings (including 46 genera) have been classified into three groups. Cuttings which rooted readily in peat moss but poorly in sand are placed in group I; those which rooted readily in sand but poorly in peat moss are placed in group II; cuttings which rooted readily in either peat moss or in sand are placed in group III. 2. The fact that cuttings in all three groups rooted readily in a mixture composed of equal proportions of peat moss and sand (with the exception of five varieties in group II) indicates that this mixture is superior to sand as a general medium in which to root cuttings. Although the pH value of the medium was an important factor in determining the type of rooting response of some varieties of cuttings, it was not the single limiting factor. The critical acid value, at which injury to the cuttings listed in group II occurred, was found to lie between pH 3.6 and 4.1. For the same varieties of cuttings callus formation was inhibited at pH values more acid than pH 4.1. 3. Whether peat moss was furnished in its natural acid state, neutralized, or mixed with sand, a more rapid rate of root growth occurred in a medium containing peat moss than in one containing only sand. Good rooting occurred for most varieties of cuttings over an acid range of pH 4.5-7.0.
strawchicago z5
8 years agoHere's a great garden blog and documented what the experts say, see below link: http://www.growingthehomegarden.com/2009/05/sand-vs-soil-for-propagation.html
" Here is what the Master Gardener Extension at Ohio State University had to say about the medium for cuttings:"Insert treated cutting in a moist rooting medium. A suitable rooting medium is half perlite and half sphagnum peat moss. Any disinfested container with drainage is acceptable for use."
Here's what North Carolina State University had to say on the subject:"The rooting medium should be sterile, low in fertility, and well-drained to provide sufficient aeration. It should also retain enough moisture so that watering does not have to be done too frequently. Materials commonly used are coarse sand, a mixture of one part peat and one part perlite (by volume), or one part peat and one part sand (by volume). Vermiculite by itself is not recommended, because it compacts and tends to hold too much moisture. Media should be watered while being used."
strawchicago z5
8 years agolast modified: 8 years agoFound a good link from NOBLE foundation research that shows the larger the particle, coarse sand, holds less water than play sand, and as the particle becomes smaller, like clay, it holds the most water. That's why coarse sand is best in rooting roses, to prevent water-logging & rotting. Here's an excerpt from below link:
"Water and air rapidly permeate coarse soils with granular subsoils, which tend to be loose when moist and don't restrict water or air movement. Slow permeability is characteristic of a moderately fine subsoil with angular to subangular blocky structure. It is firm when moist and hard when dry."
http://www.noble.org/ag/Soils/SoilWaterRelationships/
However, in real life ... coarse sand holds WATER LONGER than clay .. if the clay is high magnesium like mine. Magnesium is a drying agent, my clay becomes dry fast ... versus coarse sand holds water longer in shade. I saw a plant sprouting on coarse sand at Menards, where they have open samples of various mulches. I put wet coarse sand in 4 hours of morning sun, and it stays damp (even moisture) 5 days later at above 80 degree.


strawchicago z5