Shop Products
Houzz Logo Print
hautions11

Innovative Indoor Tomato Grow

hautions11
15 years ago

Hi everyone! New to the forum, but I wanted to start an indoor tomato growing thread. I do not see a lot of specific techniques or experiences documented on too many forums. I decided I would make a pictorial of my techniques and more importantly my results. I often see some interim pictures but rarely a complete grow. Please excuse me if this has been covered, but I have not been able to find good info up to this point. So let's get to the basics..... I have struggled even outside to grow good tomatoes in my very well shaded and heavily tree infested yard. Lots of attempts and a few minor successes. So fall came and went cold weather is upon ( 3 degrees F tonight in mid Indiana )us and I have the gardening itch. I have seen a variety of attempts with both florescent and HID lighting to grow tomatoes. I see some random pictures of very leggy 6'-7' tall plants with few (5-10) tomatoes on them.

Here is my set-up... a 3 season porch with lots of single pane glass. left to it's own devices low 20's or teens in cold weather. I often try to winter over patio plants to save the $100-$200 dollar annual investment. Perfectly south facing window that gets an honest 6-7 hours of direct sun. First problem is heat and then the light issue. Some cheap Lowes window shrink plastic covers and 3" air gaps solved the basic insulation problems. A small 500w heater keeps the room at appropriate 60 night to 70 daytime temps. Here is an overall shot of my set-up with a 400w metal halide light in place.
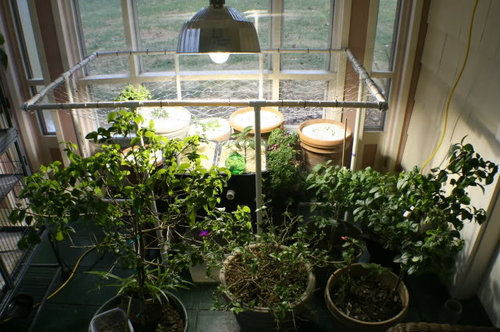
As you can see there are quite a few plants gathered around my single light source. With most of them I'm not looking for an aggressive growing situation, just some minor bushing and an increase in overall vigor so that they're ready to really take off when they go back outside in the spring. You may be wondering about the big weird-looking screen suspended above the rear plants. Its made out of poultry net mounted in a 3 by 6 foot PVC pipe frame. This would yield an 18 square foot growing area, but due to the 11 inch deep curve in it you end up closer to 23 feet. I will explain the exact function and methodology of this screen and its use at a later date when I've actually started to use it. The main attraction here is these guys.
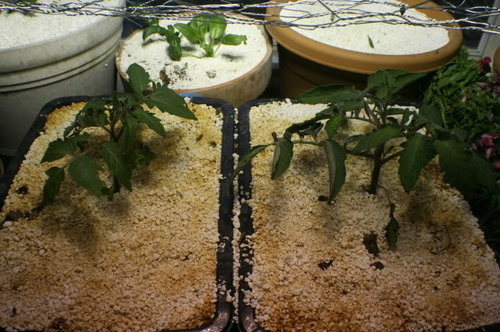
To the left we have a Burpee Big Boy hybrid, which is a large Beefsteak type tomato. The the right is Burpee's Big Momma hybrid, which is a large Roma type. Both plants are just finishing their 3rd week of life in the tubs, 4 weeks from seed. You may note the somwhat unusual looking containers in which they are planted, especially if you noticed the blue aquarium air hose snaking out of the left one. Let me explain:

Inside the tubs is a unique growing medium consisting of coconut moss, vermiculite, pearlite and compost resting on a 4 inch bed of lava rock. The rock is completely submerged in a water bath. The depth of the bath is maintained by a side overflow drain which sits at exactly 4 inches from the bottom of the tub. This allows me to water them with a can the traditional way but maintains the water level and makes sure the medium above never gets "soupy". At the bottom of the bath rests a 12 inch aquarium bubbler wand that constantly injects the bath and the medium above it with air. This oxygenates the entire medium, encouraging the growth of beneficial aerobic bacteria and killing off pesky anaerobic bacteria; technically making it a hydroponic system. However, unlike most hydroponic rigs it is mostly compromised of organic matirial and is thusly capable of supporting a full-fledged Mycorrhizae fungal colony which lives in a symbiotic relationship with the tomato roots. The fungus chelates all of the minerals for the plants, prevents dehydration, balances the PH and acts as a secondary immune system to fight off unwanted intruders. All of this makes for furiously aggressive growth from the tomatoes, it is an optimum environment for nutrient uptake, water retention and oxygenation. I feel that it has advantages over both traditional soil growing and hydroponic setups; the best of both worlds. It is much lower maintenance than most common hydroponic setups as most of the nutrients are loaded into the medium up front. I use organic nutes almost exclusively: Blood meal, coffee grounds, wood ash, garden sulfur, fast-acting lime and an organic mix called Bio-tone starter plus (contains feather meal, grab meal, guano, greensand and bone meal). The medium contains two special additives: Soil Moist granules to help it retain moisture (very important due to the light spongy nature of the medium) and Hydro Organics' Mycorrhizae Super Pack (a form of dry fungus spores). Over the course of their lives the tomatoes will receive fish emulsion for a nitrogen boost, corn-cob ash for potassium (very important) and bloom burst (my only salt fertilizer, just one teaspoon per season) for phosphorous. Other than the dry mycorrhizae spores (which aren't completely necessary because the Bio-Tone mix comes pre-loaded with a small variety of beneficial spores) all of these materials are readily available to anyone from a variety of local sources. I have gotten everything from Lowes, Ace Hardware and my local pet store.

Aside from my fancy bubbler tubs and the screen I use one other special technique not often seen in indoor tomato gardening: Supercropping.
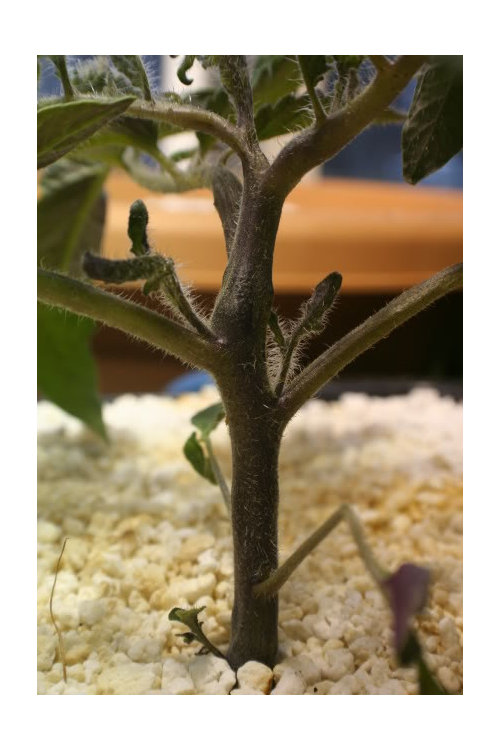
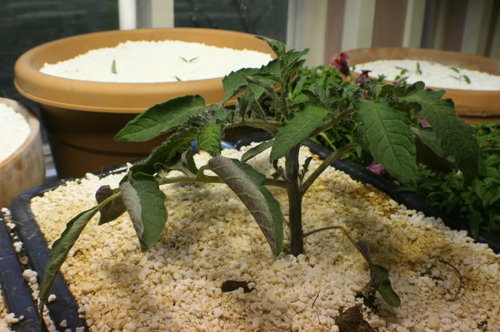
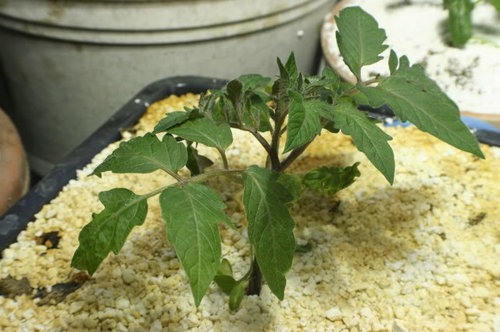
This is a shot of Big Momma's stem, which is far bigger around than the #2 pencil I forgot to include in the shot for scale. It is positively monstrous for a 4 inch tall plant, bigger than stems I have seen on 12 inch plants from my local nursery. This is achieved through the technique I referred to as supercropping. Its a simple practice though it intimidates many growers who are frightened of the potential harm it could do. It takes a little practice but let me make this clear before I even explain it. Supercropping will not kill your plants. It won't, really, honest, I promise. All you do is once the sprouts have become established in their final grow medium, around the one week mark usually, take the stem section between your thumb and forefinger and squeeze gently while making a slight alternating twisting motion. There will be a tiny crushing sound and you will feel the phloem (the veins that carry things downstream towards the roots) give way and be crushed slightly. The plant will droop and look very sad and you will feel horrible, which makes it all the more difficult to continue doing this all up and down the main stem section. However, if you didn't wuss out, when you come back the next day the plant will have righted itself and the stem will have grown noticeably thicker. You must continue this practice as the plant grows new stem sections. If you are diligent this is the result:
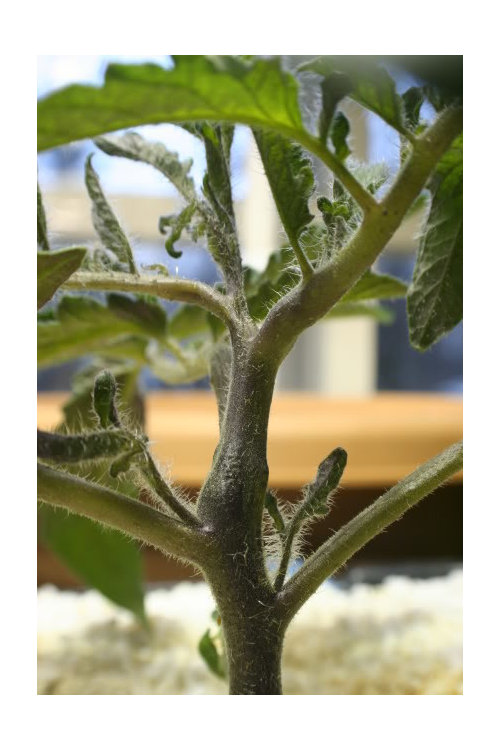
You will note that the distances between each leaf (the internodal gaps) are very short, always less than an inch and in some places as little as a quarter of an inch. This is somewhat attributed to the metal halide lamp I'm using, but the extreeme degree to which it occurs is all down to the supercropping. You can see in the main stem section right above the two suckers where it tapers down significantly. This is a spot that I had not crushed yet so as to illustrate the difference in diameter between pinched and non-pinched stem sections. You will also note that where I hadn't crushed it is far and away the largest internodal gap on the plant. Diligent supercropping results in more vigorous plants that do a better job of holding themselves up and most importantly don't get to an out-of-control height in the limited space of indoor growing.

The lamp currently in place is a 400 watt Metal Halide high bay acquired from a local business currently in the process of replacing all of their HID lamps with more efficient T5 florescents. In a few weeks it will be swapped with a pair of 400 watt high pressure sodium lamps. I will write more on the lighting in the coming weeks as it becomes more pertinent. And now, some additional pictures:


Fat Momma


Big Boy


Wide shot


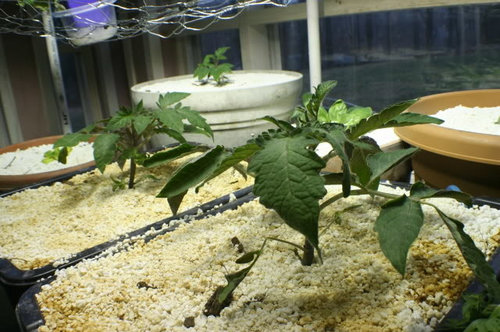
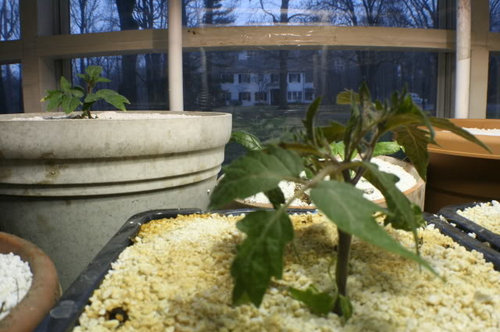
This is Big Boy and in the background is a tomato plant that is identical to him in almost every way. It came from the same bag of seeds and was sprouted on the same day. They have been given the same nutrients, bathed under the same quality of light, treated with the same Mycorrhizae spores and even have roughly the same growing medium. The only difference between this one and Big Boy is that Big boy lives in one of my bubbler tubs and the other lives in a traditional pot, yet the difference between the two of them is huge.

Well, thats about it, I've covered most of the general things that I feel sets my grow apart from others and/or may interest you guys. Feel free to ask any questions about specifics, comment, criticize or congratulate at your digression. I'd be happy to answer any questions about construction or the acquiring of materials to anyone who would be interested in employing some of these techniques themselves, or to anyone interested in why exactly I think this way is better. Happy growing and I hope you all have a great holiday!
Comments (111)

  • vrkelley
    15 years ago
    last modified: 9 years ago

    >>The plants trained on the screen are really getting kind of ratty looking.

    The picture shows curling yellow leaves. Are they getting enough water and light? If not enough light, you can try to add some foil underneath some of the leaves to help bounce some of that light back onto the plants.

  • hautions11
    Original Author
    15 years ago
    last modified: 9 years ago

    Indeed the leaves are in a sorry condition. They where a little dehydrated in that picture, we are adjusting from the initial one watering a week schedule. They are beginning to drink a lot more and are getting moody. They'll go from springy and turgid to sad and wilty in a very short period of time, not more than an hour or so. The medium they are in has great uniformity, with no wet or dry spots. When it finally runs out of moisture all 8 gallons of the medium gets dry in a hurry; with the bubblers exacerbating this issue all the time. Usually, as they are right now, leaf yellowing and curling don't occur simultaneously. Fat Momma has a curling issue, localized only on shoots that are near one of the nasty 90 degree bends in the stem. In the overhead picture this is all that is visible. None of her lower leaves are bothered and look great, a trait shared by both plants. They are shaded a bit and receive a lot of "spill" from the nearby Metal Halide lamp. Big Boy has very little leaf curl, but his leaves are mottled and yellow in places. I think we where actually a little over-lit with the beastly orange 400 watt HPS lamp hanging within 14-16 inches over the screen. Plus the Metal Halide is still up and hangs less than 36 inches away. We've backed the HPS off 6 inches since then and they appear a little better, though Fat Momma still looks pretty pissed.

    We hit them with corn-cob ash last weekend and just today fed them with Bloom Burst. Its a 12-55-6 salt fertilizer that also carries a nice little chelated Iron (.10%) boost. It was a light dosage, just 1 teaspoon per gallon, as the medium carries some hefty organic nutrient content already. We're hoping that this combined with the Blossom Set Spray (active ingredient: cytokinin) we'll be looking at rapid blooming, fruiting and ripening. We're hoping that if we can get some fruit set the mad vegetative vine growth will slow down a little. In my experience plants, especially ones in aggressive growth situations, respond surprisingly rapidly to cytokinin. If all continues to go as I've predicted we'll see fairly apparent change by the middle of this week. We'll post new pictures then and perhaps do a better job of illustrating the layers of foliage and the differences between the older less stressed leaves and the newer rather more tortured ones that where predominantly featured last time around.

  • hautions11
    Original Author
    15 years ago
    last modified: 9 years ago

    I have a better blossom picture today.

    Enjoy

  • hautions11
    Original Author
    15 years ago
    last modified: 9 years ago

    I am a little shocked as I just showed my first open blossom Sat We have 'maters!! That realy snuck up on me.

    I believe I see two more when I examine the other flower sites. This is pretty cool! No I guess I could still get BER and loose these little guys, but I will keep my fingers crossed. I mentioned earlier that we took our vibrating air pump that runs the bubbler tub and put it on the poultry net to simulate high frequency vibration, but i did not Q-tip these flowers or anything yet. It must work for some no fuss pollination. Who would have thought. Everybody wish our new little guys luck in their early development. Yea!

  • geeboss
    15 years ago
    last modified: 9 years ago

    Electric toothbrush or just shake for 10 sec. twice a day. Morning and eveneing

  • vrkelley
    15 years ago
    last modified: 9 years ago

    Looks like the plants are recovering nicely. How many days from seed to blossom??? It will also be interesting to discover the number of days from set to ripe.

  • hautions11
    Original Author
    15 years ago
    last modified: 9 years ago

    @geeboss
    Both methods we investigated long before we even set flowers. We had settled on manual pollination via Q-tip, but for fun decided to try setting our air pump on the screen as flowers first started to show up. The air pump drives a surprisingly powerful vibration through the screen and its supports. The results seem promising, blossoms that had just opened on Saturday had set fruit and where taking off late the following Tuesday without us ever messing with the flowers themselves. If this wasn't a fluke we should have good pollination rates without ever lifting a finger.

    @vrkelley
    Dad and I where talking about this last night. Blossoms had first started opening on Saturday, just as the plants where turning 6 weeks old. Now that's six weeks from being placed in our bubbler tubs, we put them in when they where very small; just starting to sprout their first set of true leaves. They where only a week from seed (thats 1 week from us putting the seeds in the sprouting medium) when we did the transplant, putting them at almost exactly seven weeks from seed when we first saw flowers. Pretty quick I think, but I'm still most impressed with our 3 day gap between the first blossom opening and our first set fruit.

  • hautions11
    Original Author
    15 years ago
    last modified: 9 years ago

    VRKelly,

    Some one, ( Master gardener ) at work threw a gauntlet that we can not make a ripe tomato, by the end of Feb! That is about 40 days from our pea size unit today! When I asked this forum the consensus was 50-55 days for a ripe tomato. This will be another test of the whole screen nutes light supercropping philosophy. That is about a 25% improvement over std good conditions outdoor grow. Pretty tough. But the whole system has been tuned up to this point to grow big abundant fruit indoors. The challenge is noted and it should be real fun to see where it goes! Watch along and we will see.

    Larry

  • vrkelley
    15 years ago
    last modified: 9 years ago

    hautions11

    I've never grown a tomato so I didn't know how well my plant is doing. My results are similar. Took 6 weeks from seed to flower. I didn't know about fruit setting, as soon as the flower falls off, there's a tomato.

    Flowers started showing up on 12/27/08. There's probably 35 green tomatoes but nothing is ripe! I'm not sure why it takes so long to ripen fruit. But there's a total of 4 truss es at various stages. Plant is still growing.

  • vrkelley
    15 years ago
    last modified: 9 years ago

    >>consensus was 50-55 days for a ripe tomato.

    When the seed pack says 50 days to mature, they mean from the time it sets to the time it ripens? I thought the days was the time from seed to eat. No wonder nothing is producing "on time".

  • hautions11
    Original Author
    15 years ago
    last modified: 9 years ago

    The package days to maturity are based on planting a 6-8 week old plant and then it is 50-65 days. Your determinate variety should be faster then that. We think our nutes pots and light will speed up set to fruit time on big 1#'ish tomatoes, but only time will tell. Keep posting pics of your plants, it is great!

  • vrkelley
    15 years ago
    last modified: 9 years ago

    >>planting a 6-8 week old plant and then it is 50-65 days
    What? So really it's 120 days to maturity (seed to eat). Deceptive marketing. This must be some outdoor metrics. What does a "6-8 week plant" looks like??? Is that a 8" tomato plant? or taller???

  • hautions11
    Original Author
    15 years ago
    last modified: 9 years ago

    With no special light it is and 8-10" pant

  • pyrorob
    15 years ago
    last modified: 9 years ago

    Hehe, I know the majority of this project appears to highlight the organic methods of hydroponics, but imagine how fast they grow when you are giving them the same nutrients at 2 or 5 or 10 times the concentration and oxygenate the roots using H2O2.

    And yes, they still taste very good. Peppers grow in a similar manner.

    --->Rob

  • hautions11
    Original Author
    15 years ago
    last modified: 9 years ago

    pyro,

    All you have to do is look at the Hrdo plant picture at Epcot listed 10-15 posts above. We like the combo potting mix and oxygenated water bath with the added micro life in the grow medium. The reason we started this diary is it is hard to find well documented grows from start to finish with good time frames and then results past "this is my first tomato" How about 3's produced etc. We still have very tight time line to get a ripe tomato by the end of Feb. We have a fighting chance, but it sure is fun trying. We will definitely have some ripe ones in March some time. Thanks for the interest and keep watching.

  • desert_cat_ca
    15 years ago
    last modified: 9 years ago

    i have a few tomato plants growing in my coffee cups on my window sill..looks pretty good..

  • slo_garden
    15 years ago
    last modified: 9 years ago

    desert,

    Me too! I have two plants in pots in a south facing window. They are both starting to flower. Just natural sunlight and potting soil.

  • hemnancy
    15 years ago
    last modified: 9 years ago

    Very interesting techniques! I am trying winter gardening indoors for the first time this year, using aquaponics. I have 2 Shubunkin goldfish in a 40 gal stock tank and a 24 gal growbed with pea gravel, flood and drain with an autosiphon. I was reluctant to spend all the money for the lighting needed for fruiting tomatoes but am just using a 4' fluorescent fixture and 3 hooded cfl. I started some seeds in net pots with hydroton, and some by throwing seeds into the pea gravel. Tomatoes did poorly in both situations, the plants sprouted but then just sat and didn't develope, so my system mostly has pole beans, of which I've eaten a few, cucumbers which are getting close to the first female flower after amazing #'s of male flowers, some Chinese mustard which has yielded a few leaves, and some basil and cilantro. They are growing very slowly but may be close to doing better.

    I like aquaponics because of lowering the cost of the nutrients and possibly in future producing edible fish. I can see the advantages of your system with the more natural growing medium and inclusion of mycorrhyzal fungi. When I can improve my light setup I'll have to see how I can work something like that in.

    Here's one of probably many threads on tomatoes from the Aussie Backyardaquaponics forum, which talks about training tomato vines and has some photos (their foliage doesn't look so great either), including a phenomenal commercial tomato hydroponics photo-

    http://backyardaquaponics.com/forum/viewtopic.php?f=3&t=1731

    Nancy

    Here is a link that might be useful: aquaponic tomatoes

  • hautions11
    Original Author
    15 years ago
    last modified: 9 years ago

    Thanks Nancy. Light is very important especially in the winter here. I am sure Slo and des cat have massive plants and are expecting 30 40 50 # yields from there coffee cups, but understanding the important drivers in the grow process can help yields significantly. I have been very impressed with the addition of simple HPS and MH lighting. No horticultural bulbs, no $150 reflectors, but solid lighting great organic nutes and flat screen training seems awesome so far. It will be interesting 2-3 months down the road to see how full the screen is and what we need to start hacking off. Lot's of fun and happy gardening.

    Larry

  • hautions11
    Original Author
    15 years ago
    last modified: 9 years ago

    Nanacy, after reviewing your link. I am thinking about taking off all the leaves below the screen. That accomplishes the same thing. I could also chase the fruit set around the screen removing leaves. I'll defiantly take this in to account. Thanks.

  • garysgarden
    15 years ago
    last modified: 9 years ago

    That purpling on the underside of the leaves (and often on the stems) is a common sign of Phosphorus deficiency.

    It's not uncommon from what I've seen for the younger plants to get that, but it doesn't tend to be a problem if you're using a high quality plant food. Most garden store brands don't cut it in hydroponics, from my experience.

    I switched to a 3-part made by Advanced Nutrients awhile back that has cleared up all the nutrition problems I had.

  • vrkelley
    15 years ago
    last modified: 9 years ago

    >>Some one, ( Master gardener ) at work threw a gauntlet that we can not make a ripe tomato, by the end of Feb!

    Oh really? How's HIS garden doing :p Hey! I picked 2 yellowing cherry tomatoes yesterday (about 90 day old plant). The bad news was that I accidentally broke the tip off of this indeterminate. Gahhh. The tip is now rooting in a baggies. Pretty sorry shape!

  • hautions11
    Original Author
    15 years ago
    last modified: 9 years ago

    >>That purpling on the underside of the leaves (and often on the stems) is a common sign of Phosphorus deficiency.

    @garysgarden:
    We did indeed have some purpling which is visible in some of the earlier shots. This was to be expected as we had only used organic ferts pre-loaded into the medium at first. We went light on the phosphorus at this point so that we could be nitrogen-heavy early on to induce rapid vine growth. Additionally, I didn't want to load them up too much early on because I knew down the road (we just did it about 2 weeks ago) we would be applying Green Light's Bloom Burst which is an incredible 10-55-6 salt fert. Having much phosphorus pre-loaded could have lead to an overdose when used in conjunction with the bloom burst. At the same time we also applied corn cob ash, a great organic potassium supplement that packs between 30 and 35% potassium by mass. I believe we got the timing right and the plants should now have all of the Phosphorous they need for flowering and fruiting.

  • hautions11
    Original Author
    15 years ago
    last modified: 9 years ago

    Our first big set-back. BER has set in on the first three tomatoes on Big Momma! OHHHH NOOOOO! I searched the forum and read all the various reasons. It is not wet or dry conditions but we do see a couple of potential issues. Very fast growth appears to be one of the drivers and if we went a little overboard on our corn cob ash ( Potassium overload ) either or both of those could contribute. I also noticed that roma's appear to be some what of a problem with BER any way. Not much we can do, may try the epsom salt foliar spray, but it will probably just have to grow out of it! Take a look.


    Pretty sad! Oh well, we will push on from here. Happy gardening!

    Larry

  • garysgarden
    15 years ago
    last modified: 9 years ago

    Yeah, Roma's are notorious for BER. I think I remember reading once that they suffer from it more than any other strain, but I could be wrong on that.

    BER is almost exclusively a Calcium deficiency but as you noted too much Potassium can lock out Calcium even if you have plenty of it.

    You might try flushing them to see if you can wash out some of the excess K.

  • gringojay
    15 years ago
    last modified: 9 years ago

    The commercial high phosphorus formulations are often spin offs from the hydroponic pot "bud" growers market. These are not interested in the subsequent fruiting crop.
    High phosphorus is not a formulation always transferable to other plants, even though the stages of development look to be the same.
    As for tomatoes: the nitrogen can be progressively diminished at flowering, at ripening & during harvest; reduce potassium at least when harvesting; curiously the phosphorus needs stay the same from flower through harvest.
    Gary gave you good advice: flush your growing medium at this stage & then make sure your calcium is adequately utilized (looks like you top water - dust off your hydroponic EC ratio chart).
    Speaking of the technique:
    In tropic field crops we take old plants of indeterminate tomatoes,eggplants & peppers that have become unproductive, twist their stem closer to the ground & they renew growth low down on the plant.
    Seems some pot growers came across this in Africa or S.E. Asia & used it for
    quick volume turn around time under lights.

  • miesenbacher
    15 years ago
    last modified: 9 years ago

    It will be interesting to see if any of the other tomato fruits develop BER. Researchers have found "Stress" to the plant more than anything else causes BER. And one thing I didn't think about before when "supercropping" the plant is how much stress are we putting on the plant? Something to think about. Ami

  • hautions11
    Original Author
    15 years ago
    last modified: 9 years ago

    Interesting observations by all. Fortunately we have a plant in a regular pot that got all the same nutrients and very hard supercropping regiment. Not tubs and real oxyniated roots to put super fast growth in to affect. It should be an interesting comparison. More pictures in a bit.

  • gringojay
    15 years ago
    last modified: 9 years ago

    Hi Miesenbacher,
    I'd like to read some more about the stress factor relevant to BER.
    It could be of use for the tropical agricultural development projects I work
    with. Any lead would be appreciated.
    Pardon my off post etiquette, Hautions,
    Thanks for sharing your interesting work.

  • miesenbacher
    15 years ago
    last modified: 9 years ago

    Here's a link I was talking about. Stress comes in many forms and this paper from the University of Nebraska explains it pretty well.

    Here is a link that might be useful: Blossom End Rot in Tomatoes

  • hautions11
    Original Author
    15 years ago
    last modified: 9 years ago

    It appears the article is referring to moisture stress and i am not sure if supercropping or even the training through the screen could contribute as well. It is hard to pick out a firm answer here. The control plant in the regular pot appears to be free of BER, at least at this point. The big boy non roma style looks like it's first fruit might be affected as well. The plant in the regular pot is a big boy with the same nutrients and light, but slower less aggressive growth. The next few weeks should display BER in the big boy tub plant and the regular pot version, if it is going to show up there. It may just be the rapid growth referenced in the article rather then stress induced by supercropping/training. We will keep you up to date.

  • freemangreens
    15 years ago
    last modified: 9 years ago

    In response to: Posted by hautions11 6 (My Page) on Sat, Jan 10, 09 at 16:11

    I must admit I kind of forgot to follow this thread. Let me explain a couple of twists to my "ultimate" growing system:

    First off, I super-crop only the main stem and for only the first 12 inches of growth. I grow in perlite and when super-cropped seedlings are about a foot and a half tall, I transplant them to a larger growing container; again 100% commercial perlite (medium to small granules).

    Here's the first trick: I start seeds in a 2" net pot and when I transplant, I put about an inch of perlite in the bottom of the new container, then set the entire 2" net pot on it and fill up the container BURYING at least 8" of the super-cropped stem. This creates a mammoth root stock.

    Next, I suspend a rope from about 5 feet above the newly-transplanted stock and begin tying off the main stem to this. The rope supports the weight of the main plant.

    As Mr. Tomato grows, I trim off side growth at about every other node. This allows enough vegetation for fruiting, but doesn't create shadows, which would otherwise starve lower leaves from light exposure. As the plant nears flowering, I use the "single-truss cropping" method. All that means is I cut out the tops as they go to flower. I rely on only one or two flower trusses about mid-way up the entire plant stalk.

    I grow 'indeterminate' tomatoes, which means they will grow for several seasons. By cutting off much of the side growth and limiting their height, together with a massive 'trunk' and super-cropped stem, they produce fruit like you wouldn't believe and it's all at waist height so this old fart doesn't have to bend over to pick it off.

    As I harvest, I let newly-formed flowering trusses remain and when I've picked all the tomatoes off one truss, I trim it off and move on to the next one and so on.

    As far as "forcing" oxygen, I guess I didn't tell you, but I aerate my nutrient tub (about 30 gallons) with a 12-inch air stone 24/7. I feed my plants with aerated nutrient using the "old fart drip irrigation method". What that means is I have both gravity-fed irrigation as well as a submersible pump in my nutrient batch tank. When I water the plants, I just flick on a switch and it supplies nutrient at the proper pH and EC to my hose, fitted with a little spring-loaded, trigger nozzle.

    I spent a lot of time determining just how much nutrient to give my plants and in the summer, I supplement nutrient delivery with a twice-a-day sprinkling with high-calcium-content tap water on a little battery-operated timer I spent a fortune for! Hey, it works--it keeps things wet and cool in the summer and prevents me from over-feeding the plants.

    When plants (strawberries and tomatoes) are in fruit, I also "tweak" my nutrients with MgSO4 (Epsom salts) to maintain the proper EC, while cutting back on the nitrogen. Nitrogen is for leaves!

    I hope that clears up a few things for you. The Web site is undergoing metamorphosis and is almost a butterfly; stay tuned.

    Here is a link that might be useful: TenGreenThumbs

  • elskunkito
    15 years ago
    last modified: 9 years ago

    > then set the entire 2" net pot on it and fill up the container BURYING at least 8" of the super-cropped stem. This creates a mammoth root stock.

    hat is a net pot?
    I made 'pots' this year from burlap sacks for maximum oxygen exposure.
    Just wondering if thats similar to your method???

  • freemangreens
    15 years ago
    last modified: 9 years ago

    Hey! Good thinking. I grow some items in burlap too. Anyway, a "net pot" is a plastic pot. I use 2" ones. Imagine a small plastic pot that has slits cut both vertically and around the base; that's a net pot.

    Go to my profile and click on my Web site, then go to Galleries and scroll down until you see a hand holding a tomato seedling in a little pot. There are white roots extending from the bottom of the thing. That's a net pot!

    Questions? Email me from my profile or Web site.

  • garysgarden
    15 years ago
    last modified: 9 years ago

    I would think that after super cropping a stem you'd have a slower root growth response from that stem. I know that if you bury a tomato stem it will grow roots all along the buried length, but if I'm not mistaken the supercropping thickens the skin and would likely inhibit root growth.

    I could be wrong, has anyone checked that?

  • vrkelley
    15 years ago
    last modified: 9 years ago

    >>Our first big set-back. BER
    Dang! I also had a few disappointments. The plant produced 40 cherry or 4.5 oz of fruit. It's now 48" long. How many trusses should a plant that size have?

    Very few new the flowers. I've started adding epsom salt to the Miracle grow that the plant gets every 10 days. About 1X/mo the plant gets a side dressing of Dr. Earth. Stuff stinks to high heavens as it rots under the soil. Even 2 air cleaners can't keep up with the soil/Dr. Earth odor -- bothers my nose! The plant has no suckers...maybe I should let the suckers produce too????

    Very meager results for such healthy plant.

  • nuttyd
    15 years ago
    last modified: 9 years ago

    I started my seedlings dec 30 and have three different projects going. The TUB (like the one that started this thread for the most part) I call it with the bubbler or TUB, the Aero garden and the regular ol pot method. Cant tell much of a difference from the Aero garden and the TUB but the regular ol pots are slow. The Aero and the tubs are HUGE and I need to promote some flowering here real soon. But I stopped the super cropping and you can tell by the big stalks half way up and the slimmer ones near the bottom, I seen they were stessing badly but now there much happier. I will keep the TUB project year after year without using the make it fast method but rather let them do there thing, only because I could see they were not liking rushed you could say. I have noticed that they like just some reguler Miracle grow food here and there and only watered about once a week in the tubs.
    I tryed many different lights and what I came up with for the TUBS was a BIG lamp shade lined with foil inside and three 60 watt flourecents inside (you know those spiral things that only take 13 watts they say), its the same thing the Aero gardens use for the most part and thats what made the plants the happyest. I did burn some leaves here and there because they grow so fast I did'nt raise the lamps enough, they don't get hot at all but will dry the leaves.
    On a different note:
    My green beans have been nuts all winter inside and they like low lighting.
    The Boston Picklings Cute Little Cumbers are crazy in the TUB/bubbler environment with flowering at about 2', I also tried them in pots but no success they are flowering at about 4" tall, so less light is my guess on that experiment.
    My family are hot pepper freaks so we keep many varieties going all year long indoors here in Michigan.

  • vrkelley
    15 years ago
    last modified: 9 years ago

    nuttyd Nice distraction from tomatoes! How many bean containers do you have and in what size containers?

  • freemangreens
    15 years ago
    last modified: 9 years ago

    garysgarden:

    I'm waiting for things to grow a bit and I'll be putting up a slide show regarding super cropping as well as burying super-cropped stems deep in perlite. I've even thought of pulling a few plants out of the growing medium to photograph their root development. If I do that, I'll include it in the slide show on my Web page.

    Hide and watch!

  • nuttyd
    15 years ago
    last modified: 9 years ago

    Sorry about bringing up the beans, but I grow them in 6"wide 8"deep and 3'long containers.I do them 5 beans per container with miracle grow potting soil and thats it.With some feeding I'm sure you could plant more in that size container, but mine are doing really good as is.

  • hautions11
    Original Author
    15 years ago
    last modified: 9 years ago

    Hey the beans are great! Sorry for the lapse in posting, but between work and results...big problems. Our plants are devastated. This week Zach ran 3 gallons of water through the tubs and flushed the current nutrient content. This will stunt all growth, but we were obviously down the wrong path. Here is a good shot of the weave and the physical method appears very sound. We probably pushed the plants too hard and made a nutrient lock of some kind.

    The weave worked and the toms hanging below the netting is great. BER is devastating and the half rotten red toms are dismal. In my favorite movie, the worlds fastest Indian, there are a lot of dismal failures leading up to great success. The overall shot of both plants is just as ugly.


    The peppers are growing well but we are fighting a HUGE bug infestation. Here is our first pepper but note the little beasties in the shot.

    The rest of the plants are either fighting bugs or doing great. Some new tom starts for a friend and doing well also.

    We will try to keep everyone updated, that's all for now.

    Larry

  • mitanoff
    15 years ago
    last modified: 9 years ago

    Ah, you'll never know until you try.
    Thanks for posting the "ugly" pics. This reminds me of my plum tomatoes from last year. Same end result, probably a different reason since they were outside. I am going to start a few seedlings tonight and supercrop them. As an experiment. I'll start a second crop later on. And those wee beasties (small furry, softbody insects- fergit what you call 'em), I had them on an indoor plant for YEARS and I just couldn't get rid of them. I said to heck with it this year, and left the plant outdoors all winter. They better be dead.

  • gringojay
    15 years ago
    last modified: 9 years ago

    Hi hautions11,
    Bugs on picture shown look like aphids. They can spread through your other plants, so taking action is wise (the plants won't fight aphids off themselves).
    I want to tell you that your innovative grow is intriguing to me - am just not chiming in to impose on your methods.
    BER dismaying & your assesment of nutrient "lock" seems correct.
    ? Will you explain to us what you are considering to improve your project?

  • garysgarden
    15 years ago
    last modified: 9 years ago

    I agree those look like aphids. You can fight them a number of ways. If you want to go "biological" on them I recommend Aphidius (a tiny parasitic wasp) or Aphidoletes (a carnivorous larvae). Aphidoletes is better at larger infestations, but can be problematic if there isn't much "dirt" under the plants. For you I'd recommend a combination of a soap treatment to bring the aphid numbers down and Aphidius to finish them off.

    Why do you leave the fruit on after they show signs of BER? You can't really eat them and the plant is just wasting resources trying to develop those fruit.

  • jusme_newby
    15 years ago
    last modified: 9 years ago

    Just a question: Could the BER come from too much over-cropping? If the plant cannot return excess nutrients back to the roots, could they build up and look like over-fertilization? I really don't know but it sounds like a logical place to look. But then, that's jusme.

  • hautions11
    Original Author
    15 years ago
    last modified: 9 years ago

    All good comments. There is no reason to leave the fruit on other then I am trying to judge if it is reducing in sverity. It is easy to see the early signs and i could just trim them but there does appear to be some better looking fruits that get farther along in the process. The big boy is definatly less affected then the roma style. Our control big boy is definately not seeing the afects.

    The control plant was overcropped just as much, so I do not think that is the factor.

    Aphids are horrible. I have been using soap and I am not even keeping up.

    Larry

  • garysgarden
    15 years ago
    last modified: 9 years ago

    I would suggest it's a bit early to dismiss the supercropping as possible cause of the BER. I agree it's not likely, but one plant without symptoms doesn't necessarily prove the supercropping wasn't at fault. It's possible the control plant had some variable in its favor that made the difference.

    Of course it's more likely there was some other minor variable that pushed things against the plants with BER.

    For the aphids I'd say either go biological or get out the big guns. Hardcore pesticides aren't great, but sometimes it's better than a total loss.

    Oh, and leaving the fruit on can make the BER persist. Each of those fruits represents a major future investment of plant resources. If there isn't enough to go around (a calcium shortage causing BER) the more fruit they're trying to grow the more thinly it's spread and the worse the problem is likely to get.

    I'd advise removing anything with even a hint of BER. Force the plant to redirect it's resources to areas that aren't already lost causes. It may be time to look for a superior source for nutrition. I've been using Advanced Nutrients for awhile now without trouble. It might work better for you as well.

  • ontheteam
    15 years ago
    last modified: 9 years ago

    Everything points to overstressed plants. The Toms look over watered too boot,

    Stress is TOO much or NOT enough of light: water :nutrients.
    Its really that simple.
    The aphids do not cause the leaf mottling on your peppers.

    It's all GOOD ideas..but I think in the end you have too much of a mis-mash of methods going on and you are diluting the benefits of any ONE method and getting all the challenges of ALL the methods.
    I'd also say as far as feeding... too much "n" and not enough P and K. All the green but mebbe not enough roots to support all that green.
    Mebbe also wrong type of fert for growing medium. With the hydro set up I would imagine you'd have to have a slow steady constant feed to allow it to be absorbed and not just washed away. Isn't that way hydro medium is basically fortified water
    Just thoughts.. a A for effort tho!

  • beauley
    14 years ago
    last modified: 9 years ago

    Very interesting. I am beginning experimenting with this supercropping technique. I hope to feedback results. Thank you.

    Here is a link that might be useful: http://www.triond.com/

  • ceilifinnigan
    14 years ago
    last modified: 9 years ago

    This has all been so interesting! Does anyone have innovations for the upside-down tomato bags that are now on the market I recently started 2 (outdoors) with hopes of moving them into a greenhouse when it gets cold and because I have very limited full sun area.Maybe I'll supercrop one to see the difference in yield.

    ceilifinnigan

Sponsored
Winks Remodeling & Handyman Services
Average rating: 5 out of 5 stars1 Review
Custom Craftsmanship & Construction Solutions in Franklin County