Hi everyone! New to the forum, but I wanted to start an indoor tomato growing thread. I do not see a lot of specific techniques or experiences documented on too many forums. I decided I would make a pictorial of my techniques and more importantly my results. I often see some interim pictures but rarely a complete grow. Please excuse me if this has been covered, but I have not been able to find good info up to this point. So let's get to the basics..... I have struggled even outside to grow good tomatoes in my very well shaded and heavily tree infested yard. Lots of attempts and a few minor successes. So fall came and went cold weather is upon ( 3 degrees F tonight in mid Indiana )us and I have the gardening itch. I have seen a variety of attempts with both florescent and HID lighting to grow tomatoes. I see some random pictures of very leggy 6'-7' tall plants with few (5-10) tomatoes on them.
Here is my set-up... a 3 season porch with lots of single pane glass. left to it's own devices low 20's or teens in cold weather. I often try to winter over patio plants to save the $100-$200 dollar annual investment. Perfectly south facing window that gets an honest 6-7 hours of direct sun. First problem is heat and then the light issue. Some cheap Lowes window shrink plastic covers and 3" air gaps solved the basic insulation problems. A small 500w heater keeps the room at appropriate 60 night to 70 daytime temps. Here is an overall shot of my set-up with a 400w metal halide light in place.
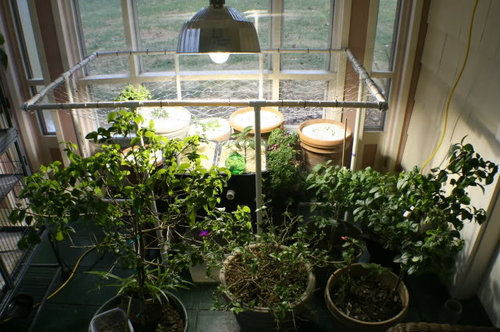
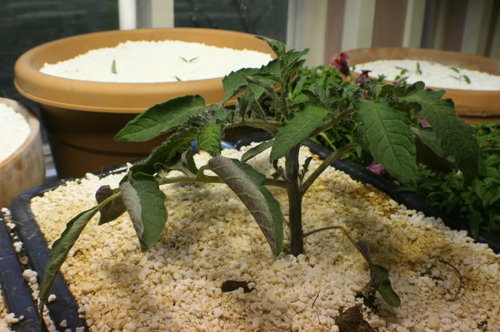
As you can see there are quite a few plants gathered around my single light source. With most of them I'm not looking for an aggressive growing situation, just some minor bushing and an increase in overall vigor so that they're ready to really take off when they go back outside in the spring. You may be wondering about the big weird-looking screen suspended above the rear plants. Its made out of poultry net mounted in a 3 by 6 foot PVC pipe frame. This would yield an 18 square foot growing area, but due to the 11 inch deep curve in it you end up closer to 23 feet. I will explain the exact function and methodology of this screen and its use at a later date when I've actually started to use it. The main attraction here is these guys.
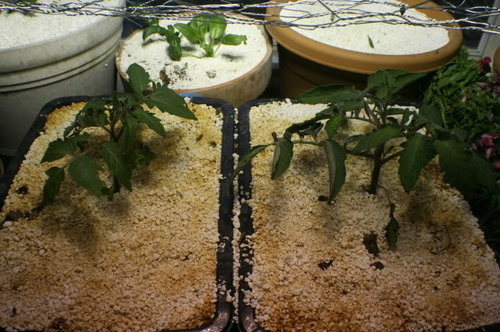
To the left we have a Burpee Big Boy hybrid, which is a large Beefsteak type tomato. The the right is Burpee's Big Momma hybrid, which is a large Roma type. Both plants are just finishing their 3rd week of life in the tubs, 4 weeks from seed. You may note the somwhat unusual looking containers in which they are planted, especially if you noticed the blue aquarium air hose snaking out of the left one. Let me explain:
Inside the tubs is a unique growing medium consisting of coconut moss, vermiculite, pearlite and compost resting on a 4 inch bed of lava rock. The rock is completely submerged in a water bath. The depth of the bath is maintained by a side overflow drain which sits at exactly 4 inches from the bottom of the tub. This allows me to water them with a can the traditional way but maintains the water level and makes sure the medium above never gets "soupy". At the bottom of the bath rests a 12 inch aquarium bubbler wand that constantly injects the bath and the medium above it with air. This oxygenates the entire medium, encouraging the growth of beneficial aerobic bacteria and killing off pesky anaerobic bacteria; technically making it a hydroponic system. However, unlike most hydroponic rigs it is mostly compromised of organic matirial and is thusly capable of supporting a full-fledged Mycorrhizae fungal colony which lives in a symbiotic relationship with the tomato roots. The fungus chelates all of the minerals for the plants, prevents dehydration, balances the PH and acts as a secondary immune system to fight off unwanted intruders. All of this makes for furiously aggressive growth from the tomatoes, it is an optimum environment for nutrient uptake, water retention and oxygenation. I feel that it has advantages over both traditional soil growing and hydroponic setups; the best of both worlds. It is much lower maintenance than most common hydroponic setups as most of the nutrients are loaded into the medium up front. I use organic nutes almost exclusively: Blood meal, coffee grounds, wood ash, garden sulfur, fast-acting lime and an organic mix called Bio-tone starter plus (contains feather meal, grab meal, guano, greensand and bone meal). The medium contains two special additives: Soil Moist granules to help it retain moisture (very important due to the light spongy nature of the medium) and Hydro Organics' Mycorrhizae Super Pack (a form of dry fungus spores). Over the course of their lives the tomatoes will receive fish emulsion for a nitrogen boost, corn-cob ash for potassium (very important) and bloom burst (my only salt fertilizer, just one teaspoon per season) for phosphorous. Other than the dry mycorrhizae spores (which aren't completely necessary because the Bio-Tone mix comes pre-loaded with a small variety of beneficial spores) all of these materials are readily available to anyone from a variety of local sources. I have gotten everything from Lowes, Ace Hardware and my local pet store.
Aside from my fancy bubbler tubs and the screen I use one other special technique not often seen in indoor tomato gardening: Supercropping.
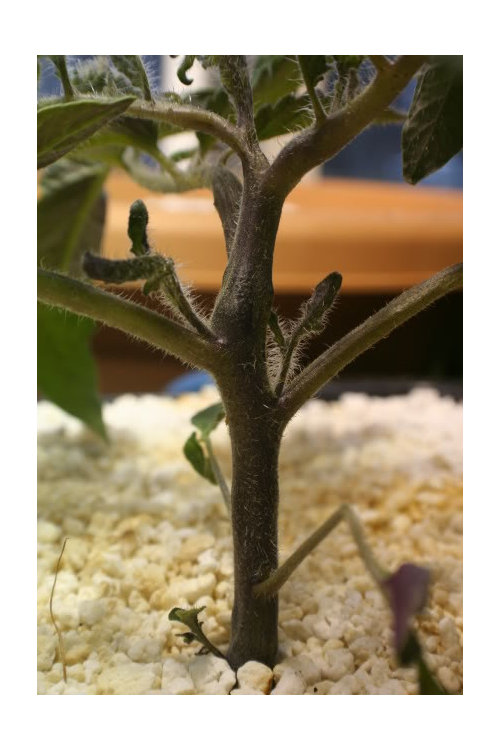
This is a shot of Big Momma's stem, which is far bigger around than the #2 pencil I forgot to include in the shot for scale. It is positively monstrous for a 4 inch tall plant, bigger than stems I have seen on 12 inch plants from my local nursery. This is achieved through the technique I referred to as supercropping. Its a simple practice though it intimidates many growers who are frightened of the potential harm it could do. It takes a little practice but let me make this clear before I even explain it. Supercropping will not kill your plants. It won't, really, honest, I promise. All you do is once the sprouts have become established in their final grow medium, around the one week mark usually, take the stem section between your thumb and forefinger and squeeze gently while making a slight alternating twisting motion. There will be a tiny crushing sound and you will feel the phloem (the veins that carry things downstream towards the roots) give way and be crushed slightly. The plant will droop and look very sad and you will feel horrible, which makes it all the more difficult to continue doing this all up and down the main stem section. However, if you didn't wuss out, when you come back the next day the plant will have righted itself and the stem will have grown noticeably thicker. You must continue this practice as the plant grows new stem sections. If you are diligent this is the result:
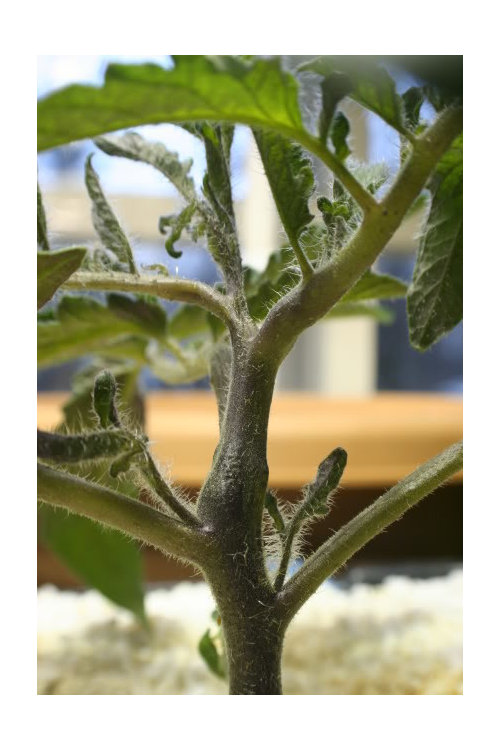
You will note that the distances between each leaf (the internodal gaps) are very short, always less than an inch and in some places as little as a quarter of an inch. This is somewhat attributed to the metal halide lamp I'm using, but the extreeme degree to which it occurs is all down to the supercropping. You can see in the main stem section right above the two suckers where it tapers down significantly. This is a spot that I had not crushed yet so as to illustrate the difference in diameter between pinched and non-pinched stem sections. You will also note that where I hadn't crushed it is far and away the largest internodal gap on the plant. Diligent supercropping results in more vigorous plants that do a better job of holding themselves up and most importantly don't get to an out-of-control height in the limited space of indoor growing.
The lamp currently in place is a 400 watt Metal Halide high bay acquired from a local business currently in the process of replacing all of their HID lamps with more efficient T5 florescents. In a few weeks it will be swapped with a pair of 400 watt high pressure sodium lamps. I will write more on the lighting in the coming weeks as it becomes more pertinent. And now, some additional pictures:
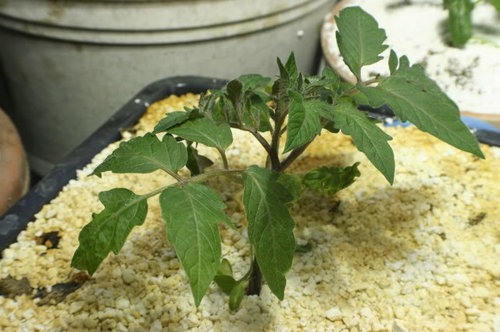
Fat Momma
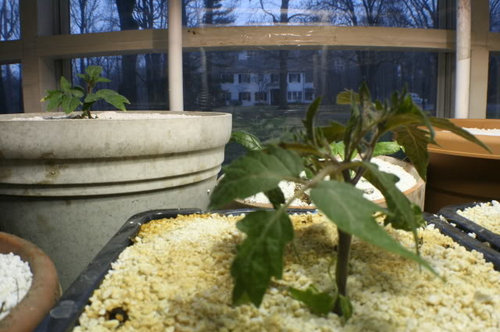
Big Boy
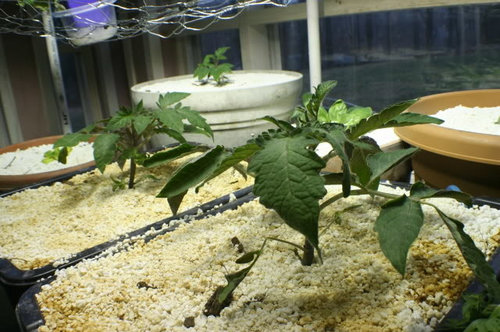
Wide shot
This is Big Boy and in the background is a tomato plant that is identical to him in almost every way. It came from the same bag of seeds and was sprouted on the same day. They have been given the same nutrients, bathed under the same quality of light, treated with the same Mycorrhizae spores and even have roughly the same growing medium. The only difference between this one and Big Boy is that Big boy lives in one of my bubbler tubs and the other lives in a traditional pot, yet the difference between the two of them is huge.
Well, thats about it, I've covered most of the general things that I feel sets my grow apart from others and/or may interest you guys. Feel free to ask any questions about specifics, comment, criticize or congratulate at your digression. I'd be happy to answer any questions about construction or the acquiring of materials to anyone who would be interested in employing some of these techniques themselves, or to anyone interested in why exactly I think this way is better. Happy growing and I hope you all have a great holiday!


vrkelley
hautions11Original Author
Related Professionals
Wheeling Landscape Architects & Landscape Designers · Forest City Landscape Architects & Landscape Designers · Pelham Landscape Contractors · Cornelius Landscape Contractors · Elkridge Landscape Contractors · Lees Summit Landscape Contractors · Lynchburg Landscape Contractors · Country Club Hills General Contractors · Lake Forest Park General Contractors · Winfield General Contractors · Adrian Decks, Patios & Outdoor Enclosures · Liberty Decks, Patios & Outdoor Enclosures · Morgan Hill Decks, Patios & Outdoor Enclosures · Portage Decks, Patios & Outdoor Enclosures · West Chicago Decks, Patios & Outdoor Enclosureshautions11Original Author
hautions11Original Author
geeboss
vrkelley
hautions11Original Author
hautions11Original Author
vrkelley
vrkelley
hautions11Original Author
vrkelley
hautions11Original Author
pyrorob
hautions11Original Author
desert_cat_ca
slo_garden
hemnancy
hautions11Original Author
hautions11Original Author
garysgarden
vrkelley
hautions11Original Author
hautions11Original Author
garysgarden
gringojay
miesenbacher
hautions11Original Author
gringojay
miesenbacher
hautions11Original Author
freemangreens
elskunkito
freemangreens
garysgarden
vrkelley
nuttyd
vrkelley
freemangreens
nuttyd
hautions11Original Author
mitanoff
gringojay
garysgarden
jusme_newby
hautions11Original Author
garysgarden
ontheteam
beauley
ceilifinnigan