


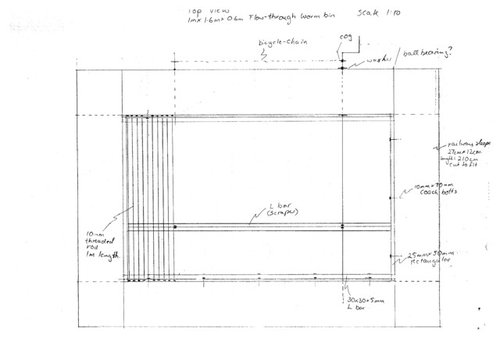
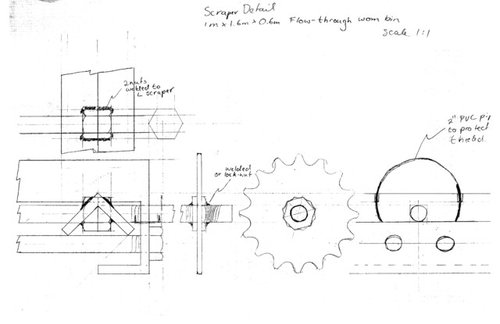
Building a medium sized flow-through system in South Africa
pyropunk
15 years ago
Sort by:Oldest
Comments (29)
Related Stories
KITCHEN OF THE WEEKKitchen of the Week: Good Flow for a Well-Detailed Chicago Kitchen
A smart floor plan and a timeless look create an inviting kitchen in a narrow space for a newly married couple
Full Story
GREAT HOME PROJECTSHow to Add a Radiant Heat System
Enjoy comfy, consistent temperatures and maybe even energy savings with hydronic heating and cooling
Full Story
BATHROOM WORKBOOKStandard Fixture Dimensions and Measurements for a Primary Bath
Create a luxe bathroom that functions well with these key measurements and layout tips
Full Story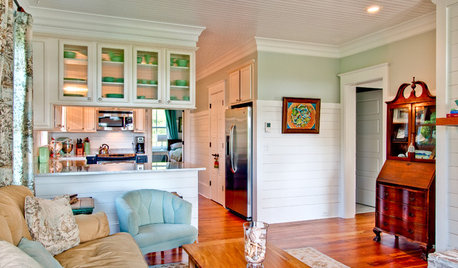
COTTAGE STYLEHouzz Tour: Lowcountry Charm for a South Carolina Cottage
Smart design and beautiful views help a family of 5 live comfortably in 1,200 square feet
Full Story
DOORSLet's Walk Through the Latest Door Trends
The functional feature has been getting a dose of flexibility, creativity and glamorous detail
Full StoryGREEN BUILDINGInsulation Basics: Heat, R-Value and the Building Envelope
Learn how heat moves through a home and the materials that can stop it, to make sure your insulation is as effective as you think
Full Story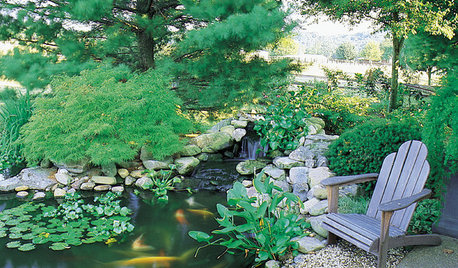
GARDENING AND LANDSCAPINGHow to Make a Pond
You can make an outdoor fish paradise of your own, for less than you might think. But you'll need this expert design wisdom
Full Story
EARTH DAYGrow a Beautiful Garden With Ecofriendly Greywater
Reducing home water waste means lower bills and a healthier planet. Here's how to set up a greywater home irrigation system that can help
Full Story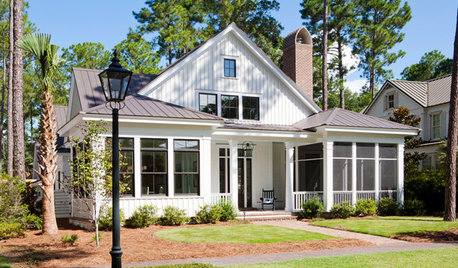
TRADITIONAL ARCHITECTUREHouzz Tour: Lowcountry Style With an Eye on Entertaining
Flexible rooms with great flow make this South Carolina home intimate yet ever ready for a soiree
Full Story
FLOORSIs Radiant Heating or Cooling Right for You?
Questions to ask before you go for one of these temperature systems in your floors or walls (yes, walls)
Full StorySponsored
More Discussions
eric30
pyropunkOriginal Author
Related Professionals
Berkley Landscape Contractors · Fairfield Landscape Contractors · Hollywood Landscape Contractors · Lynchburg Landscape Contractors · Pompton Lakes Landscape Contractors · Roswell Landscape Contractors · Royal Oak Landscape Contractors · Welby Landscape Contractors · Chesapeake Ranch Estates Stone, Pavers & Concrete · Alhambra General Contractors · Marysville General Contractors · Meadville General Contractors · New Braunfels General Contractors · Rolling Hills Estates General Contractors · Sauk Village General ContractorspyropunkOriginal Author
leearnold
pyropunkOriginal Author
pyropunkOriginal Author
pyropunkOriginal Author
eric30
pyropunkOriginal Author
pyropunkOriginal Author
eric30
leearnold
pyropunkOriginal Author
pyropunkOriginal Author
eric30
pyropunkOriginal Author
folly_grows
pyropunkOriginal Author
pyropunkOriginal Author
pyropunkOriginal Author
leearnold
pyropunkOriginal Author
jaybun10
11otis
pyropunkOriginal Author
pyropunkOriginal Author
pyropunkOriginal Author
KeithBenitez_Yahoo_Com
trivedi_south