Shop Products
Houzz Logo Print
worms4tracy

my new other fabric ft (mammoth) composter

Worms4Tracy
12 years ago

So I decided to go really big. I now have so many different binds and FT composters that I am getting tired of having to feed them all individually, especially as I anticipate needing more and more as time goes by. I really wanted to have the ease and efficiency of a fabric composter, but have much more space than the "Worm-Inn" funnel shape allows. I had been looking online and at you-tube videos and saw one of the industrial composters that I kind of liked. It was like a big cube made out of metal, electrically heated with a motorized sweeping mechanism that would shave off the bottom inch or two with the flip of a switch. Its basic box shape maximized both capacity and surface area. It's only drawbacks were moisture control (it was metal, not fabric) and it was, of course, thousands, if not TENS of thousands, of dollars.

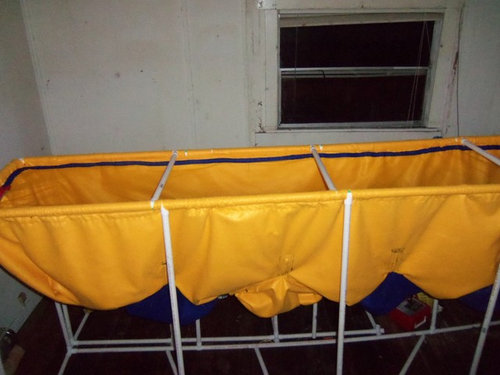
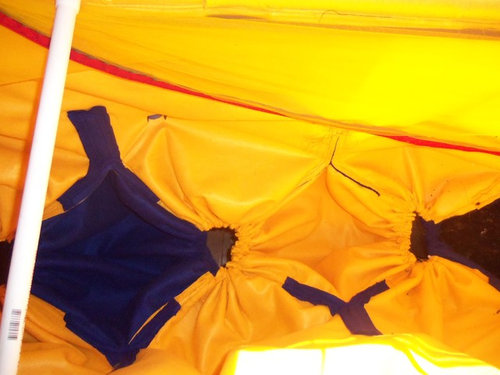
I wanted to see if I could construct something equally awesome out of fabric and PVC. Unlike my former FT fabric vermicomposter, I bought my fabric at the fabric store. I didn't think I would be able to find a ten-yard bolt of the kind of fabric I needed at a thrift store, so I just used my 50% off coupon and bought two whole bolts of Eco-Felt. This is the stuff recommended by the DIY worm-inn instructions online, and I liked it because it is sturdy, breathable, colorful, and made from reclaimed plastic bottles. I constructed a simple box frame out of both fabric and PVC pipe that is ten feet long, two feet wide, and four feet high. On the bottom, I inserted pieces that were 3' X 3' (these are the blue pieces). I cut slits in the bottom of the yellow "box," folded the blue in half, and stitched it to the slits to form an upside-down v shape that ran from front to back at four different places about every two feet along the length of the box. What this did was create five gaping holes that were 7-8' in perimeter along the bottom. I inserted drawstrings and drew them shut, creating an uneven but relatively flat bottom and five different outlets for harvest. I made them really big because I didn't want to lose any cubic footage due to a funnel shape, and because I wanted harvest to be as easy as possible. I've seen the you-tube videos of people trying to scrape hard VC out of a small funnel opening with a mini pitchfork - it looks tedious. I wanted to be able to empty out a single section with the pull of a string, if necessary. I put in 3' drawstrings so that it can be opened relatively wide over a large bin. Two things I noticed: the bottom is definitely not flat. The blue fabric is large enough that the weight of the fabric forms "pouches." However, the unevenness allows me to manipulate it from the bottom if necessary because there is slack in the fabric. Second, the 7+ foot perimeters of the bottom openings did not allow for complete closure with the drawstrings. In short, the bulkiness of the double-layers of felt simply could not be cinched tight like with the funnel shape. By the time I figured this out I already had the whole thing up on the frame, and didn't feel like taking the whole thing back to the sewing machine. So I did what we normally do for new FT composters: I lay down a few layers of paper over the openings and began layering the worm-laden compost, bedding, and food over the top. It worked just fine.

I used velcro tabs to secure the sides to the frame (they are not yet installed in the pictures, but run along the lower edge of the composter) so that the composter would retain its rectangular shape rather than sagging down to the floor. I added a zipper-close mesh top. I found a package of two 7' zippers with industrial-strength adhesive at the hardware store. I had them meet at the center and they were long enough to wrap around the sides. As I mentioned in my earlier post, my sewing machine doesn't jive with industrial strength adhesive, so I stuck the zipper to the fabric and then hand-stitched around the edges to reinforce it.

I made triple-reinforced seams. I laid the two pieces of fabric side-by-side and then overlapped them by at least an inch and a half. I stitched through all four thickness (because this is all double layers of eco-felt) and then went back and stitched another two seams 1/4" on either side of the original seam. I used 100% polyester thread so that hopefully the worms won't eat their way through it.

Here are some pics:

This is the front view - the blue strip running along the back inner edge of the composter is just more eco-felt to reinforce the seam of the mesh. You can see a tiny part of the red zipper on the left-hand side.

This is the inside of the composter - you can see the drawstring closures which are about 2"-3" wide and the blue pouches. When I went into the fabric store and asked for an unopened bolt, they had limited color selection. I decided to be adventurous and said, "I don't care, so long as it's BRIGHT" - hence the yellow and blue. Why can't worming be eco-friendly AND fashionable? :-P

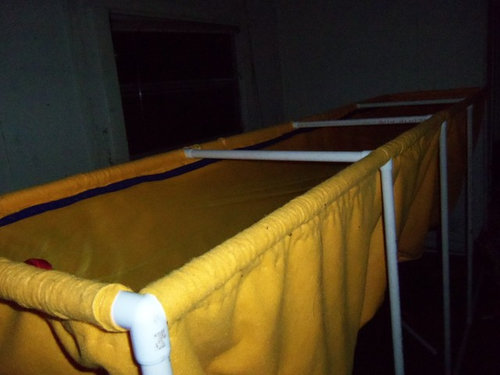
This structure is in a room that is just 12' X 12', so it is hard to photograph the entire thing. This picture shows the length, with the cross-beams for support. You can see that I built in an extra-wide seam so that the 3/4" PVC could slide all the way through the fabric, distributing the weight. I used open T PVC joints and spaced slits in the top of the composter so that I could slide an entire 10' PVC pipe along the edge. I wanted there to be as few joints as possible to keep the weight evenly distributed and maintain the integrity of the structure. In short, wanted as few weak points/stress points as possible...if this thing falls down when it's full, it ain't getting back up again. Best not fall down in the first place.

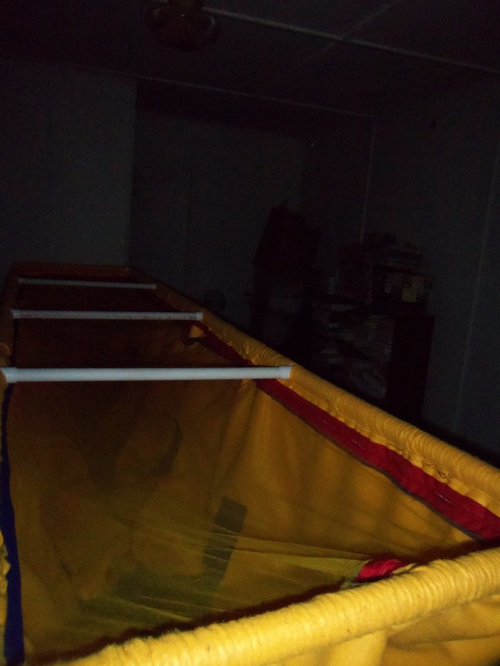
Here's another view of the length, where you can clearly see the mesh top and the red zipper. The two zippers meet in the center of the 10' side so that I can open one side or the other.

In this picture you can see the inside of the composter with the mesh open. I am starting to load it and you can see some compost on the right-hand side. I'm not going to try and fill it all at once, but if/when I have enough money to buy a bulk order of worms, I'll have a place to put them.


Comments (13)

  • mendopete
    12 years ago
    last modified: 9 years ago

    I am VERY VERY impressed! I have not heard of the open-t pvc joints. are they a specialty item? This bin is going to be HEAVY! Your frame seems to lack "shear-strength". I would secure it to the wall along the top frame so it does not begin to lean.
    Hail to the wormy queen! Good luck, Pete

  • PeterK2
    12 years ago
    last modified: 9 years ago

    Very cool, but I would highly recommend some bracing on that frame. As Mendopete mentions, shear bracing. All the weight is going to put pressure on those corners to the left or to the right (shear, the thing will twist when moving down) and with those long runs that's a lot of force (think leverage)

    I would recommend diagonal cross pieces, but I doubt they exist in those pipes. As you see in all building, bridges etc, all large 'square' sections have a diagonal piece through them so it doesn't collapse. Either going from one corner to the other (the strongest) or at least a piece to support a corner. It's why in iron frames etc, everything is triangles and not squares.

    http://en.wikipedia.org/wiki/File:Eiffel_Tower_(72_names).jpg

    If you can't go diagonal, might get away with many more vertical pieces for load, and then have more horizontal pieces for support in the middle instead of those long vertical runs. Your system when full is going to weigh hundreds of pounds. If you can't imagine 4-5 people standing on it, needs more strength.

    You could also go another way to remove the issue. If you had say a stacks of bricks supporting the top, those won't have such high shear problems are they are not flexable. It's why you see so many bridges have concrete supports (vertical) and the iron lattice for the road (horizontal). Or maybe some wood bracing, stronger and more freedom to make proper bracing. It's just those pipes are so thin and they have some flex they are so prone to shear.

    Welcome to the world of large scale construction ;).
    Luck.

    Edit- fyi, if you are familiar with the worm inn, the maker had made one four times the volume. But he hasn't sold them because the piping system he sells with the worm inn won't support it. He hasn't yet figured a way to support it, not one that ships easily I guess.

  • PeterK2
    12 years ago
    last modified: 9 years ago

    Oops sorry, course you know the Inn as it's based on tha, duh, what I get for quick typing. Anyway I had some time to find the link I remembered.

    http://www.redwormcomposting.com/fun-stuff/name-that-worm-inn-winners/#comments
    "Sharon�cThe Worm Inn MEGA itself is complete. Because of it�fs weight, I�fve needed to source special parts for the stand kit to eliminate sway. I'm working on stabilizing the stand now, and hope to have it ready to go within the week."

    I thought you could copy his solution, but after a quick look I didn't see any Worm Inn MEGA for sale. Yours would be a bit more stable as it's wider instead of so long and high, but that twisting torque is still going to be nasty.

    Luck, Peter.

  • mr_yan
    12 years ago
    last modified: 9 years ago

    This is huge and impressive. I've been thinking of similar ideas for expanding my system in the future.

    I will second PeterK2 about the weight and weakness of the PVC structure. I used to use 3/4" PVC and heavy canvas to make iguana cages in a very similar manner to your construction. The typical size for a cage was 3'x6'x6' or 4'x8'x6'.

    3/4" PVC at 24 inches in length will bow in a frame like this with weights much over 30 pounds even when the fabric is evenly across it as you did. You can help this by sliding a pipe in the center of the PVC. Maybe see if 1/2" steel conduit or concrete rebar will slide within the 3/4" PVC pipe.

    The main weak point I see is where the two T fittings mate together with a small length of pipe. You may want to look at some 4 way fittings as they sell here:
    http://www.littlegreenhouse.com/accessory/pvc.shtml

    The other potential problem point I see would be twisting and falling diagonally as Peter brought up.

    It is hard to see but is the ceiling where this will be kept open to the floor joists above? The simplest fix will be to both support it from above and below. Add some strong anchors into the joists and suspend it with the frame under it still. You'll want to run the bin perpendicular to the joists and tie off to several joists to distribute the weight. While you have the sewing machine out nylon straps with a loop on one end and a ladder lock strap would be easy to make.
    http://www.ahh.biz/hardware/ladder_cinch_locks/locks_ladder_heavy_black_plastic.html

    I hung my worm inn with a frame of PVC around it to hold square and parachute cord tied off to the frame and some solid anchors in the floor joists overhead.

    [I just know I need to be clear as this is a wide open forum, I'm not trying to target you Worms4Tracy - solid anchors in joists are NOT plumbing pipes or electrical conduit these are 1/4" minimum bolts or lag screws with either a hook or eye. Each one should be able to hold an average mans weight minimum]

  • PRO
    equinoxequinox
    12 years ago
    last modified: 9 years ago

    "buy a bulk order of worms" You should be fine with just the worms you have having the luxuary of growing into their great new home.

    "If you can't imagine 4-5 people standing on it, needs more strength." This is a very nice way of saying we have seen systems where the structual integrity of the bin has been cut away and we want to see yours strong because we were all sad when the others had catastrophic yet easily predicatable events occur.

    "It's just those pipes are so thin and they have some flex they are so prone to shear." Even some support from on high would help. Is there sturdy roof beams to support the bin with?

    What bothered me massively about other systems is expecting to capture vermicompost in a bin below when the bin below does not extend past the areas of vermicompost fall out. One can not simply put a bin below a rack. Vermicompost falls to the outside edges not just as imaginations would have it neatly in the middle.


  • PRO
    equinoxequinox
    12 years ago
    last modified: 9 years ago

    The other systems I was refering to were the ones made out of multi gallon trash cans.

    One of the main advantages of a bag system such as yours is being able to coral and collect the vermicompost without having to dig it out or it falling on the floor and having to sweep around support structures to get it.

    For me that is a big plus.

  • morgan_3
    12 years ago
    last modified: 9 years ago

    Tracy, like your other supporters here, the first thing which came to mind was the ability of the PVC to hold the weight. I have a four foot long 3/4-inch PVC plant stand which does some sagging under much less weight. I use PVC for other projects as well, and where sagging is an issue you can insert 3/4-inch PVC inside 1-inch PVC for added support. I am not sure if that holds true for the stronger schedule 80 PVC (gray color) but you could check. I think if necessary, you could modify your existing desigh buy simply cutting the PVC half way between the joints and inserting the next size down piping, then glue it back together with slip joints.

  • Worms4Tracy
    Original Author
    12 years ago
    last modified: 9 years ago

    Great ideas, guys! I'm going to go to my hardware store this weekend and get some wall brackets and some PVC reinforcements. It is already leaning a little because the floor it is on is uneven, so that concerns me. I'm going to try bolting it to the wall studs first...I'll let you know how it goes.

  • morgan_3
    12 years ago
    last modified: 9 years ago

    I use rebar inserts for PVC piping as well Tracy. Little more expensive and makes the structure a bit heavier. A gallon of wet vermicompost weighs about 8.33 lb/gal, so be careful.

  • mr_yan
    12 years ago
    last modified: 9 years ago

    Is this inside your climat controlled home? I'm wondering what this will do to your himidity and will that throw off the HVAC system, especially when running th AC.

    I've been thinking i need to expand my system to keep up with my cooking style( almost vegitarian and make almost everything from scratch). I was thinking aboit two more worm inns. My inn has been going through a lot of water and I have been wondering how much water three will put in the air.

  • Worms4Tracy
    Original Author
    12 years ago
    last modified: 9 years ago

    Mr_yan this is in an old, unused cottage that used to be a rental unit but is now unfit for living. We mostly use it for storage, and there is some concern about increasing moisture levels, but I just leave all the windows open and don't worry about it. The worms are all in one room, the stored items are in another.

  • PRO
    equinoxequinox
    12 years ago
    last modified: 9 years ago

    Different materials may allow the bin to dry out more or less quickly. I almost think the bins mentioned here maybe are using a material that has more air flow through the material than the ones sold. Thus the great quantaties of water evaporating from them. But maybe things are composting faster with the more air. Maybe the material is like those clothes sold that advertize "wicking" away the moisture.

  • reyas
    10 years ago
    last modified: 9 years ago

    I'm a newbie to the Forum, I'm very impressed with your "Mammoth" bin... If I understand the date stamp used by the Forum I believe you posted this information/photos in 2012 I would really appreciate hearing from you as to how "things" are at this point...

    Thank You