


Plans for a homemade vermicomposter??
Grdnr
19 years ago
Sort by:Oldest
Comments (5)
Related Stories
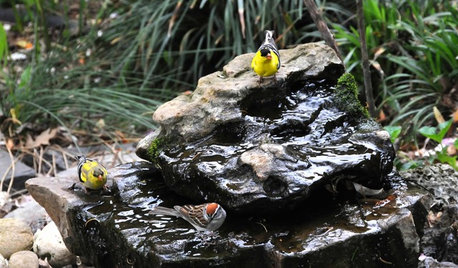
OUTDOOR PROJECTSBring In the Birds With a Homemade Bubble Rock
An avian expert from Southern Indiana shows how to make a burbling fountain that migrating birds will love
Full Story
BEDROOMS13 Homemade Headboards That Thrill With Creativity
Snipped from a trellis, snagged from a pallet pile and more, these inventive headboards excite in any bedroom
Full Story
GARDENING GUIDESHow to Plan Your Edible Garden
Get organized before you plant to ensure that your fruits and vegetables have a chance to thrive
Full Story
FEEL-GOOD HOMESimple Pleasures: Plan a Rejuvenating Retreat at Home
Crave a quiet day or a weekend devoted to yoga? Design a mini retreat without going anywhere
Full Story
ENTERTAININGHoliday Party Prep: Plan Your Table Settings
Do a dry run with dinnerware, table decorations and the buffet setup now to avoid surprises and stress later
Full Story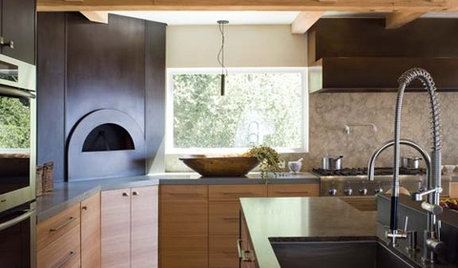
KITCHEN DESIGNKitchen Luxuries: The Wood-Fired Pizza Oven
If you love homemade pizza and are (ahem) rolling in dough, a wood-burning oven may be just the right kitchen investment
Full Story
KITCHEN OF THE WEEKKitchen of the Week: 27 Years in the Making for New Everything
A smarter floor plan and updated finishes help create an efficient and stylish kitchen for a couple with grown children
Full Story
GREAT HOME PROJECTSHow to Get a Pizza Oven for the Patio
New project for a new year: Light a fire under plans for an outdoor oven and claim the best pizza in town
Full Story
LIFETurn Off the Video Games and Turn On Your Kid's Creativity
Going nuts planning summer activities? Kids overdosing on screen time? It may be time to foster more self-directed play
Full Story
PRODUCT PICKSGuest Picks: Gear Up for Holiday Shopping
With Black Friday around the corner, it's time to make a game plan for holiday shopping. These tools and accessories can help
Full StoryMore Discussions
boreal_wormer
Bdadawg
Related Professionals
Fitchburg Landscape Architects & Landscape Designers · Lyons Landscape Architects & Landscape Designers · Hilo Landscape Contractors · New Berlin Landscape Contractors · Palatine Landscape Contractors · Sun City Center Landscape Contractors · Vacaville Landscape Contractors · Weslaco Landscape Contractors · West Chester Landscape Contractors · Ansonia Landscape Contractors · Bloomington General Contractors · Fitchburg General Contractors · Groveton General Contractors · Mashpee General Contractors · Waianae General Contractorselly52
new2gardenfl
marshall2000