


My new FT Vermicomposter
I started with two pounds of worms and a little VermiHut back in April. Since then, my worm population has exploded and it's getting difficult to 1) feed them from my own household's scraps and 2) maintain both the VermiHut (now using all five trays) and the Rubbermaid 45-gallon tub. I am at the point where I need to start selling worms and harvesting large amounts of compost, so something had to give. Andrew suggested a FT composter and gave some links in my previous post, and I found one that I thought would work really well:
http://vermicomposters.ning.com/profiles/blogs/my-flow-through
I copied this design and built it today. Props to the original designer, and thank you Andrew for the great suggestion! I got a 50 gallon Rubbermaid garbage can with a snap-on lid and wheels, and put in lengths of PVC pipe about 3 inches apart, with 1 1/2" screws protruding about 1 1/4" from the pipe.
I don't get the daily paper, but we have a surplus of brown paper grocery sacks, so I cut those open and put down two layers on top of the pipe, and several inches up the sides. With the overlap, some parts may have had three layers. I poured the contents of three FULL trays from the VermiHut into the bottom, which totaled about 6-8 inches of almost-ready-to-harvest compost, plus a plethora of EF and their cocoons.
On top of that I put about 3-4 inches of bedding: the rest of my coconut coir and a bunch of shredded brown paper bags, cardboard, and junk mail. All of this was damp.
On top of that I put a bunch of food: coffee grounds, veggie peelings and scraps, leftover cooked plain pinto beans, several changes of brown paper from the bottom of the bird cage. All of this had been frozen and then defrosted.
Tomorrow I plan to put a tray in the bottom, shred up a ton more cardboard, and collect a bunch of aged horse manure from a local horse stable that said I can come and take as much as I want.
This whole project took about one and a half hours from start to finish once I got the new bin and the PVC pipe home from the hardware store. Total cost: $66. Tools included a wood saw, a screwdriver, and a power drill with a 7/8" boring bit and a smaller drill bit, all of which I had at home.
My 5 yo helped me put the pipes and screws in. She told me that one of her secret powers is the ability to speak worm and so kept going back and forth between me and the VermiHut to tell the worms how awesome their new home was. :-) She also helped transfer the worms from the VermiHut to the new FT by the very-very-very small handful and insisted on telling each handful that they were about to move into their new home.
I think that to contain my current worm population and allow for their rapid growth, I will need at least three more 50-gallon FT containers. But I am determined that worm sales must pay for them, so I am going to work on that before I head back to the hardware store.
Here are some pics from the project:

By crocpunter at 2011-09-26
My PVC pipe cut to size, drilled with staggered holes on both sides, and fitted with T-joints (for use as a handle). The glue is drying.

By crocpunter at 2011-09-26
This is the bin. It was just wide enough to fit five bars, spaced a little less than 3" apart. I drilled five holes in the front and five in the back about 8" above the ground. I drilled starter holes at the corners of where I wanted my door to be, and then used a wood saw to cut out the shape of the door.

By crocpunter at 2011-09-26
This is what the inside looks like with the holes drilled in front and back, and the door cut out.

By crocpunter at 2011-09-26
This is my 5 yo inside the bin (laying on its side) fitting the pipes and screws together.
By crocpunter at 2011-09-26
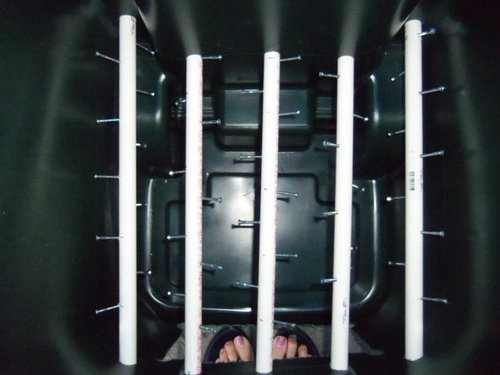
This is the inside of the bin after the PVC and screws have been installed. Yes, those are my toes at the bottom peeking through the door.

By crocpunter at 2011-09-26
This is the final completed product. It has a lid that fits tightly.

scotty66
Worms4TracyOriginal Author
Related Professionals
Alexandria Landscape Contractors · Buford Landscape Contractors · Norwood Landscape Contractors · Concord Landscape Contractors · Cordele Landscape Contractors · Cudahy Landscape Contractors · Kerman Landscape Contractors · Lyndhurst Landscape Contractors · Pueblo West Landscape Contractors · Reedley Landscape Contractors · Whittier Landscape Contractors · Bon Air General Contractors · Champaign General Contractors · Parkville General Contractors · Pine Hills General Contractorsscotty66
equinoxequinox
PeterK2
sbryce_gw
PeterK2
Worms4TracyOriginal Author
Worms4TracyOriginal Author
craig1959
Worms4TracyOriginal Author
craig1959
11otis
equinoxequinox
Worms4TracyOriginal Author