


My Flow Through Bins - Population
I started a new thread on this subject hoping to generate more activity.
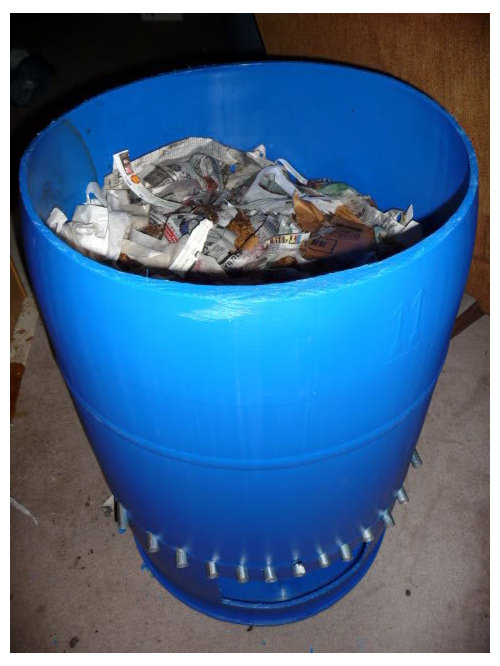
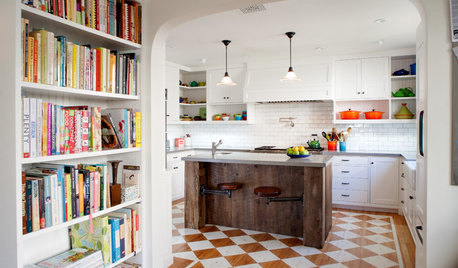
I'm a week and a half into my new 55 gallon "flow through" system with splitsec's design. I had 2 plastic totes full of worms and finished compost which I layered in the barrel with bedding and food scraps with a little dirt in it. Topped with a couple of flat beers found in the corner of the garage. After the heat scare last week, things have cooled down for the most part and the worms are starting to move around and trying to catch up with the system. For now I am storing scraps in the freezer. I estimate 7 to 8# of worms in there initially.
My question is this: Does anyone have any idea what the red wiggler population will max out at under idea conditions? I know the conditions will probably change over time with the accumulation of finished compost against the bottom grate before the 1st harvesting. I first thought that they populated to surface area and now learn that they will travel anywhere to food sources as long as the bedding is loose enough and there is oxygen. I agree the flow through has excellent ventilation. I realized this when it heated up soon after adding the initial material, I never got this with the closed plastic totes.
Anyway, for some reason I want to say 20 pounds. The operating area is about 24" diameter and 28" height or about 7 1/3 cubic feet.
I was excited to hear that someone else has a flow though barrel is so active that it is hard to keep up with the feeding. My plastic totes used to take 3 months to break down and didn't amount to much; too slow!

Comments (47)

splitsec002
15 years agoHey, very nice looking bin you got there. I didn't get to say that to you in the other thread. Keep us up to date and let us know how well the feeding goes :)
squeeze
15 years agoeric - the reason you found the material quickly heating is you built a hot compost with your mix of castings [high bacterial population], food scrap [high nitrogen and moisture content] and paper [high carbon], as well as the oxygen incorporated when you mixed all the materials into the barrel at one go ... and the beer added more nitrogen ... if you don't understand the bacterial action in composting, see here
the desired bacteria in vermicomposting are the mesophiles that function well at temps that worms prefer ... greatly increased air circulation will very quickly lower the temperature by disturbing the moisture/nutrient balance, and hopefully for the sake of your worms those detectably higher temps dropped soon, although they have the sense to dive to cooler climes, if they have time .... the main reason you didn't have the higher temps in plastic totes was the smaller volume, ideally hot composting requires a volume of about a cubic yard, as well as a thourough mixing of materials ... the bacterial action will use the oxygen soon enough, and re-heating would require a remixing of the material ["turning the pile" in bin composting]
Bill
Related Professionals
Fort Lee Landscape Architects & Landscape Designers · North New Hyde Park Landscape Architects & Landscape Designers · Wheeling Landscape Architects & Landscape Designers · Allentown Landscape Contractors · Anderson Landscape Contractors · Hollywood Landscape Contractors · La Verne Landscape Contractors · Las Vegas Landscape Contractors · Middleton Landscape Contractors · Banning General Contractors · Fort Pierce General Contractors · Great Falls General Contractors · Martinsville General Contractors · Sun Prairie General Contractors · Westmont General Contractorseric30
Original Author15 years agoThanks for the link. Yes, I got a bit carried away during the initial setup. I got worried when I dug around 3 days after setup and I could feel the heat in the core and the worms were piled up around the sides. With the same flat beers I found in the garage, I rotated them in and out of the freezer to help out. I suspect there haven't been any mass killings because there has been no smell, and I've smelled dead worms before. Now that I am beyond this I am waiting for things to settle before putting any greens in. For now I have been just throwing paper plates and napkins in there after dinner, and typical browns collected on a daily basis like dryer lint and paper. Once I begin feeding again it will be in thin layers as I wait for them to populate the bin.
With the initial setup came fruit flies. They hung around even after adding another layer of dry bedding. There are air gaps in my lid where they could get in and out so I made a cardboard disc to fit under the lid. It took a few days but I finally snuffed them out. Now I just see one or two flying around aimlessly. The bin is between the kitchen and the living room and I have been assuring my girlfriend that this condition is temporary, I'm just "working the bugs out".
So how about population? I think they said 30-40 pounds for a wigwam and that is 3'diameter but I don't know how high the operating range is on that. I know the unit is 3' tall but I think that includes the harvesting area. 15-20 pounds for my setup would be a rough guess. Just wondering how many worms can populate a cubic foot.
lkittle
15 years agoHi eric30 the guess is a little ruogh 5-7#s in a flow thru barrel is closer. The round Wig Wam is 15-18#s of worms and the 5'X6' Wig WAm is 30-40#s. You can calculate an estimate using Pi X R^2= 3.14X1^2=3.14sq' x1# or 2#. Wig Wam uses 2# density.
eric30
Original Author15 years agolkittle,
that's the surface area calculation but sources say that worms will inhibit a volume if given the right food, bedding, and oxygen. I also used to believe in population by surface area. My previous bins were wide and shallow (only 7").Here's a piece of an article I found:
You can have upwards of 3,500 worms per cubic foot with a maximum of 7,000. The minimum is around 500. Do not feed the worms any more than they can eat in any given area in more than two weeks. Stated otherwise, it takes a pound of worms to eat a pound of daily feed. Bear in mind that you will also have to remove a pound per day of old worm castings too. This can be done either on a continuous basis from the bottom of the worm bed or periodically using a batch technique.
I assume that you have Mary Appelhof's book, "Worms Eat My Garbage".....
Most of these answers are in her book.
lkittle
15 years agoHi eric30; That is correct and it takes 3500-4000 worms to make a bed run pound biomass hense the 1-2# per ft and the 15-18# for the WW. I have two Wig-Wams(round ones) and a 55 gal barrel and two Can of Worm bins and they are all at max. biomass densities. I harvested the CoWs a few weeks back and picked every worm to be found and weighed the results and thats how I know. The findings are documented at one of the vermi sites on line. I do not cross or multi post the same info on each site. The info is out there however. From the harvest I started two new bins each from each CoW. The Cow manufacturers instructions say the system will support up to 5# of worms and that may be but if you start with about 2# in one tray the most of the worms stay close to the working tray and the tray just below the bottem tray and catch basin had only 4.2 oz combined. thats the info not in the post. They are also the worms in two new along with the 12 oz fron the secound tray.
Here is a link that might be useful: COWS with worms!!!!!
eric30
Original Author15 years agolkittle,
Thanks for the info. I under estimated you yesterday until my jaw dropped from looking at all of the worms you have that you posted on the other forum.Anyway, I'll keep everyone posted on the progress.
How about moisture? you mention that keeping the system fairly dry is over rated and most worms like it wet. My bin is fairly dry right now compared to the swamps I had in the bins. Don't get me wrong, they were swampy but still no liquid. I felt that the bins were WAY too wet if there is any drainage. I think I'll unload another flat beer into there.
lkittle
15 years agoHi eric30,
I like to keep the bins as dry as the food and worms allow. I have not had to put any water in this year. We had a fairly wet summer compared to the summer before and the worms were outside. I had to water to keep the WWWs damp the airflow when they were starting would dry and the worms went down, up and all over to find water. Then when I put them inside and during winter I still had to wet the WWW to keep the worms happy. I finally have enough depth in compost that it's not drying any more. The COWs are very soggy in the bottem but no driping of leachet from the spigot. All the 10,18,35 gal bins are also mucky on the very bottom. the worms seem to love in the very damp parts of the bins. They crawl up to the dripping wet tops and down to the muck in the bottom when the moist food is getting in low supply. I think worms prefer wet to damp or dry. We like damp because its easier to work with and the worms can live in that condition.eric30
Original Author15 years agoWell, the heat is about gone and the worms have spread out through the barrel. The previous heat caused a little dryness in the core so I poured in another flat beer after ripping up the paper plates and napkins I have been throwing in there for the last week.
When operating my plastic bins, sometimes I had to leave the lid off for a week before harvesting because I didn't want to deal with all of the mud.
pyropunk
15 years agoEric
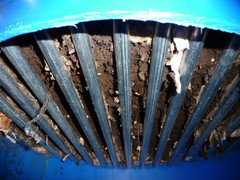
How far did you space your rods apart? From the pics it looks like about 1"?
Thanks
Alexeric30
Original Author15 years agoThey are about 1.5" from center to center. I actually designed the spacing around the garden fork I will use to scrape the compost off the bottom grate. Don't be afraid to put them closer. I've had some minor fall throughs now that the bottom paper has decayed. As the base of finished compost becomes more compacted against the bottom, I hope this will be less and less.
pyropunk
15 years agoI can understand newspaper and paper derivatives, but hair trimmings, old socks and underwear? Do your worms wear underwear? ;-) I suspect you only put the non-polyester stuff in there? How do you keep your moisture levels up?
eric30
Original Author15 years agoHa ha! Yes they eat all of the cotton. You're left with the rubber elastic to pick out later. The socks are kind of a meshy mess. Hair you have to spread out otherwise it sits in a clump and takes a long time. Because of the air flow from bottom to top it does get a little dry at times. I have a sheet of cardboard under the lit that seals humidity in but lets air through, very humid in there. The food I put in adds some moisture; like toms and cukes break down into slime and juice. I have been getting rid of some cheap ice beer I bought over a year ago. I pour one or two in every now and then. If the bin has any heat to it I'll skip the beer and add 12 or 24 oz. of water, just pour it in evenly. I sense that as I am accumulating more volume in there, There is more of a cushion and room for error when adding moisture. I feel that if I add too much by accident, the finished compost on the bottom will soak a lot of it up. If too dry, the finished compost is still be giving off humidity. I get down and feel the bottom compost above the bars with the back of my hand. If it is dry down there then I know to add. If it is moist then I leave it alone unless the bedding on top is getting really dry. When I get a chance I'll get some updated pictures! Does anyone else have updates on their flow through systems?
eric30
Original Author15 years agoOk, so I've had this system since Sept and it has been a pleasure but a constant learning curve. First it was the heat because I made a hot pile when I set it up. Then lots of minor fall throughs; Once I had worms wandering out onto the floor because what fell through was drying and they needed to escape. I fixed that by stuffing used napkins and newspaper up into the leaky areas so the compost could settle down and hold itself above the grate by natural compaction. Then all of the little problems that were easy to fix like fruit flies, feeding, and moisture level. I wanted this system to be the least labor intensive as it would allow, so I have been just tossing things in small to medium sized pieces. Cardboard pieces, torn paper, egg shells crushed by hand, and kitchen scraps in pieces as they leave the cutting board. I never worried about blending anything or breaking it down more than it was. The most I've ever broke food down was by freezing it. Then I started juicing about a pint per day and saved the pulp for the worms. I sprinkle the pulp and trimmings in and mix it around in the bedding a little; cover up with some torn junk mail. I did it again, went in today and the core of the barrel was hot, probably 120 degrees; not as bad as the last time. It was just in the center for the top 12" about 3 gallons; below and outside of that were still room temp. The worms migrated away from the core and closer to the wall of the barrel; some were up on the wall. Here is what I did - I pulled the bedding out of the center and laid it up against the wall to form like a volcano to take the heat away from the core. Now I'll wait a few days. This has to be because of the drastic increase in surface area of the food; going from chunks to pulp. Also I got carried away with the bedding a month ago when I was cleaning up the house. This caused me to mix food in deep; I've been laying off the bedding except for small items. Just wanted to share some experience in what to look out for. I hope it will be back to normal soon and I can adjust my habits when feeding fruit and veggie pulp.
eric30
Original Author15 years agoHollowing out the center of the bin worked like a charm. The heat dissipated and the worms are back in and throughout the bedding. I'm noticing quite an increase in activity with the pulp compared to larger pieces of food. I peeked today and there are swarms of very active worms all over the surface. The surface area is making the pulp decay and mold faster, that seems to make them pretty happy.
pyropunk
15 years agoEric,
you seem to be having a lot of heat problems. The following solution might work:
Get a piece of 2" PVC pipe. drill some holes in it so you have ventilation and stick it down the centre of your bin.
Thanks
Alexeric30
Original Author15 years agoAlex,
Thanks for the advice, seems like a pretty good idea. I'll leave it alone for now and see what happens; I may adopt this "volcano" formation permanently. I think my overfeeding may have been an issue. Now that I think of it, I put a lot of pineapple trimmings in there 2 days before I found the heat.eric30
Original Author15 years agoGood question Alex. I measure temperature and moisture by feel, smell, and sight. When I take the lid off I look and smell. If excess worms are piled around the wall and climbing up the wall then I suspect something is different. In this case I put my hand in the center up to about my wrist and felt heat. I feel other areas of the bin and verify that the heat is in the core, also there were no worms in this area. I know what it smells like normally so a difference may tell me something. in this case it still smelled the same. The temp is an educated guess from years of feeling, I said about 120 this time for a small core area. Not quite as warm as when I first set it up, when I popped the lid and was met with a face full of steam and convection. As far as moisture, I look at and feel the bedding. If it is moist to the touch and the worms are slimy and wet then I know it is OK. If the bedding is starting to dry out and the worms are moving down to get moisture, then I know I need to do something. The flow thru barrel gets a decent amount of air so it has never been too wet yet, I've always had to add moisture once per month or so. Dripping would obviously tell me that it is too moist. Also when it gets too dry I have fall throughs because the finished compost dries to the point where it crumbles and falls through the grate. Before I went on vacation for the holiday, I added 4 - stale beers, 3 pints of water, and there wasn't any leachate. It was on the dry side then.
Several days after I hollowed out the core, I felt and the heat was gone. The worms also moved back into the center of the bin. it was those pineapple pealings I think, a bit much for them to handle at once.
Hope this helps. I haven't felt the need to get a thermometer or any gauges. All of my problems so far have been answered in this forum and using my senses. Thanks to all.
captaindirt
15 years agoLove the concept of the flow through worm bin.
I have been wanting to build one and have a few plans for one that would be kept outside all year.(fully insulated)
Can someone give me an estimate just how long it might take the worms to reach the top of a bin that's 1' x 1' x 3'?
I know it's hard to estimate this but any help would be greatly appreciated.
I need 2 gallons of worm castings but 5 gallons would be better.eric30
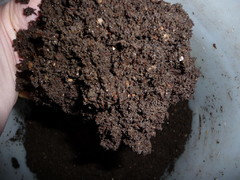
Original Author15 years agoI harvested today for the first time after starting the bin 6 months ago. The barrel is no where near full but I need the VC for my soon to be emerging seedlings. I went in with my plastic garden fork that I designed the grate spacing around. The 6 layers of newspaper had not completely broken down. As a matter of fact they were cemented together pretty good. It took a little while tearing at and pulling on the bottom layer of newspapers. The VC was pretty dense and compacted, slightly moist. After raking for a bit I got about 2 gallons of material to fall down into the bottom compartment which is about what I needed. As promised it was free of worms and cocoons. Remember the stuff I just pulled out was the initial material I added when I set this thing up; so it is probably less refined. There were the pieces of newspaper and some chunks of undigested bedding so I used a plastic kitchen strainer over a pail to screen it out. The chunks I was left with went back into the top of the bin for another round. The VC I ended up with was black, slightly moist, and wonderful. The bin is actually bridged over right now with air pockets above the grate; and I didn't see the stack sink at all. I'll keep you posted on future harvestings.
eric30
Original Author15 years agoHere you can see how the compost is hung up a little bit. On the next harvest I'll scrape around the sides and hopefully the stack sinks down.
Here is a link that might be useful:
pyropunk
15 years agoeric,
I see a piece of plastic on the right. did that come with the newspaper or the pipes?
Alex
eric30
Original Author15 years agoPiece of plastic? Hmmm. on the right in the background there is a purple sticker on the pipe identifying the conduit. On the left there is a shred hanging down. That I believe it the top wrapper of a pack of Marlboro Lights. Downfall of raiding the paper shredder at work. I've come to the conclusion that I produce more than enough paper and cardboard at home.
Here is something of interest. I've been throwing this penny into my bins over and over again for a couple of years. By luck I pulled it out of the bottom of the barrel today. It appears slightly defaced but it is clean with no corrosion. I just wiped the compost off with my fingers. Explain this one! I'm going to throw it back in now, I'll see it again in the fall. Brings the worms luck I think.
Here is a link that might be useful:

pyropunk
15 years agoEric,
Sorry that should have been left=teachers right. Damn those smokers, forever leaving their rubbish where they shouldn't ;-)
The penny is not corroded because you bins are not acidic - a good thing!
eric30
Original Author15 years agoAwesome. must be the regular addition of smashed egg shells keeping the Ph stable. The shredded paper was full of litter and I used it anyway. Cigarette ashes, shredded plastic, gum wrappers... I grabbed them from a guy that sits in his office and smokes. Been suffering ever since picking out shreds of clear plastic, butts, and gum wrappers. I screened for the first time and it was pretty slick! Just a cheap plastic pasta strainer working over a pail; very easy. The compost was so fine and luscious, and the garbage was easy to pick out.
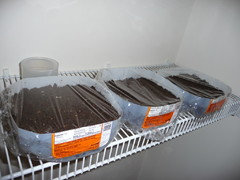
Since I am in the habit of posting photos, here is one of a finished vermicompost and peat moss mixture that I am using for my seedlings. You can see little bits of egg shell in it.
Here is a link that might be useful:
pyropunk
15 years agoYowser, are you still allowed to smoke in the office? Over here all places of work are mandated by law to be smoke free zones.
eric30
Original Author15 years agoActually, smoking wasn't allowed in the office but this guy did anyway. He was a big wig and nobody could stop him, I thought it was funny. I used to go visit him and chew tobacco. I don't work there anymore cause of the economy; the place is almost closed.
Anyway, to keep the post worm related. Here is what I did with the 1/2 VC and 1/2 peat mix. I set up a germination station. There are 3 varieties of heirloom tomato and 3 varieties of peppers here waiting to sprout.
Here is a link that might be useful:
eric30
Original Author15 years agoHey pyro,
The growing station is doing great. I have 72 tomato and pepper plants under light right now. They are 4" to 6" tall and healthy. No need to fertilize either. This photo is older from a week ago.Here is a link that might be useful:

pyropunk
15 years agoeric,
Your seedlings are looking good. I learnt some new things today. How to propagate from seeds, layering, stem cuttings, root cuttings and root division. With some practical, hands on stuff as well. All using VC. And we got to take our propagated plants home.
What tomato variety are you growing? And peppers? I would love to try this with some chillies ;)
eric30
Original Author15 years agoI started with a mixture of VC and peat, things I already have; even though every article and discussion I could find tells you to go to the store and by a bunch of stuff to get started.
The peppers you see are california wonder. Also someplace in there are a few jalapeno and cayenne. The tomatoes are brandywine, big rainbow, and black krim that I saved seed from last season. There is also 4th of July, and a heirloom mixture that I bought in Burpee seed packs.
fzilz
15 years agoWhen you save your tomato seeds, do you just dry the pulp from the tomato, or how do you do this. I have generally purchased started plants (along with volunteer cherry tomatoes), but last year - finally I had some really nice (for me) heirloom production and wanted to retain the seeds - ended up eating the last tomatoes before I got the great idea of saving the seeds of the plants that worked so well for me :-( So if I have some luck this year, I would like to save the seeds of the tomatoes we like and that do well for us. PS (in previous years, I had beautiful plants (green huge jungle of tomatoe plants) but they did not start producing tomatoes till Sept.
eric30
Original Author15 years agofzilz,
For tomato you have to ferment the gel off of the seeds. Here is an article.Here is a link that might be useful: Saving Tomato Seed
eric30
Original Author14 years agoWell its official; I just accepted a job offer and I'm moving from Wisconsin to an hour SE of Pittsburgh. Lucky for me the barrel only weighs about 100# right now. i hope they don't mind riding in the back of a U-haul for 14 hours.
folly_grows
14 years agoEric, the image of your flow-thru barrel happily bouncing along in the back of a U-haul makes me smile. :-)
cathd66
14 years agoHi Eric,
I was just wondering- did you ever figure out what population your bin was supporting? Or do you have a rough idea of how much waste per week you're putting in- either in volume or thickness of layer.
I'm trying to design a really easy starter system for complete newbies- so I'm gathering any figures/ experience I can.eric30
Original Author14 years agoCath,
I really couldn't tell you for sure. My best guess would be about 8 pounds of worms. I haven't measured anything that I put in. I'm certain that I could be feeding more but I haven't paid much attention due to the new job (starting Monday) and the big move. I'll be living in a hotel for the month of May and will be coming back in June to complete the move so they will be unattended for a month besides my fiance who won't go near them. I plan on wetting down and adding a slow release feeding for when I am gone. I found some old potatoes and a head of cabbage in the cellar the other day, perfect! I won't cut them up, just plunk them in there and cover with bedding. I'm planning on the worms feeding off of it as it slowly decays.shadyapex
14 years agoMy Experience for what its worth:
Last fall I read this thread and started my own flow through bins based on eric30's design. After a few months I tried to harvest some castings but it wasn't finished and there were still a lot of worms in the bottom of the can. Last spring the whole affair got rather too wet (I think I didn't use enough bedding) and the unfinished casting started dribbling out the bottom a bit so I decided that I'd gotten the whole moisture balance off kilter and decided to abandon the flow through idea. I let it sit for a couple of months without even looking at it until today when I took a look and discovered that the bin has settled and in the top is almost finished castings and still a fair lot of worms. In the bottom (which had collapsed down past the grate) was stuff the consistency and smell of mud flats at low tide, primordial ooze, and still much wetter than finished castings. I shoveled this out and dumped it into the compost bin. I think that by letting the bin sit for a bit without adding anything new the moisture level found its own ideal. I'm going to add some more bedding and kitchen scraps and I think the population will rebound. Hopefully I can eventually get finished castings out the bottom.fosteem1
14 years agoWhen the bottom filled up the bin became in essence a non-flow through. Like a Rubbermaid, so you got all the hassles associated with that type system.
I myself have had a couple occasions when there was a huge thunderstorm that soaked the bin. I did git a large amount of worm filled compost fall through to the bottom. I keep a lid on the bin to help prevent this but during large storms the lid overflows. The bin always dries out again in a couple weeks.
What i observed when i started my Flow Through.
When I fed the FT it formed a layer that is almost pure castings just under where the food was placed. The castings are more paper than black compost and is a little stiff and hard for the worms to get through. There were worms stuck below this layer in the original bedding.
I filled mine full of nearly finished compost from my bins. And discovered that the compost wasn't as done as i thought it was. I have used compost as broken down as it was and hadn't given it a thought.
But I found a FT does a far better job at breaking down everything in the bin. The compost settled down to about a third the original volume after a couple months. That was with huge feedings and a lot of paper additions too. It was a big surprise.
The layer of finished compost at the top got thicker and eventually reached the bars. It comes out looking and feeling more like composted leaf litter on a forest floor, fluffy too.
The first compost I harvested for a while was from the original worm filled compost transferred from my old bins. It did keep improving the longer it stayed in the FT. But it just didn't get as good as the compost formed in the FT to start with.
The original bin compost was also lumpier and looser than the layer formed in the FT. As the worms wiggled about in the layer of loose compost it fell into the bottom collection area. I eventually harvested out most of the fallen compost and separated out the worms. Adding the worms back into the top of the bin.
When the FT layer reached the bars on the bottom I needed to scrape the compost out. There still are a few worms and a little compost falling but not nearly as much. I just leave the compost in the collection area. For stray worms to live in until there is enough to bother removing it. I then separate out the worms and store the finished vermicompost in a old Rubbermaid bin until i need it.
I should add that the compost that comes out the bottom is damp enough for the worms but dry enough to send through my homemade 1/4 inch strainer without waiting for it to dry out more.
And i never found worm cocoons in the finished compost after the original compost worked its way through the FT.
And this one i find a bit curious. Almost all the worms that fall into the collection area are NOT adults. I wondered about this one a lot but decided that they are the babies hatched out from the cocoons laid at the top of the bin.
mndtrp
14 years agoOne thing I like about the flow through system is the rather large margin for error. Smaller, rubbermade type bins can go haywire overnight, and can take a bit of work to turn around. The flow through bins take more work to screw up, and generally leaving them alone for a month will get everything back in shape. I've done things to my flow through that I would never do to the rubbermade bin I used for a short time.
silverminer
13 years agoHi everybody, would like to know if a 30 gallon blue water
barrel would be ok to use, or just too small maybe. It is
just me so not too much table scraps around. Lots of water melon rind, coffee filters, cucumber skins, old lettuce, egg shells.
Would have to cut off the top as 30 gallon barrels come
with sealed tops it seams like. And what size of tubing
down below if advisable. Thanksrookie09
13 years agoI use a small kitchen trash can ($5-$15 depending on size and lidded or not) and vinyl covered garden stakes. quick, easy and cheap. Mine weighs about 40 lbs after a year and probably has 3 or 4 lbs of worms. It is self harvesting about 2 large handfuls of compost a week but I am not feeding them a lot right now.
If you want to cut your barrel then yes it will be big enough. Use your choice of 1/2" conduit or PVC or 1/4" all-thread or larger for the grate.


eric30Original Author